

About Beth
Beth created one of the first gluten-free companies in the US, wrote books, and now shares 40 years of living well without gluten in her latest book, The Complete Guide to Living Well Gluten Free. She believes no one should go without because of gluten. Through her cookbooks, lifestyle book and essays, she shows us how. Travel, restaurant dining, parties, dating, raising kids – she’s been there and takes celiac disease and the gluten free diet along for the ride. Join her as she answers all your baking and lifestyle questions.Makes Two 12-inch Pizzas 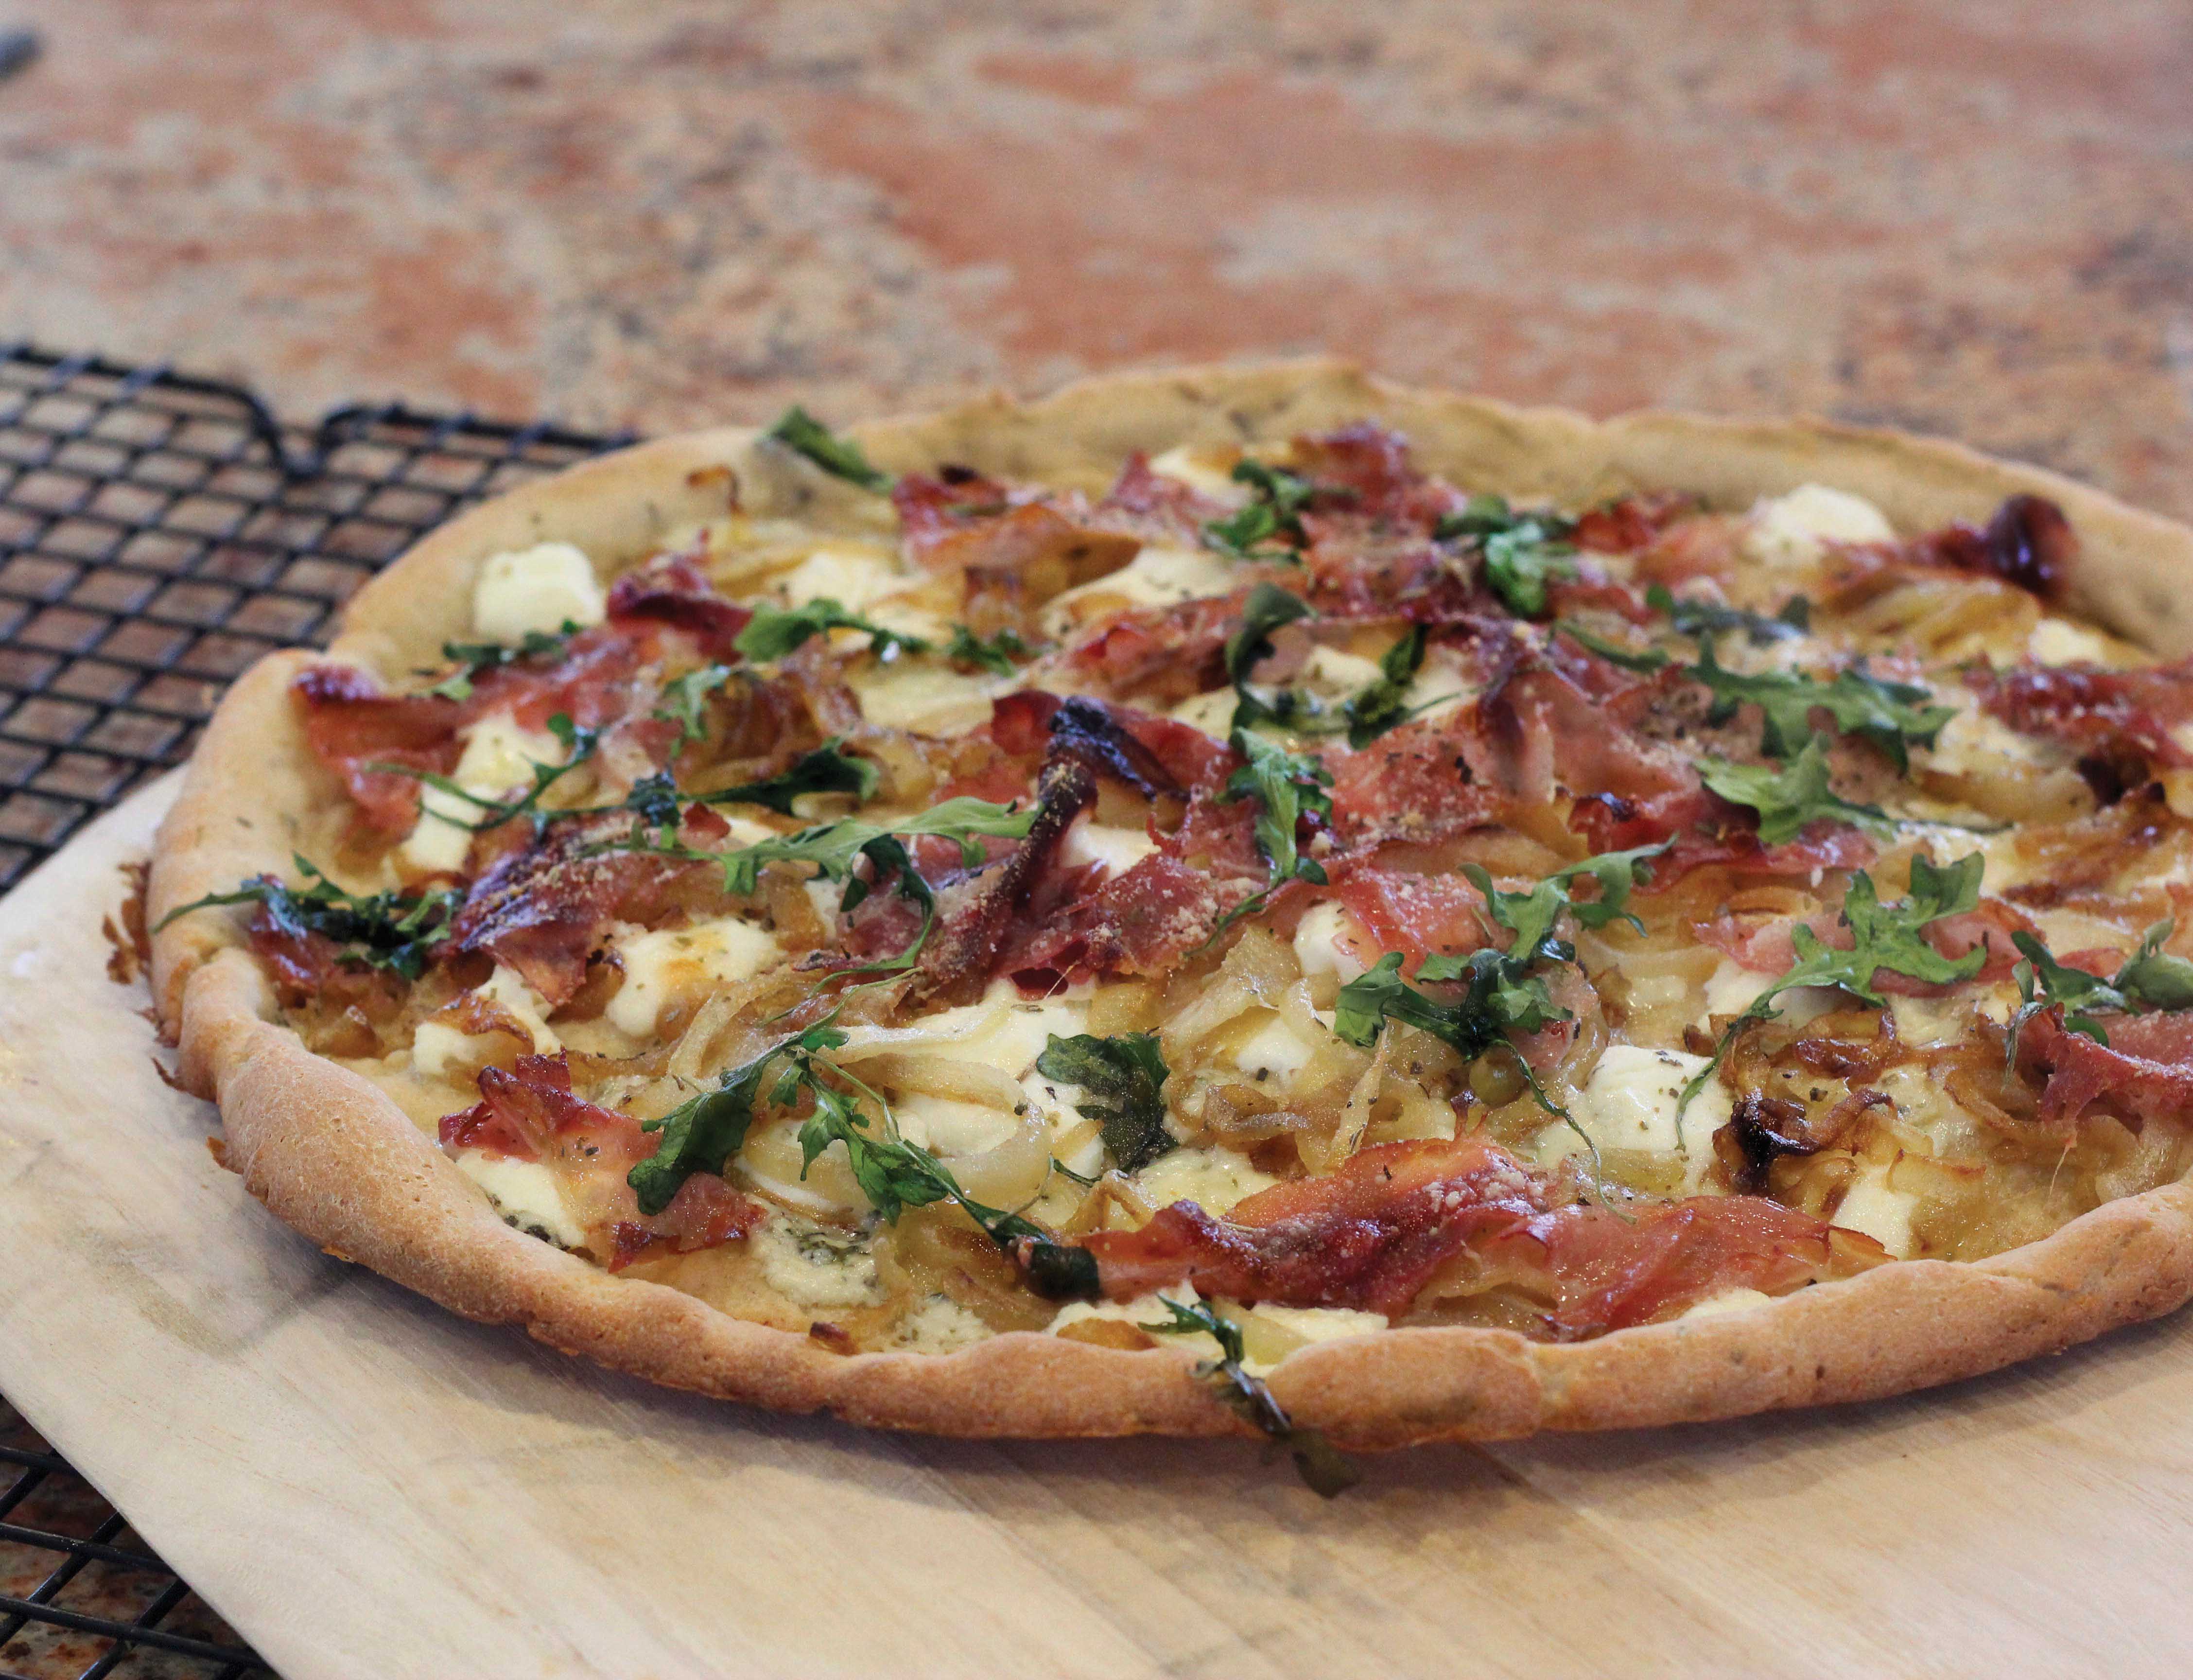
This is National Pizza Week. But, seriously, isn’t homemade pizza worth celebrating any time of the year? This pizza has endless possibilities. It’s called white because there are no tomatoes or sauce on this pie. However, add some tomatoes or pizza sauce, if you prefer a more traditional pizza. Experiment with your favorite cheeses and herbs, too. And leave the cheese off or use dairy free cheese, if milk is not on your list. If you have a pizza stone and a peel (wooden paddle) use those as the crust will be chewier. Otherwise, use a heavy baking sheet or a round pizza pan and set it on the lowest rack in the oven so it browns nicely. Cut all ingredients in half if you wish to make one pizza. This freezes nicely (especially without pizza sauce) so you might want to make both and save one for another day.
The Toppings
4 tablespoons extra virgin olive oil, divided
1 large onion, thinly sliced
Pinch of sugar
½ teaspoon salt
6 ounces fresh ricotta cheese (part skim milk cheese is fine)
2 ounces Gorgonzola cheese, crumbled, optional
4 ounces thinly sliced prosciutto or other Italian meat
½-1 cup baby arugula
Italian seasoning, to taste
Pecorino Romano cheese, to taste
The Dough
Makes 2, 12-inch pizzas
2 ½ cups high protein blend, below
½ cup millet flour
1 tablespoon xanthan gum
1 teaspoon salt
5 teaspoons instant active dry yeast
1 1/3 cups warm water
2 tablespoons olive oil
1 tablespoon honey
1 teaspoon cider vinegar
Preheat oven to 425°F. If using a pizza stone, place it on the lowest rack and preheat the oven. Do this 30 to 60 minutes ahead so the stone is very hot. If you’re not using a stone, it’s not necessary to preheat the oven for an extended amount of time.
Make the toppings. In a medium skillet, heat 2 tablespoons olive oil over medium heat. Add onion and sauté to soften, about 2 minutes. Add sugar and salt and reduce heat to lowest setting. Cook onions until they turn a rich golden brown, about 10 minutes. Remove from heat and set aside. Lay out all the other toppings you will be using.
Make the dough. In the bowl of a heavy duty mixer fitted with the paddle attachment, combine the high protein blend, millet flour, xanthan gum, and salt. Blend well. Add the yeast and blend. Combine water, oil, honey, and vinegar. Beat at medium high speed for 3 to 5 minutes or until the dough thickens.
Scoop half the dough onto a lightly oiled sheet of parchment paper. Cover with a sheet of lightly oiled plastic wrap. Use finger tips and palm to lightly press the dough into a 12-inch circle. Use finger tips to create a rim of dough around the edge that will become a pretty crust. Drizzle olive oil of the surface and top with a light coating of pizza sauce.
Scoop half the dough onto a lightly oiled sheet of parchment paper. Cover with a sheet of lightly oiled plastic wrap. Using fingertips, lightly press the dough into a 12-inch circle, creating a rim of dough around the edge to form a crust.
Drizzle 1 tablespoon of remaining olive oil over the surface of 1 crust. Place small dollops of half the ricotta evenly over the olive oil, followed by half the Gorgonzola cheese. Top with half the cooked onions and slices of prosciutto. Scatter half the arugula over the top. Sprinkle with Italian seasoning and Pecorino Romano cheese.
Slide pizza (with parchment paper) onto a pizza paddle and then onto the stone, pizza pan, or baking sheet set on the lowest rack of preheated oven. Bake 16 to 20 minutes. When done, the bottom of the pizza will be lightly browned. (While first pizza is baking, repeat with remaining dough and ingredients.)
Remove pizza from oven and let cool briefly. Slice and serve warm.
High Protein Blend (from Gluten-Free Makeovers)
Blend well and scoop out 2 ½ cups for the pizza recipe above. Reserve the rest for later use.
1¼ cups white or brown rice flour
1¼ cups sweet white sorghum flour
½ cup amaranth flour
¾ cup cornstarch or tapioca starch
Shortcut: Use a commercial pizza crust mix and follow my instructions for preparing it. I’ve had good luck with pizza mix from Glutino Gluten Free Pantry, King Arthur brand, and Bob’s Red Mill mix.

Categories: Recipes | | No Comments »
A Quick Recipe from Beth
Merri-Mint Chocolate Brownie Trifle
Serves 6 to 8
People think I am an amazing chef when I serve them gluten free brownies, mind you, straight from the freezer. When I am in a rush, brownies are my go-to dessert. Top them with designer ice cream or a layer of chocolate ganache and the crowd goes wild. But this recipe takes brownies to a whole new level, a simple (but decadent) dessert that I pull out of my bag of gluten-free tricks when company is coming and I’m pressed for time like during the holidays.
Assemble this in one big glass bowl for a buffet or individual glass goblets for a sit down meal. Either way, this luscious chocolaty mint dessert will make you giggle when you bite into the rich chewy brownies layered with peppermint-laced whipped cream, crushed candy canes, and shaved chocolate. Could anything be better? This time, I used Glutino Gooey Chocolate Merry Mint Brownie Mix . They already come with a hint of peppermint and a topping of white chocolate fudge. But you could add peppermint extract to any brownie mix and top with white chocolate chips. If you are making this for an adult-only gathering, use Crème de Menthe liqueur in place of peppermint extract. Add nuts, mini marshmallows or hot fudge if you wish. There are no rules, just the promise of lots of holiday merri-mint.
1 package of gluten free brownie mix 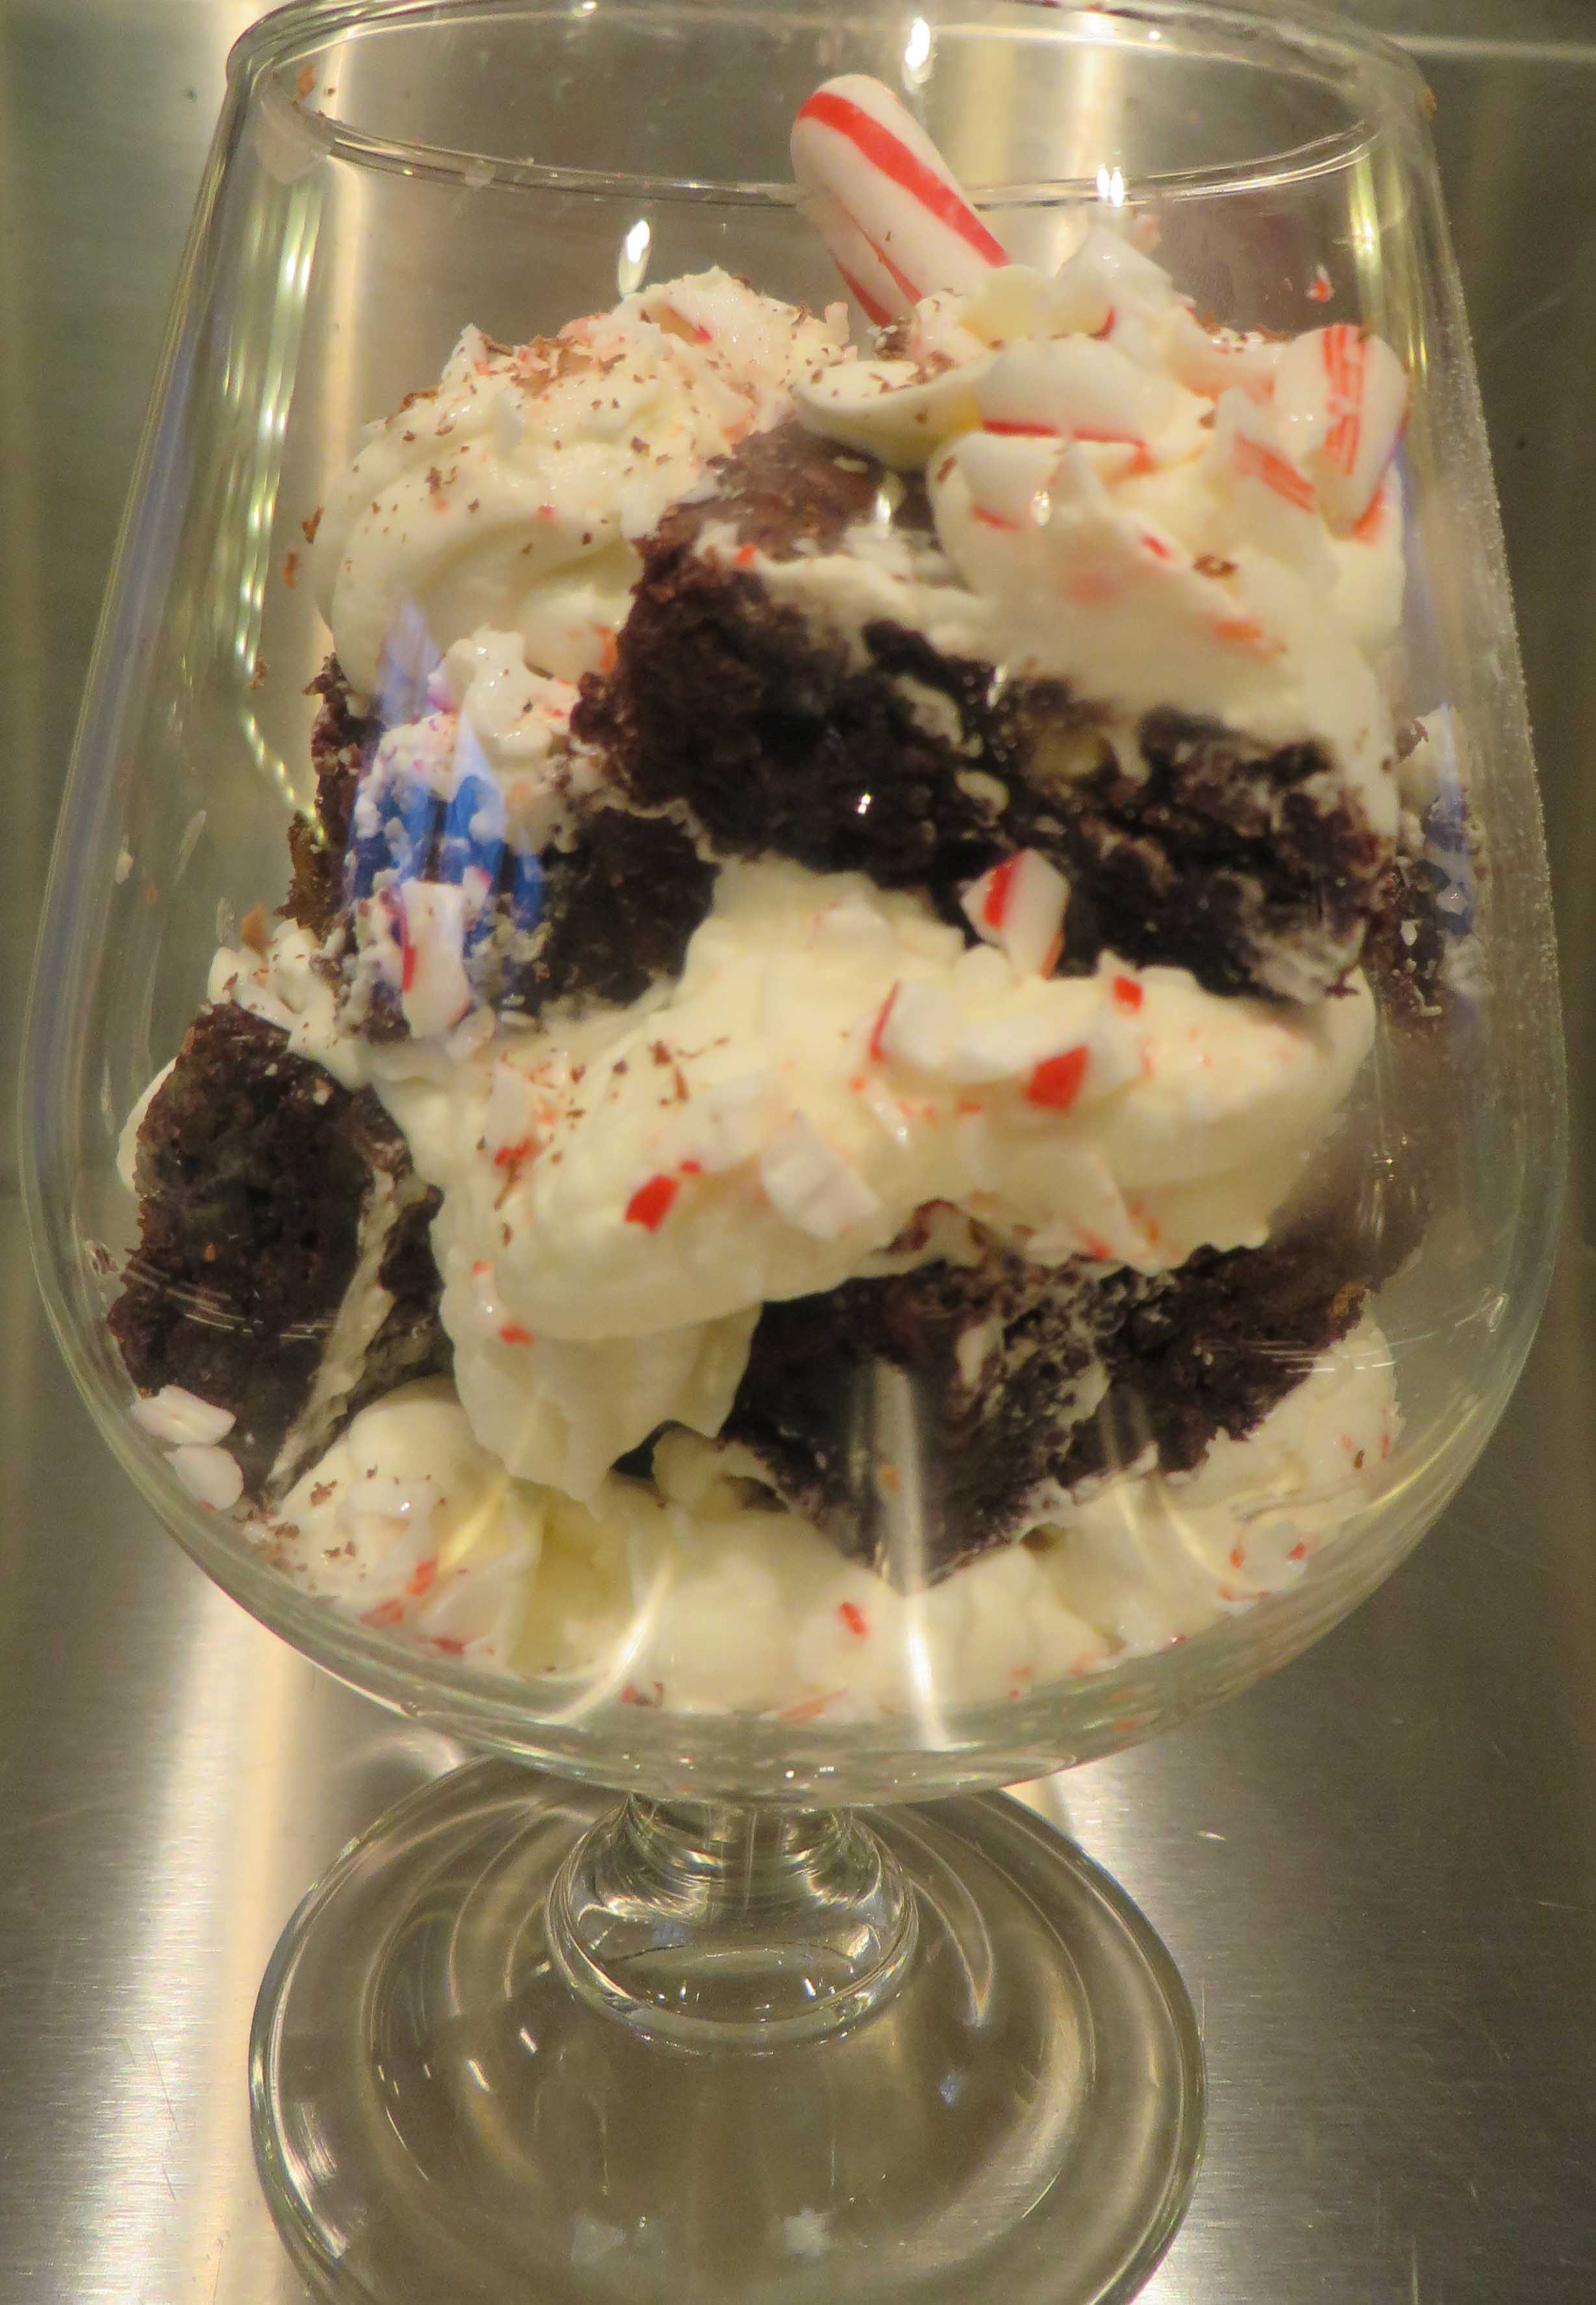
¼ teaspoon peppermint extract*
1/3 cup white chocolate chips*
*omit if using Glutino Merry Mint Brownies
Whipped Cream
¾ cup (12 ounces) whipping cream, very cold
¼ cup confectioners’ sugar
½ teaspoon vanilla extract
¼ teaspoon peppermint extract or 1 tablespoon Crème de Menthe liqueur
1/3 cup crushed candy canes, leave extras whole for decoration
Shaved Semisweet or Bittersweet chocolate for garnish
Prepare the brownie mix according to the directions on the package. Bake in a foil lined 7×11 inch pan. I like to under bake these by about 2 minutes so they are very chewy. Remove and cool completely.
Beat the cream in a chilled bowl until half whipped. Add sugar and extracts and beat until cream forms stiff peaks. Refrigerate.
Remove the brownie from the pan using the foil edges and set on a cutting board. Cut the brownie into ¾ inch squares, trimming the edges if desired. In individual glass dishes (like large brandy snifters) or one large glass bowl, layer brownie squares alternating with dollops of whipped cream and crushed candy canes. Top with more dollops of whipped cream and crushed candy canes and finish with shaved chocolate. Chill for 2 hours or overnight. Garnish with whole candy canes.
Categories: Recipes | Tags: easy gluten free recipes, gluten free baking, gluten free brownies | No Comments »
A Recipe From Beth
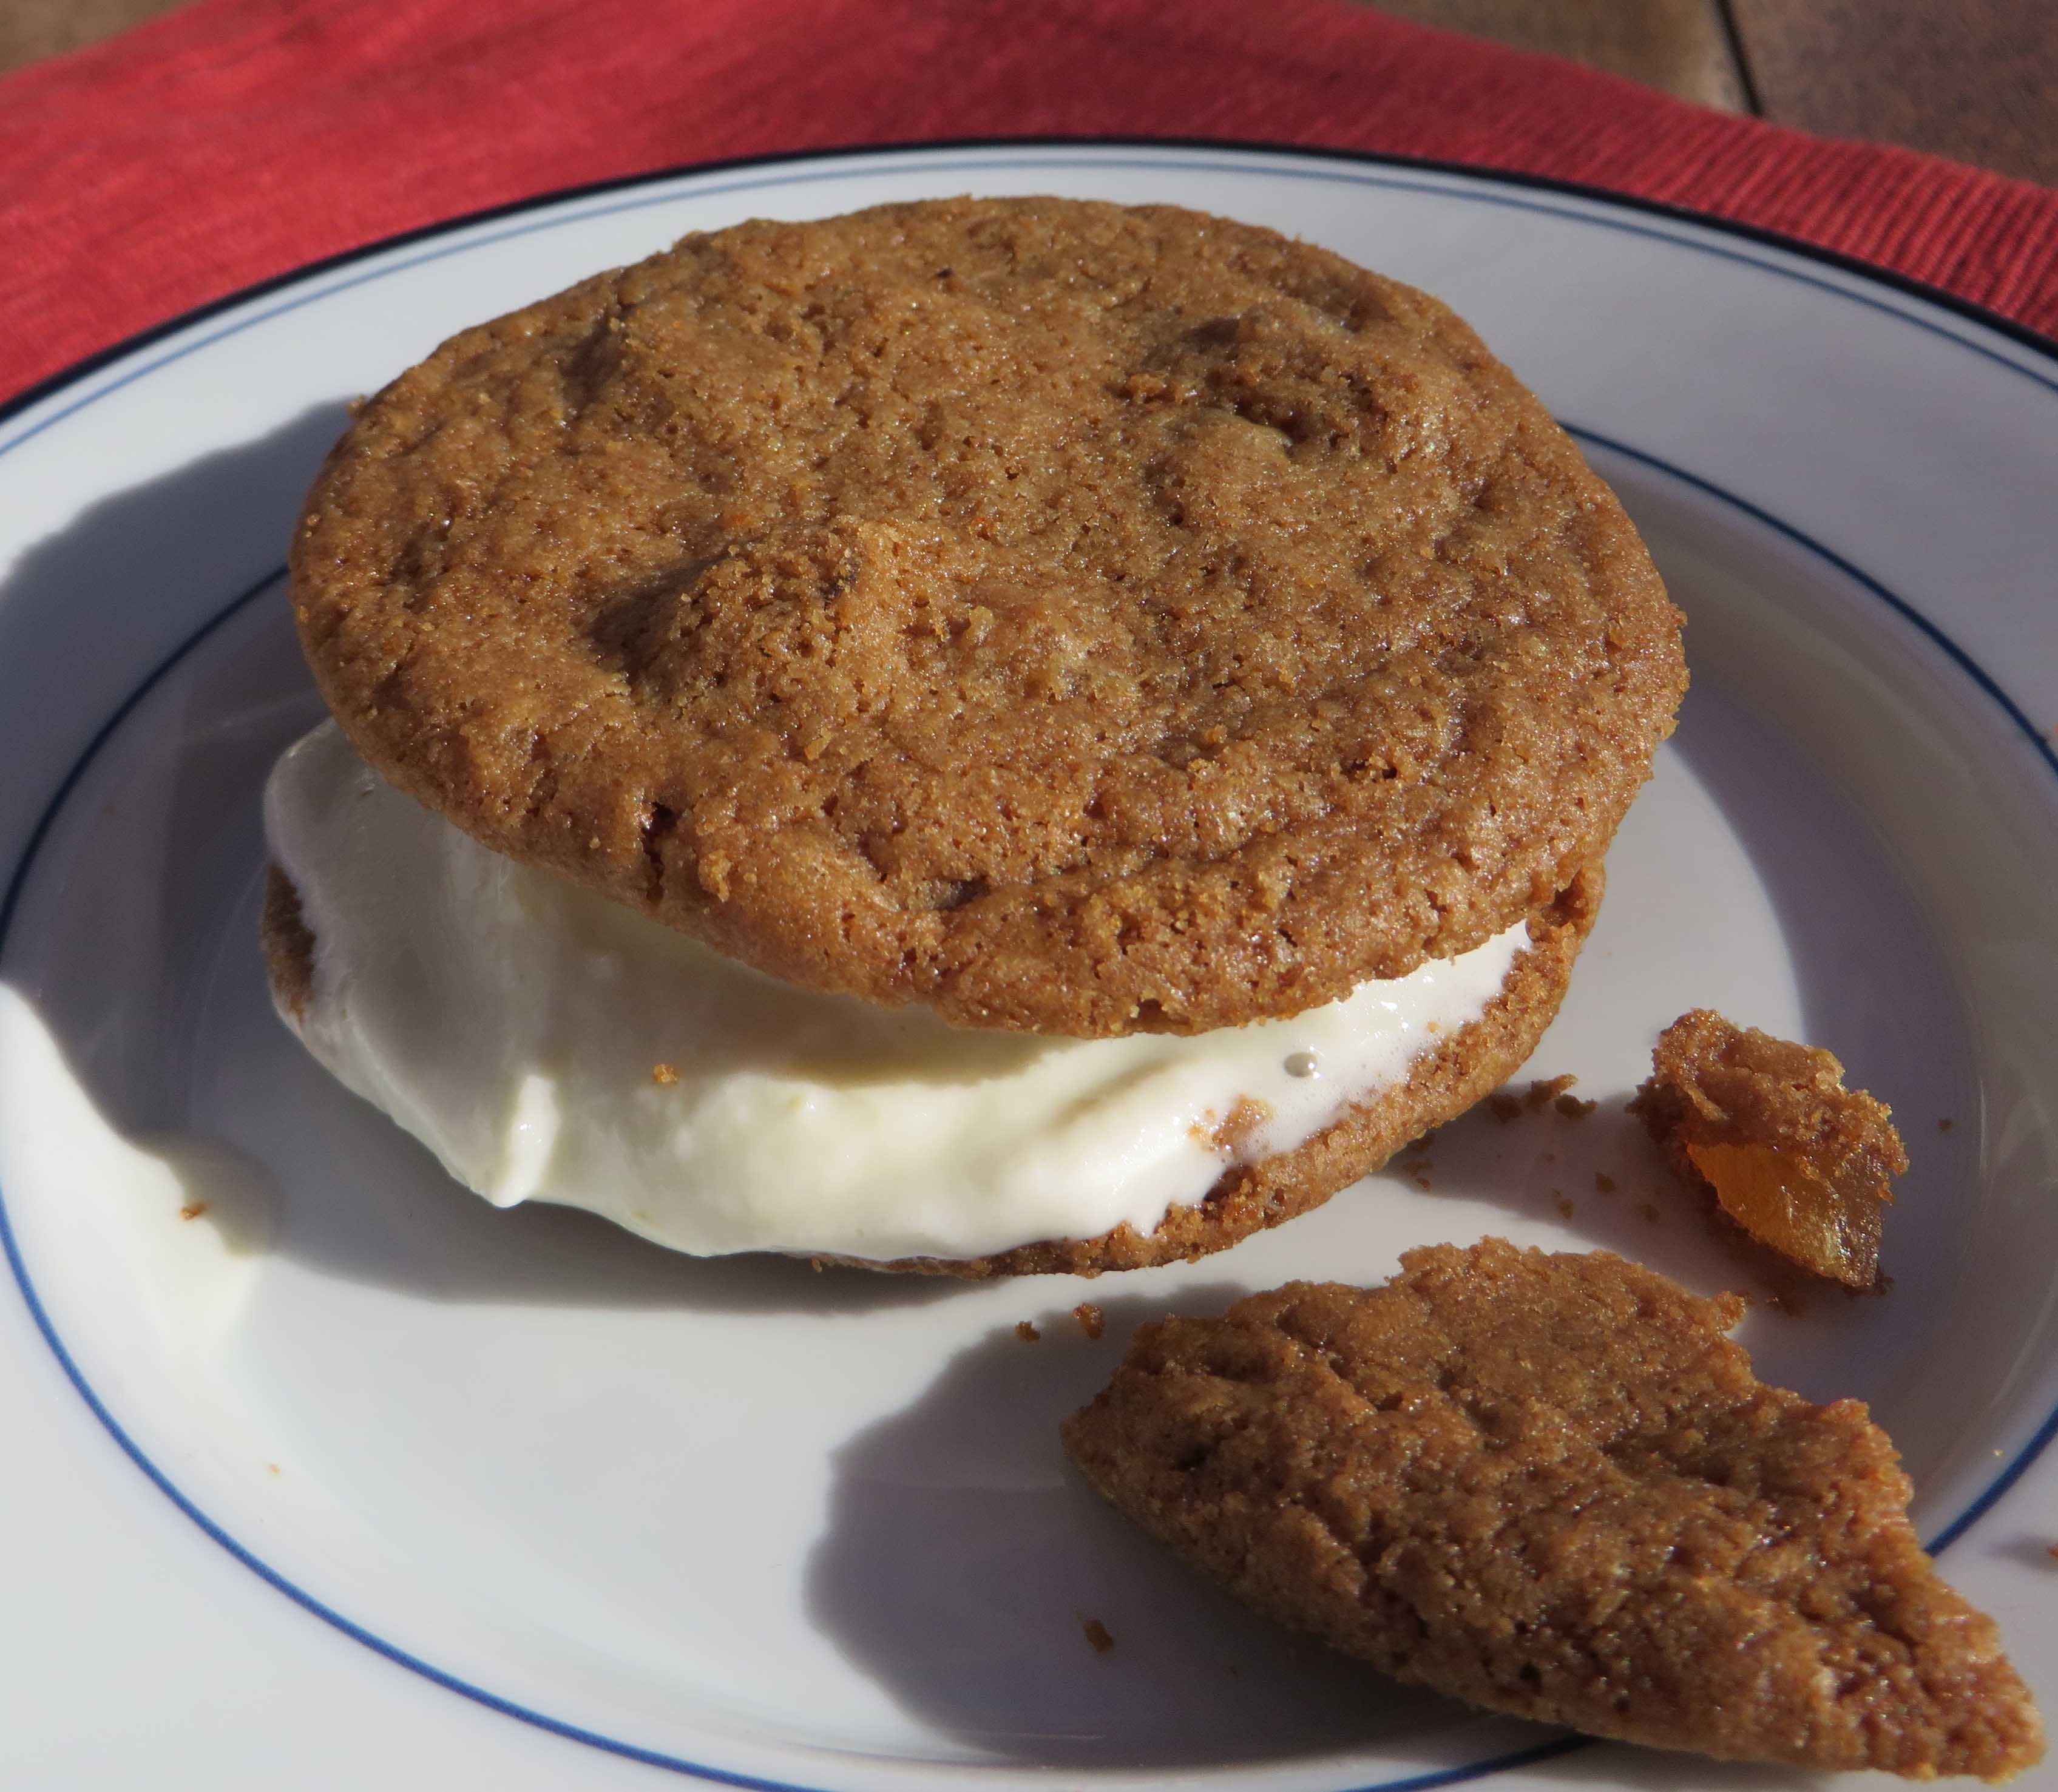
Tate’s Bake Shop GF Ginger Cookie Ice Cream Sandwiches
One Serving
I’m okay taking shortcuts when the results are delicious and impressive. And during the holiday season, I’m all about doing things the easy way. This fun dessert is exactly that — bursting with flavor and embarrassingly simple. I start with two top notch ingredients — yummy tasting Ginger Cookies from Tate’s Bake Shop and exquisitely rich ginger ice cream from Bart’s Homemade Ice Cream. My guests assemble their own ice cream sandwiches. I sit back and collect the ooh’s and ah’s.
First, let me tell you a little bit about the amazingly talented baker behind these cookies. If you visit Southampton, NY with its charming beach community and New York chicness, you’ll come upon a little bake shop called Tate’s. It’s legendary around the Hamptons. Creator, Kathleen King, has been baking here forever. Long before she decided to turn her amazing cookies into gluten free gems, I was making over recipes from her first cookbook so I could enjoy the gluten free versions.
Now Tate’s Bake Shop makes a gluten free line of cookies (in a dedicated facility) that will knock your socks off. I was beyond excited to receive a gift basket of their goodies. The butter, the crunch. Wow. My friend, Gail, had just served Tate’s Ginger Cookie Ice Cream Sandwiches with ginger ice cream at a dinner party. The cookies are peppered with bites of crystallized ginger. I was over the moon. I had to recreate that “recipe” for you here.
2 Tate’s Ginger Zinger Cookies
1 scoop (about ¼ cup) Bart’s Homemade Ginger Ice Cream (it says GF on the label) or another good quality ginger ice cream
Warm Hot Fudge Sauce, if desired
Soften the ice cream a bit then spread it over the flat side of one cookie. Top with the second cookie (flat side pressed onto the ice cream. Dip in warm hot fudge sauce if you wish. Eat every morsel! Ask for more!
A Giveaway 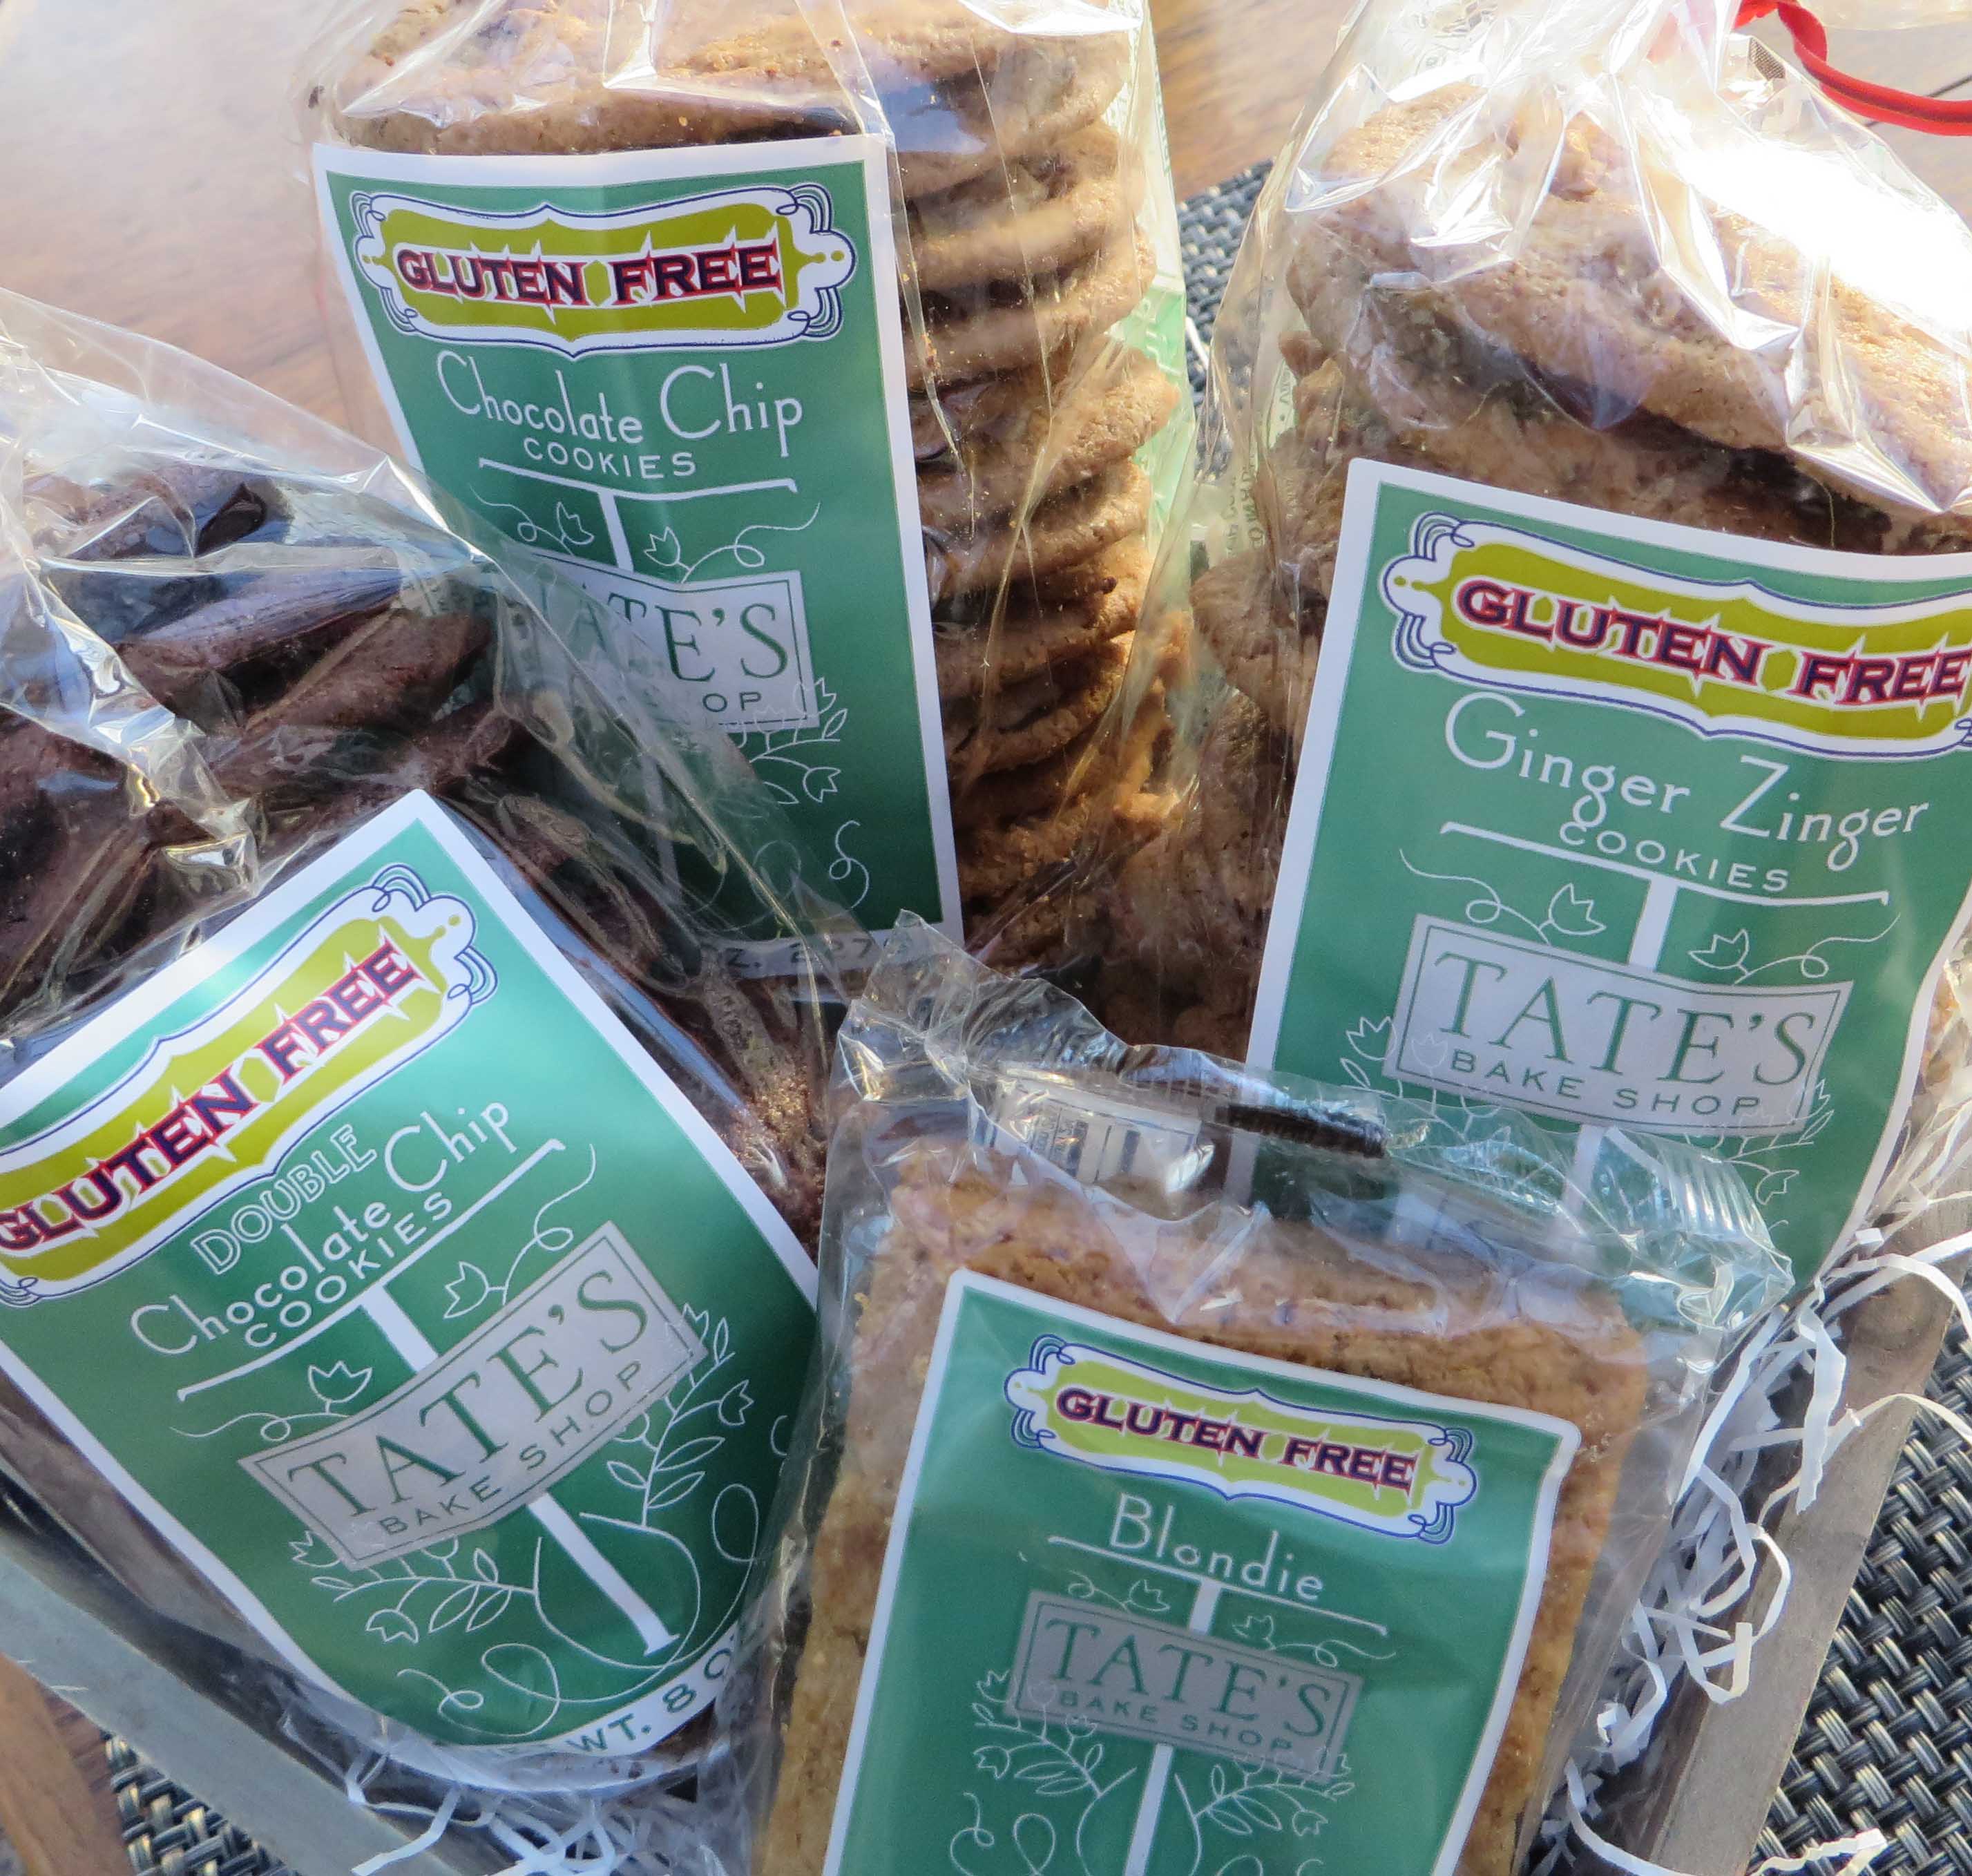
Tate’s has offered to send a gift basket of gluten free goodies to one lucky person reading my blog. Just send me an email at beth@glutenfreemakeovers.com to be entered in this giveaway. Hurry. You’ll have to reply by December 31, 2014.
Categories: Recipes | Tags: easy gluten free recipes, gluten free cookies, Gluten-Free. Desserts | No Comments »
A Recipe from Beth
Here’s a chance to play with your food and take some of the stress out of the hectic Thanksgiving holiday, too. Even young children can make these treats. Use them as favors and set one by each plate or fill a tray with these little birds and pass them out at dessert. Either way, these turkey favors are sure to become part of your Thanksgiving tradition from now on. 
I used Glutino Original Crackers to make these and the recipe first appeared on Glutino’s blog. They are so darn cute, I had to share them with you.
You’ll Need:
1 box Glutino Original Flavor Crackers
1 bag Miniature Reese’s Peanut Butter Cups, 1 per turkey
1 bag Hershey’s Milk Chocolate Kisses, 1 per turkey
1 bag Indian Candy Corn, You’ll need 5 for tail feathers per turkey plus 1 for each beak and feet*
Frosting:
6 tablespoons softened unsalted butter
2 cups confectioners’ sugar
2 ½ tablespoons milk
To Make the Frosting: Beat the butter until fluffy. Add the sugar and beat until crumbly. Add the milk and beat until smooth. Add a little more milk, if necessary, to create a smooth frosting. However, remember, this is the spackle that holds everything together. It needs to be thick.
To Assemble:
Follow these steps to make assembly easier and prevent crackers from breaking.
Lay out the crackers on wax paper-lined cookie sheets.
Spread some frosting over the bottom of Reese’s Peanut Butter Cups. Set them slightly back from the center of a cracker and away from you. Put a small blob of frosting on the front of the peanut butter cup (facing you).
Spread a thick layer of frosting over the front of a second cracker and on the bottom edge of the cracker. This should be a fairly thick layer so the candy corn and kiss can adhere.
Press the frosted cracker against the blob of frosting on the peanut butter cup at a slight angle and press the bottom edge of frosting onto the first cracker. Hold it there for a minute to steady the cracker.
Now comes the fun part. Put a generous dollop of frosting on the bottom of a Hershey’s Kiss and set it in the center of the frosted cracker. This will be the beak. Press five candy corn in an arc around the cracker with the points toward the kiss. Start by placing one at the top of the cracker and two on each side so your turkey’s feathers will be even.
Note: It’s important to plant the kiss on the cracker first to stabilize it.
For the beak, cut the white and a little of the orange from a candy corn, smear a little frosting on the back, and smoosh it down above the pointy part of the kiss.
Cut two slices from the remaining orange part of this candy corn. Smear a little frosting on the narrow side of each and set them at the base of the cracker for feet. Voila. Your turkey favors are ready.
Put these in the fridge to harden or just leave them at room temperature, especially if your kitchen is cool. Don’t wrap them right away or the feathers may come loose.
Make these ahead if you are planning to use them for favors or set out all the ingredients and let the kids create decorations for the table on Thanksgiving Day.
* Indian Candy Corn is best because it is brown, orange and white (like turkey feathers). However, you can also use Candy Corn if you have it leftover from Halloween (It’s brighter orange, yellow, and white.) Brach’s, CVS and others state that their candy corn is free of gluten and the 8 top allergens. Brach’s does have a disclaimer that their products are made in a facility that also processes wheat. But CVS seems to go the extra mile to say their candy corn is gluten free. If you can’t find gluten free candy corn, you can use g-f pretzel sticks instead. Still cute and very safe
Categories: Recipes | Tags: easy gluten free recipes, gluten free Thanksgiving | 5 Comments »
From Beth Hillson
Makes 24 balls
Preparation time: 10 minutes
Here’s the ultimate quick, delicious dessert from Carol Fenster’s new cookbook, 100 BEST QUICK GLUTEN-FREE RECIPES. My friend, Carol, is a master of gluten-free cooking and baking. She has produced eleven cookbooks and each one is better than the last. But this one truly takes the proverbial gluten-free cake! Every recipe can be made in 30 minutes or less. With the holiday season around the corner, you’ll welcome these simple and yummy recipes for meals, entertaining and all your holiday treats. Here’s one of my favorites.
Serve these bite-size treats during the holidays or at dinner parties in little foil or paper candy liners. Their small size and rich, satisfying flavor makes them ideal for when you want just a little something sweet, not an entire dessert. A food processor makes the prep super-fast. You can replace the white chocolate with dark chocolate, if you wish.
1 cup whole almonds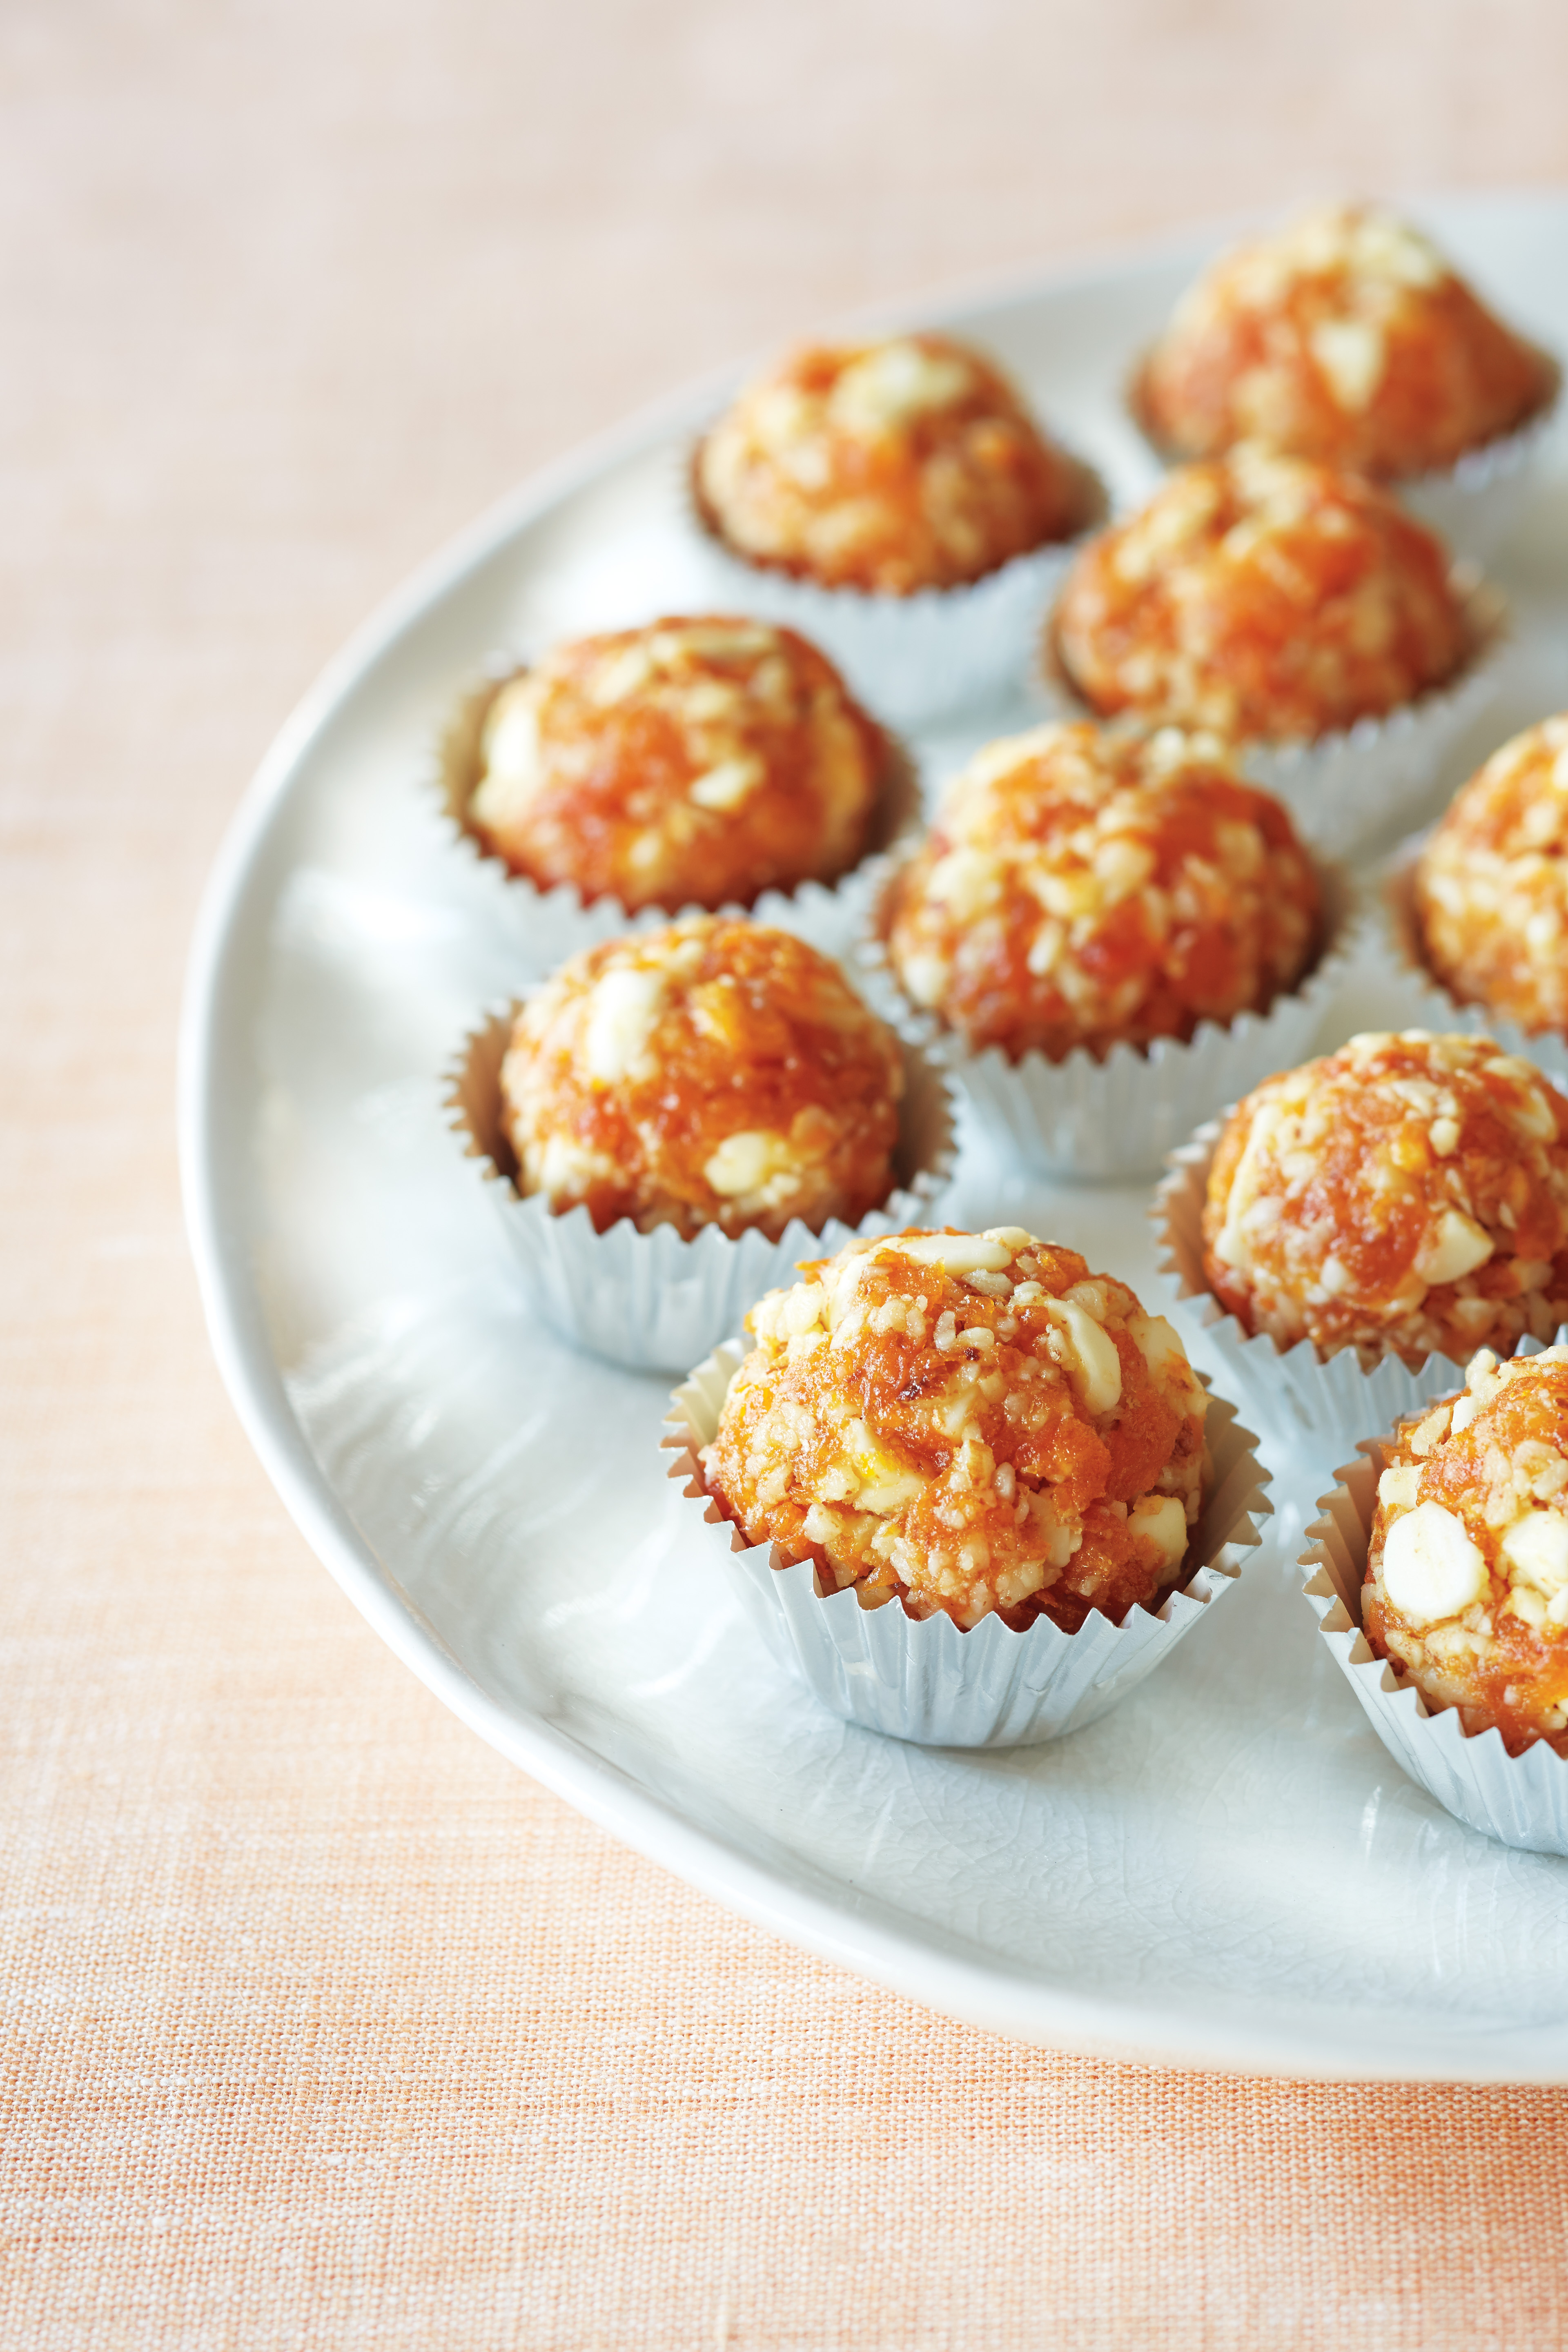
2/3 cup powdered sugar
2 cups dried apricots (about 12 ounces)
2 tablespoons light or dark rum or orange juice
2 teaspoons grated orange zest
1 teaspoon pure vanilla extract
3 ½ ounces white chocolate chips (or a 3.5- ounce bar of white chocolate, chopped or broken into ¼ -inch chunks)
In a food processor, process the almonds and powdered sugar until the almonds are very finely ground. Add the apricots and pulse until the apricots are very finely chopped.
Add the rum, orange zest, vanilla, and white chocolate chips and pulse until the mixture is just blended. With lightly oiled hands, roll and compress the dough into 24 balls, each 1 -inch in diameter. Refrigerate for at least 1 hour to firm up. Serve in foil or paper candy liners.
STORAGE: Store leftovers, tightly covered, for up to 2 days in the refrigerator or for up to 1 month in the freezer for up to 1 month.
Per ball: 130 calories; 3g protein; 6g total fat; 2g fiber; 17g carbohydrates; 0mg cholesterol; 8mg sodium
Excerpted from 100 BEST QUICK GLUTEN-FREE RECIPES © 2014 by Carol Fenster. Reproduced by permission of Houghton Mifflin Harcourt. All rights reserved.
Categories: Recipes | Tags: gluten free cookbooks, gluten free quick desserts, gluten free quick recipes | No Comments »
By Beth Hillson
If you love salmon, you’ll want to try this easy and flavorful recipe from Silvana’s Gluten-Free and Dairy-Free Kitchen by Silvana Nardone. You might know Silvana from her blog, Silvana’s Kitchen or from her previous book, Cooking for Isaiah. Released earlier this month, Silvana’s Gluten-Free and Dairy-Free Kitchen contains125 gluten-free, dairy-free recipes for breakfast, brunch, breads, appetizers, salads, soups, homemade pasta, fake-out takeout, TV dinners, restaurant classics, dessert classics, reinvented baking mixes and reinvented dairy-free favorites.
Congratulations, Silvana! Pick up a copy of the book at Amazon.com or anywhere books are sold.
Sticky Sesame Salmon with Orange Sauce 
Serves 4
For the Sauce
1⁄4 cup ketchup
1⁄4 cup orange juice, preferably freshly squeezed
2–4 tablespoons sugar
2 tablespoons chili paste, such as sambal oelek, or to taste
1 tablespoon sesame oil
For the Fish
4 6-ounce salmon fillets, skin removed
Salt and black pepper
3 tablespoons olive oil
1∕3 cup sesame seeds
Preheat the oven to 350 ̊F.
Make the sauce: In a large bowl, stir together the ketchup, orange juice, sugar, chili paste
and sesame oil. Set aside.
Make the fish: Season the salmon generously with salt and pepper, then drizzle with 2 tablespoons of the olive oil. Place the seeds on a plate and dredge the tops of the fillets in the sesame seeds to coat.
In an ovenproof skillet, heat the remaining 1 tablespoon olive oil over medium-high heat.
Add the salmon, sesame seed side down, to the pan and sear, turning once, until golden
brown, about 3 minutes on each side.
Transfer the skillet to the oven and roast the salmon until cooked through, about 6 minutes.
Generously brush with the orange sauce and serve.
Excerpted from Silvana’s Gluten-Free and Dairy-Free Kitchen © 2014 by Silvana Nardone. Reproduced by permission of Houghton Mifflin Harcourt. All rights reserved.
Categories: Uncategorized | | No Comments »
I love to bake, but I can’t remember when I’ve had this much fun in the kitchen. And it’s all because I was on a quest to do a Twinkie makeover. I created this yummy gluten-free version so we could all celebrate the return of the crème-filled snack cakes.
But it’s a gluten-filled lifetime ago since I ate a Twinkie. So I scanned the internet for inspiration – – the size, the texture, the filling. It looked like there were two ways to go – – either a sponge cake or a cake mix. I opted for the sponge cake version, remembering that gluten-free cakes can be delicate and crumbly. I needed these babies to hold up when I injected them with a creamy frosting center.
Now I needed a clue on forming the cakes. Knowing gluten-free batter spreads unless corralled, I suspected I would need a special pan. Aha. The answer was a Cream Canoe Pan. Mine came with a cupcake injector/decorating kit.
The checklist of tools complete, I looked into the crème filling. To my surprise, the traditional one was flour based and, although I could substitute gluten-free flour, it did not sound all that appetizing. I created a yummy filling using Marshmallow Crème another icon of my childhood and, in this case, a good fit.
Finally, I turned to the ingredients. In place of regular flour, I used a gluten free All Purpose Flour Mix, in this case, the one from Gluten-Free Pantry (Glutino) and my go-to flour blend when I don’t want to start from scratch.
The sponge cakes turned out to be a brilliant choice. They were amazingly sturdy yet delicate and up to the task of holding the filling without falling apart. Voila, Winkees. As you can see, these look (and taste) like the real deal. Several gluten-eating tasters couldn’t tell they were gluten free.
While Winkees don’t have a 45-day shelf-life, the cakes keep on the counter for several days. The frosting keeps for several weeks. If you don’t have a canoe pan, you could make these as cupcakes and fill them with the fluffy filling. But, do yourself a favor and buy the pan. In fact, buy two. Winkees are addictive.
Makes 20 Snack Cakes 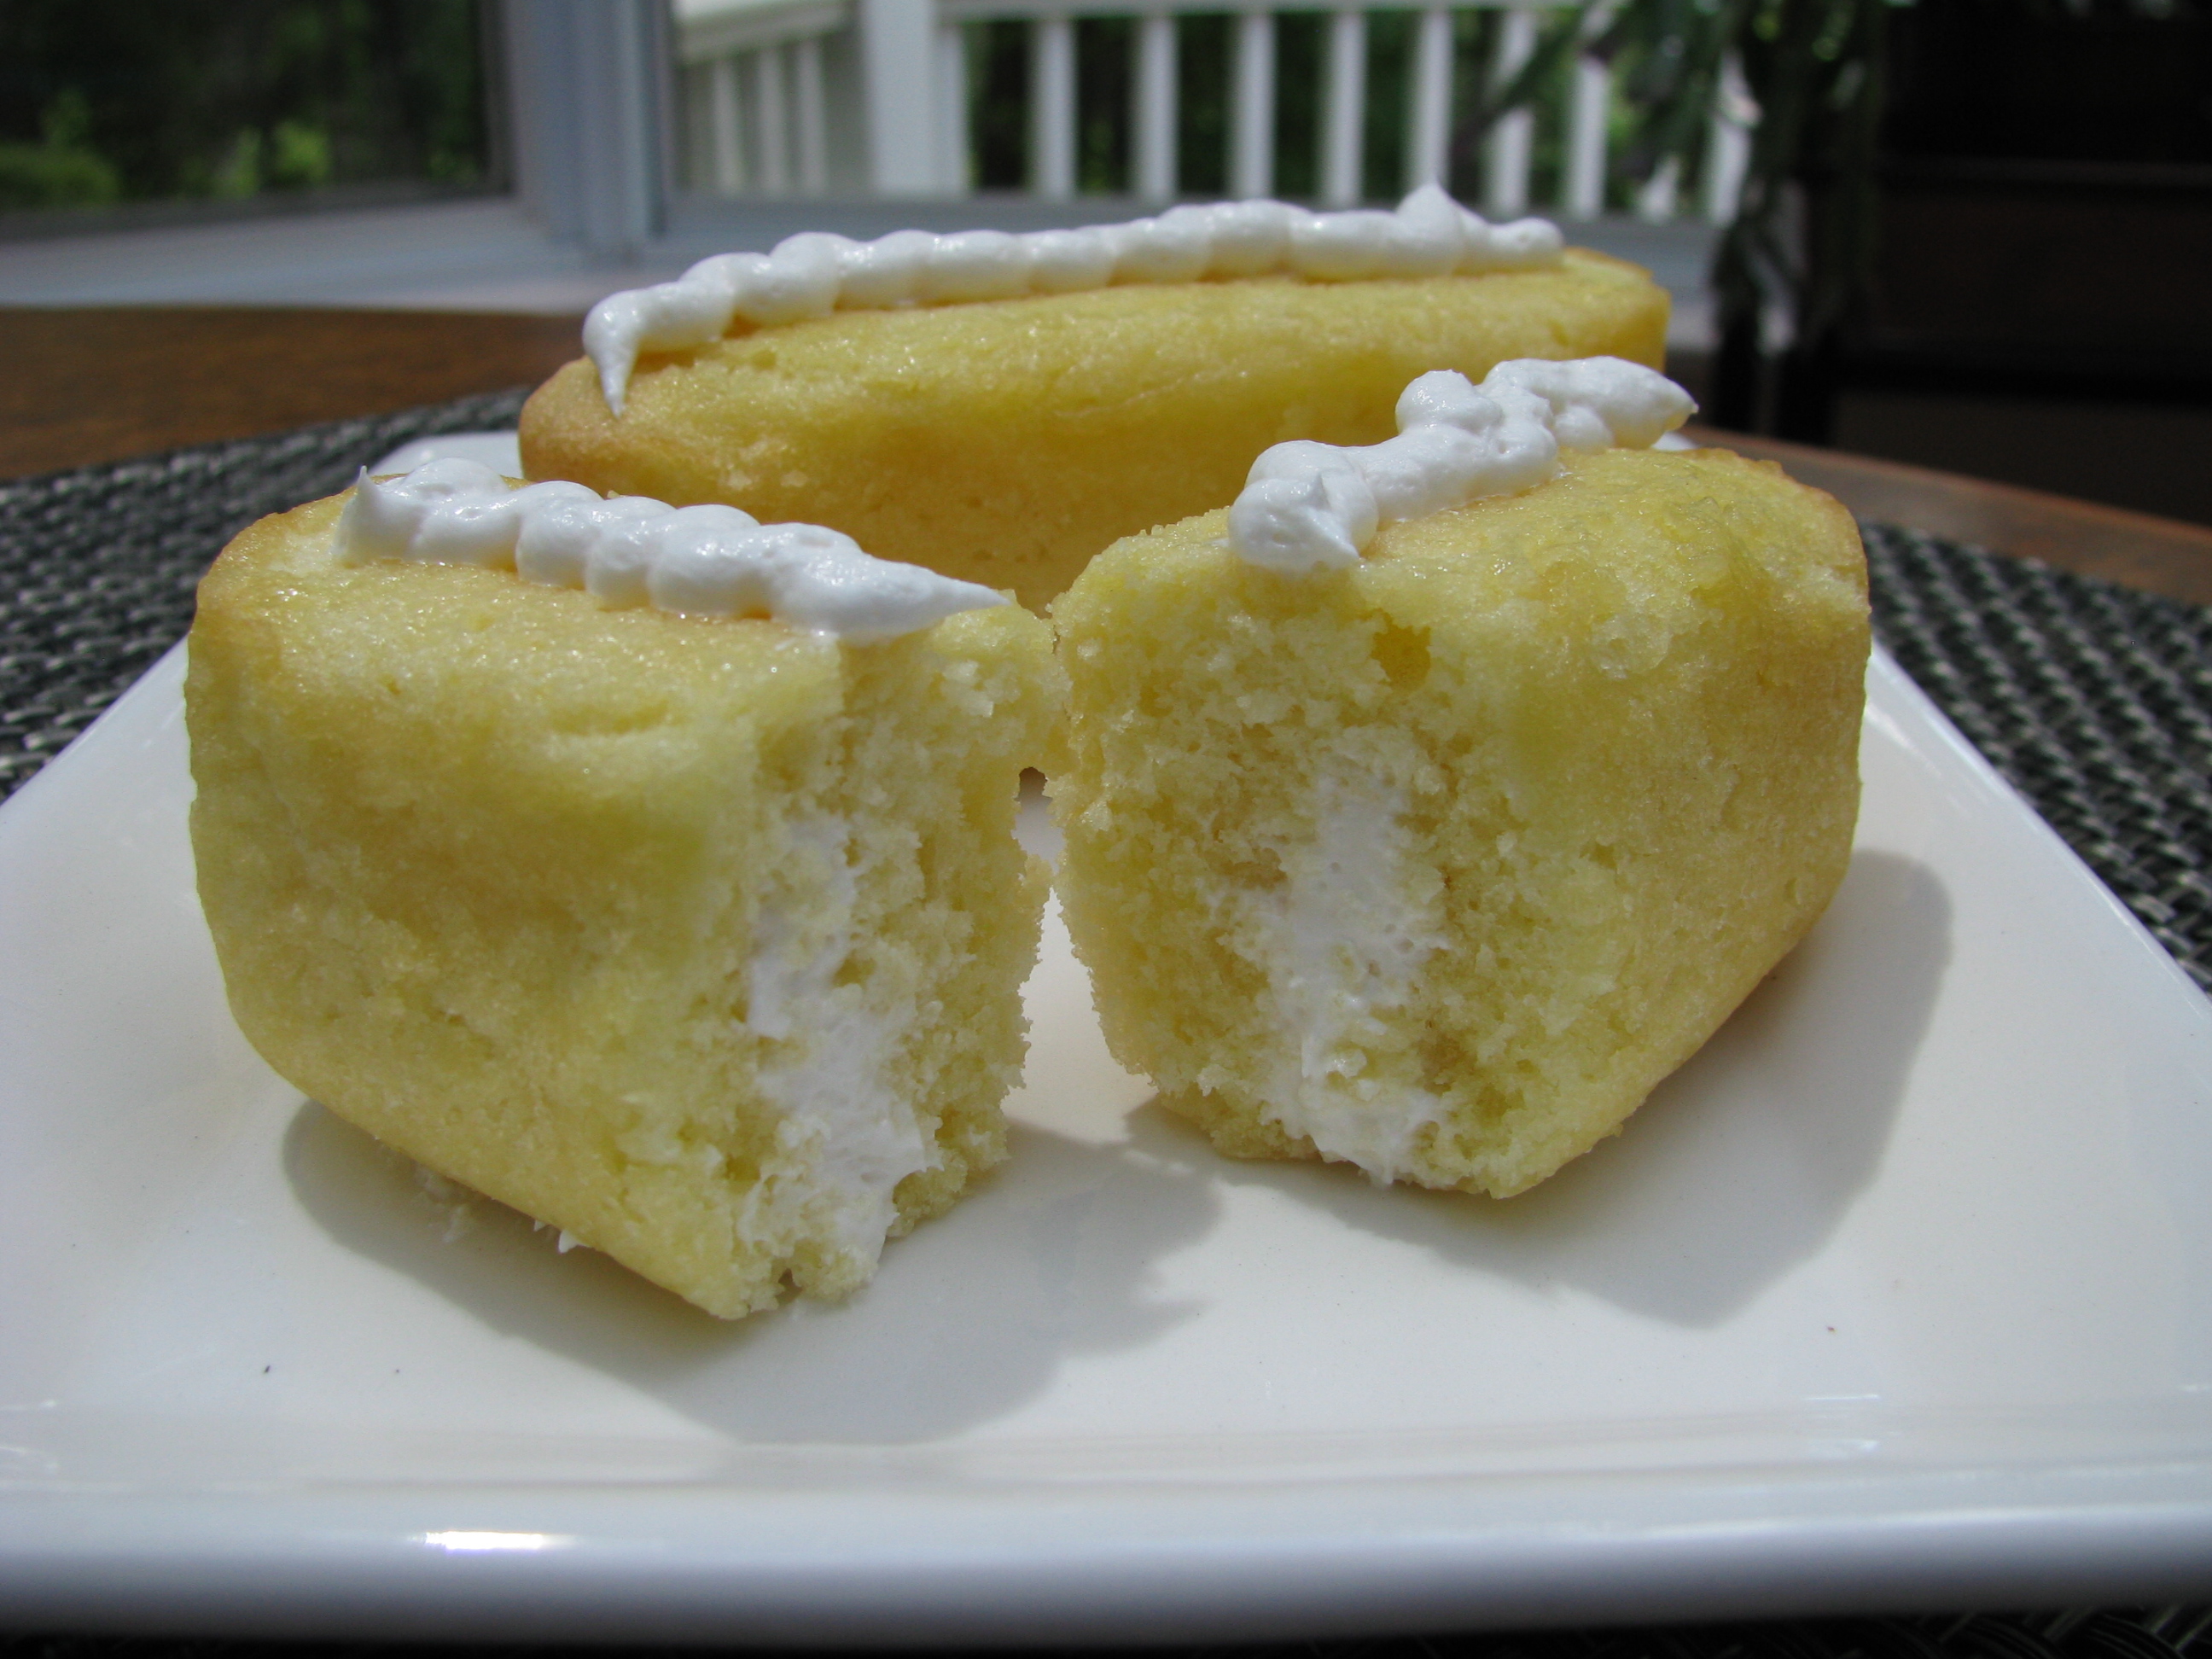
The Cakes
7 large eggs
½ teaspoon cream of tartar
2 cups Gluten-Free All-Purpose Flour Mix or blend below
1 ½ cups granulated sugar
1 tablespoon baking powder
½ cup vegetable oil
¾ cup cold water
1 ½ teaspoon vanilla
The Filling
2 teaspoons hot water
1/4 teaspoon salt
1 (16-ounce) jar of marshmallow crème
¾ cup vegetable shortening
1 1/3 cup powdered sugar
1 ½ teaspoon vanilla
To make the cakes: Preheat the oven to 350°F. Spray the canoe pan channels lightly with vegetable spray. Set aside.
Separate the eggs, placing the whites in one large mixing bowl and the yolks in another. Add cream of tartar to the whites and beat until they form stiff peaks. Set aside.
Place the flour mixture, sugar, baking powder, oil, water and vanilla in the bowl with the yolks and beat until smooth.
Working in thirds, fold the beaten egg whites into the batter. Don’t be tempted to stir or beat this mixture or the egg whites will lose their loft.
Fill each section of the snack cake pan 3/4 full. An over-filled 1/3 cup measure works well for filling these pans. Bake for 18-20 minutes, or until golden brown.
Remove the pan from the oven and let cool for 5 minutes. Using a flexible spatula, gentle turn cakes onto a wire rack to cool flat side (top side) down. Cool completely.
Wipe out the pan and spray with more vegetable spray. Add more batter. Repeat until you’ve used all the batter.
Let these cool while you make the filling.
To make the filling: Combine the salt with the hot water in a small bowl and stir until salt is dissolved. Let mixture cool. In a large bowl, combine the marshmallow crème, vegetable shortening, powdered sugar, and vanilla and beat until fluffy. Add the water and beat to combine.
Line two cookie sheets with waxed paper. Set the cakes, flat side down, on the cookie sheets. Use a thick skewer to make three holes in the bottom of each cake, moving the stick around inside of each cake to create space for the filling. Don’t poke through to the top however. Fill a cake decorator or pastry bag with filling and inject each cake with filling through all three holes. Don’t worry if you overfill these and the sides begin to break. They won’t fall apart. Add a row of squiggles on top for decoration.
All-Purpose Blend
This makes more than you’ll need for the recipe above. Store the remainder in a zip-loc bag.
2 ¾ cups rice flour
1 ¼ cups corn or potato starch
1/3 cup tapioca flour
3 teaspoons xanthan gum
1 teaspoon salt
Categories: Recipes | | 2 Comments »
When food writer and chef, Robin Asbell asked me to take part in a blog potluck to introduce her new Gluten-Free Pasta book (Running Press) I was all ears. “Can you make Crêpe Cannelloni with Roasted Veggies and Chèvre?” she asked.
We eat a lot of roasted veggies in my house so I was hooked immediately and Robin is a champion of all things vegetable. Then I received a copy of Robin’s gorgeous book. It’s filled with more than 100 ways to make pasta including easy, homemade noodle recipes like these Crêpe Cannelloni. And she’s included low-carb (and no-carb) options and dishes with an Asian flare as well. I mean, there is something for everyone in this book. And, of course, it’s all gluten free.
As a food writer, I love browsing through cookbooks and this one is great for window shopping. But there are several recipes I want to try right off the bat.
The recipe I picked to reprint here has several steps. But it’s worth it. I did not make the Veggie Spaghetti Sauce, however, although I included the recipe here. It sounds delish. Instead, I used a good quality commercial product (Muir Glen). That’s the one shortcut I would recommend if time is limited.
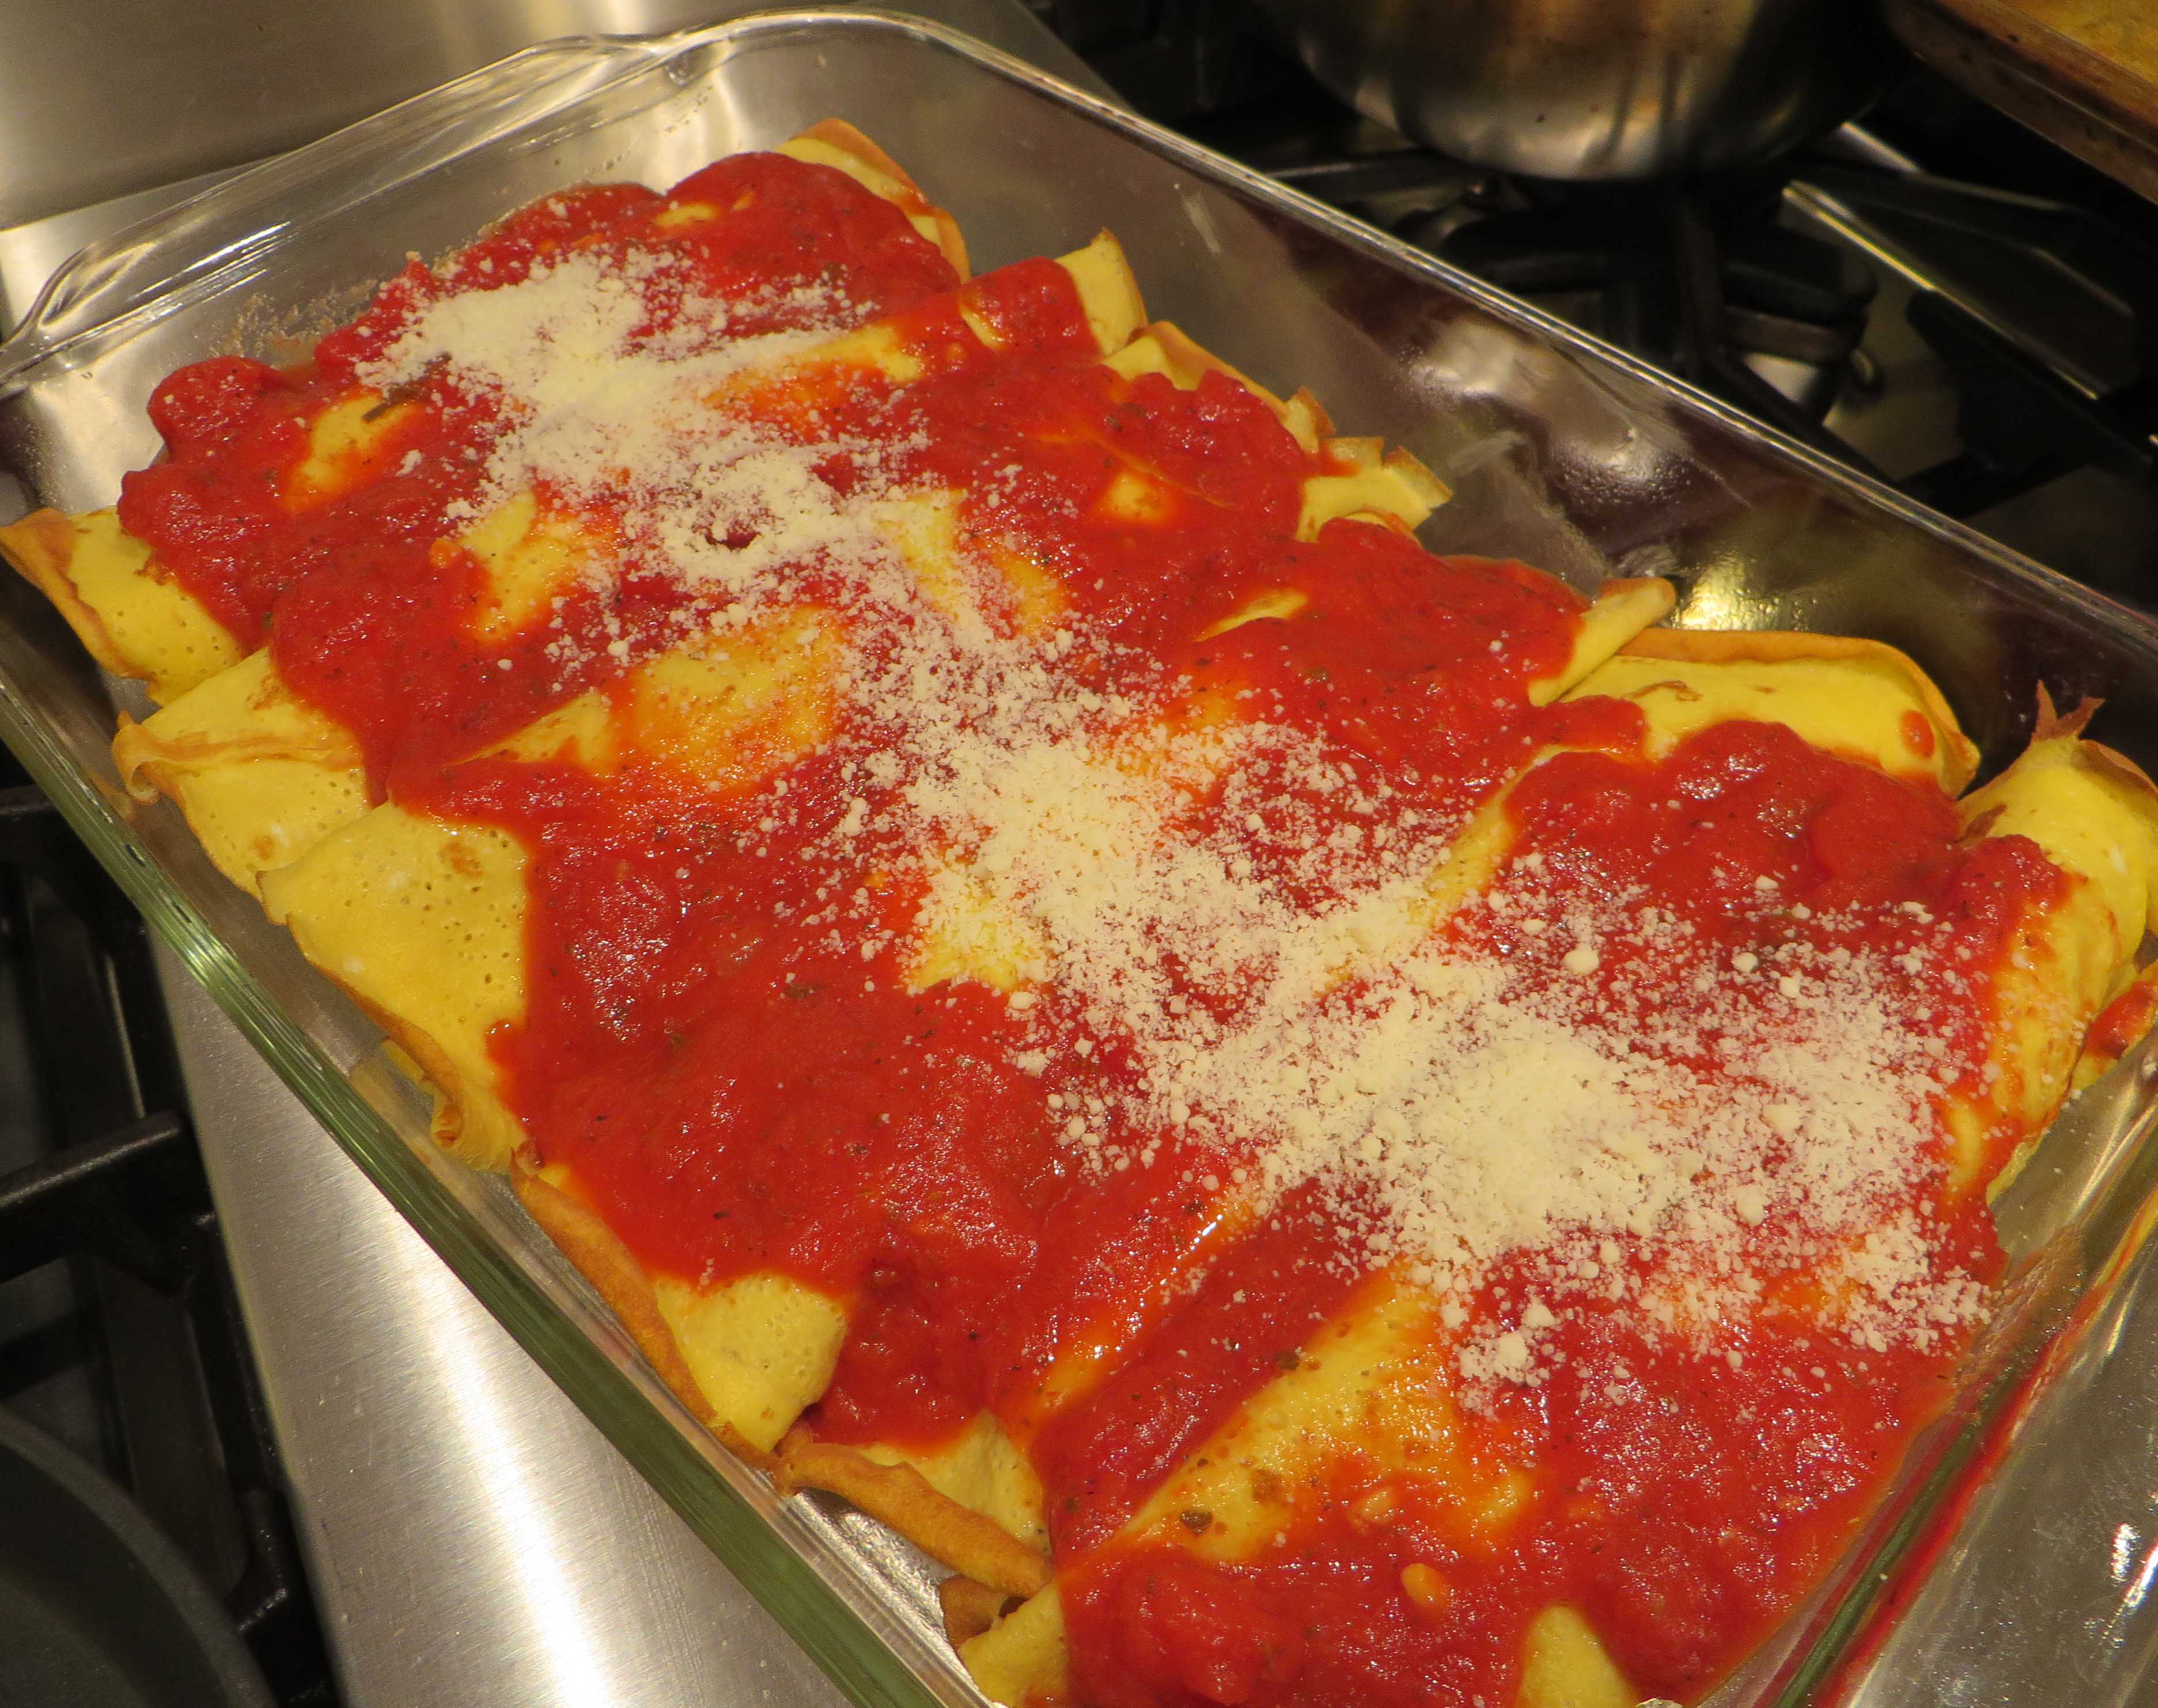 The crepes were easy to make, light and wonderful with the vegetable filling. You can also make these into easy strands for noodle dishes. My husband and I ate several filled cannelloni in one sitting. And this is a terrific way to get kids to eat their vegetables.
I can’t wait to try more of Robin’s recipes. For more, visit her web site robinasbell.com
I am giving away a copy of Gluten-Free Pasta to one lucky reader. Just leave a comment to this post or on my Facebook page to win.
Be sure to include your email address in the comment so I can contact you. the offer ends Sunday, March 30. Sorry, but it’s only open to US residents.
The following recipes are Reprinted with permission from Gluten-Free Pasta © 2014 by Robin Asbell, Running Press, a member of the Perseus Books Group.
Roasted Vegetable Egg Crêpe Cannelloni with Chèvre
Egg crêpes make a wonderful pasta stand-in in this delicious dish. Butter-soft roasted veggies are laced with tangy chèvre, rolled in tender crêpes, then topped with classic red sauce before being baked to crusty greatness. 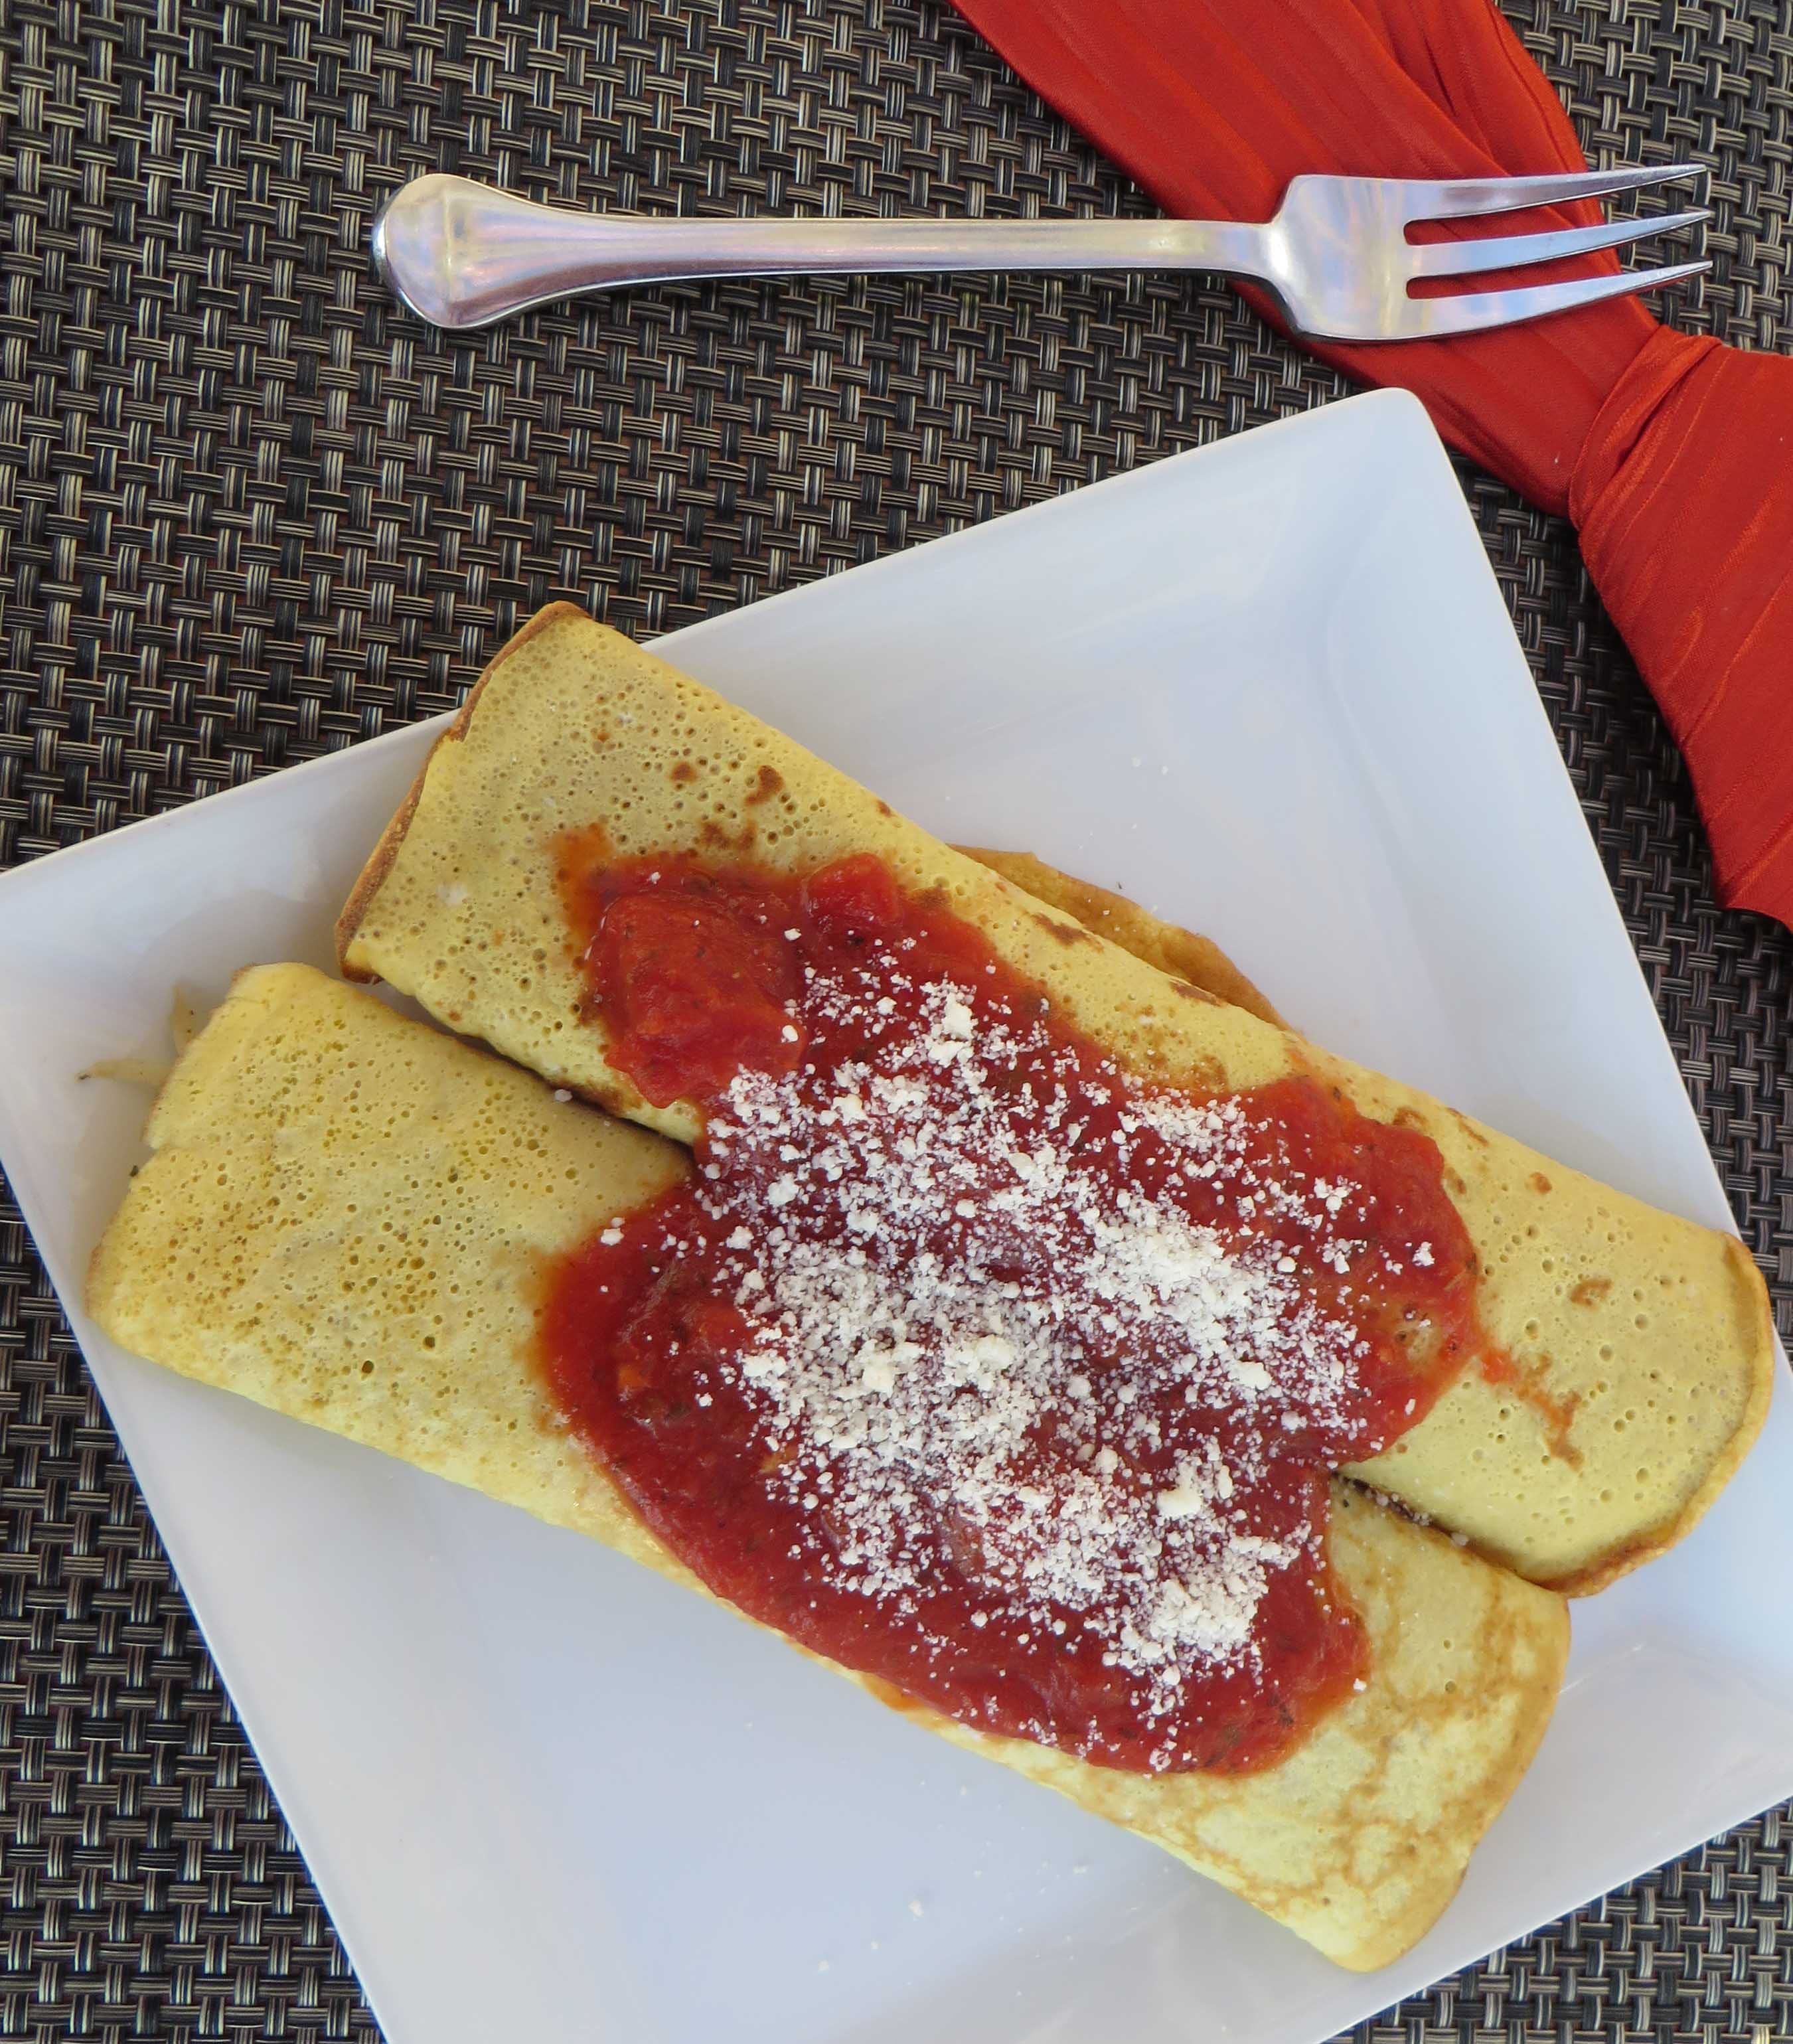
Serves 8
1 pound asparagus (tips and tender stalks only), cut into 2 to 3-inch pieces
1 pound zucchini (about 2 medium), cut into 2 to 3-inch sticks
1 medium yellow onion, thinly slivered
1 large red bell pepper, thinly sliced
1 tablespoon extra-virgin olive oil, plus more for the pan
1/2 teaspoon fine salt
1/2 teaspoon freshly cracked black pepper
3 garlic cloves, chopped
1/4 cup packed fresh basil leaves, chopped
6 ounces chèvre cheese
1 recipe Egg Crêpe “Noodles” (recipe as follows)
2 cups Veggie Spaghetti Sauce (recipe as follows), or use a good quality commercial sauce)
1/2 cup grated Parmesan cheese
Preheat the oven to 400°F. Combine the asparagus, zucchini, onion, and red bell pepper in a large bowl and add the olive oil, salt, pepper, and garlic. Toss to mix. Spread the veggies on 2 sheet pans and roast for 20 minutes, then stir, rotate the pans, and roast for 10 minutes more.
The veggies should be tender and browning. Let the pans cool to room temperature on racks. Leave the oven on. When cool, transfer the veggies to a medium bowl and add the basil, then toss to mix.
To assemble the cannelloni, lightly oil a 13 x 9-inch baking pan. Lay the crêpes out on a counter or cutting board. Divide the chèvre and veggies among the crêpes, then roll them up and place them in the baking pan, seam-side down. Cover with the veggie sauce and then sprinkle the Parmesan down the center of the crêpes.
Bake, uncovered, for 35 to 45 minutes, or until the sauce is bubbling and the cheese is melted and golden.
Egg Crêpe “Noodles”
Serves 4 to 6
1/2 cup (60 grams) garbanzo flour
3/4 cup milk
1 teaspoon fine salt
8 large eggs, whisked
Canola oil, for the pan
Whisk the garbanzo flour, milk, and salt in a large bowl until smooth. Add the eggs and whisk again.
Heat an 8-inch crêpe pan or a small sauté pan over medium-high heat. Brush or spray with oil.
Measure 1/4 cup of crêpe batter into the pan and quickly swirl to coat just the bottom of the pan. Cook for a minute or two, until set and flip over carefully. Cook the second side for only a couple of seconds and transfer the crêpe to a cutting board to cool. Continue with the remaining crêpe batter.
When all the crêpes are cooked and cooled to room temperature, you can either use them for cannelloni or roll them up and slice them thinly into strands. Toss to fluff. These can be stored, tightly covered, for up to 4 days.
Veggie Spaghetti Sauce
This is a simple sauce to use for everything. It is full of chunky vegetables but is delicious and tomatoey enough that kids love it. Make a double batch to freeze and use it for quick weeknight spaghetti, pizzas, and lasagna, or anywhere else a red sauce would be appropriate. I use Muir Glen canned tomatoes.
Serves 6 (Makes 6 Cups)
2 tablespoons extra-virgin olive oil
2 large yellow onions, chopped
1 pinch red pepper flakes (optional)
4 garlic cloves, minced
4 ribs celery, diced
2 large carrots, diced
2 tablespoons fresh thyme leaves, coarsely chopped
1/4 cup red wine dry Burgundy or chianti
1 (15-ounce) can tomato sauce
1 (15-ounce) can tomato purée
1 (14.5-ounce) can diced tomatoes
1 teaspoon fine salt, plus more as needed
Freshly ground black pepper
In a 4-quart pot, heat the olive oil over medium-high heat. Add the onion, pepper flakes, garlic, celery, carrot, and thyme. Once the mixture begins to sizzle, reduce the heat to medium-low. Cook, stirring often, for at least 10 minutes, and up to an hour if you have the time, to caramelize the onions and add more depth of flavor. Add the wine and bring to a boil, then stir in the tomato sauce and purée, diced tomatoes, salt, and pepper.
Bring the mixture to a boil, then reduce the heat to a simmer and cook for about 15 to 20 minutes, or until the sauce is thick and the vegetables are very tender. Season with more salt and pepper, if desired.
Categories: Uncategorized | | 21 Comments »
Lemon Poppy Seed Muffins

You’ll love these yummy, moist muffins for brunch, tea or anytime!
Makes 12 to 14 muffins
These moist and vibrant-tasting muffins add a touch of elegance to a brunch or tea. But don’t wait for a special occasion to whip up a batch. These muffins will be cause for celebration whenever you make them. I used silicone baking cups called “Baking Buddies” instead of muffin papers to test this recipe. I was a little concerned that the heavy dough would cause the cups to lose their shape and the muffins to spread rather than rise. (Gluten-free dough has a knack for doing that.) As you can see, they rose beautifully. I set half in muffin tins and half on a baking sheet just in case, but there was no perceptible difference between the two. These silicone cups wash easily, too. Fun to use and I love the colors. You can buy them on Amazon.
1 ¾ cups all-purpose flour blend (below)
1 ½ teaspoons xanthan gum
½ teaspoon salt
2 teaspoons baking powder
1/2 teaspoon baking soda
2 tablespoons poppy seeds
1 tablespoon grated lemon zest
6 tablespoons unsalted butter or non-dairy buttery spread, softened
2/3 cup sugar, extra to sprinkle on top of muffins
2 large eggs
1 cup buttermilk or milk of choice
3 tablespoons lemon juice
1 teaspoon vanilla
Preheat oven to 375°F. Line a muffin tin with muffin papers or use Baking Buddies. (No need to oil these silicone cups.)
In a medium bowl, mix together flour blend ingredients (below), xanthan gum, salt, baking powder, and baking soda. Add poppy seeds and lemon zest and blend well. Set aside.
In a large bowl, cream the butter and sugar until fluffy. Add the eggs, beating well.
On low speed, add the dry ingredients to the creamed mixture. Add the buttermilk, lemon juice and vanilla. Beat just until smooth.
Spoon the batter into the prepared pan, 3/4-full. Sprinkle sugar over the tops of the muffins just before baking.
Bake for 20 to 22 minutes or until a toothpick inserted in the center comes out clean.
Cool for 5 minutes before removing to cool completely. These can be frozen.
All/Purpose Flour Blend
1 cup white rice flour
1/2 cup corn starch
1/4 cup tapioca starch
By Beth Hillson
Serves 8 to 12
During the bone-chilling winter months, I make hearty gluten-free soups for lunch and dinner. Here’s a chowder that is a favorite in our house. It is a wholesome soup with big chunks of veggies suspended in a milk-based broth. But, instead of milk, I use coconut milk. It creates a wonderful creaminess and a filling potage. Puree half the vegetables and add them back to make this soup both creamy and chunky. Light a fire, warm up some gluten free biscuits and enjoy. This keeps for 3 to 5 days in the refrigerator. 
3 ounces hickory-smoked bacon, chopped
2 to 3 tablespoons olive oil, divided
1 large leek, chopped
3 medium carrots, peeled, roughly chopped
1 medium red bell pepper, cored, roughly chopped
3 pounds of sweet potatoes, peeled and cubed
5 cloves garlic, chopped
½ teaspoon chipotle chili powder
4 – 6 cups gluten-free chicken broth
Salt and freshly ground pepper to taste
1 (13.6 ounce) can light coconut milk
Garnish
2 tablespoons olive oil
2 ½ cups corn kernels, frozen and thawed, or fresh
Salt and freshly ground pepper to taste
½ cup finely chopped red pepper
Heat 1 tablespoon of the oil in a very large Dutch oven or stockpot. Add the bacon and sauté until it begins to brown. Remove the bacon with a slotted spoon and reserve. Add remaining oil and sauté the leeks, carrots, and bell pepper. Cook over medium-high until vegetables begin to soften, about 5 minutes. Add sweet potatoes, garlic and chipotle. Cook and stir for about 5 minutes.
Add enough broth to cover the vegetables. Check seasonings and add salt and pepper and the cooked bacon. Simmer, partly covered, over low heat, stirring often, until sweet potato is very tender, 15 to 20 minutes. Remove from heat. Use a slotted spoon to scoop out 3-4 cups of vegetables and set aside.
Use an immersion blender to puree remaining soup or ladle some of the soup into a blender and puree in batches. Add back the chunks of vegetables and stir in coconut milk. Return the soup to low heat. Check seasonings and add more salt and pepper if desired. If the chowder is thicker than you like, add additional chicken broth until you reach desired consistency.
For the garnish, heat olive oil in a large cast-iron skillet over medium-high heat. Add the corn and sauté until the corn is lightly charred, about 5 minutes. Add salt and pepper. Stir into chowder.
To serve, heat the chowder until hot. Ladle into bowls; top with diced red pepper.
Categories: Uncategorized | Tags: gluten free hearty winter soup, gluten free soup, gluten-free recipes | 2 Comments »
Follow Us Online
More Cookbook Stuff
Gluten-Free Makeovers - - Nearly 200 recipe makeovers for everyone to enjoy. Buy it at glutenfreeandmore.com, Amazon.com and barnesandnoble.com.
About This Blog
 Baking guru, Beth Hillson, transforms favorite foods into recipes that are safe for your gluten-free diet.


