Monthly Archives: August 2011
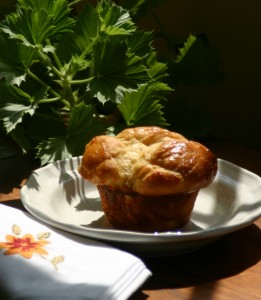
 When I was growing up, any special occasion called for tri-cornered rolls that my mother called Parker House Rolls. The name sounded exotic. We believed we were partaking in something sacred, a secret food that only my mother could make.
I’ve since discovered these were simply brown-and-serve dinner rolls with dimpled indentations on the top. She bought them in the grocery store, browned them in the oven, lovingly arranged them in a napkin-lined basket, and took all the credit. And, why not? These warm, doughy pillows were the backbone of every important gathering and I relished them as if she had measured the flour, proofed the yeast, and let them rise in the warmth of our own kitchen.
I remember placing one or two on my bread plate and letting a pat of butter melt into the little indentations in each. I licked the puddle of yellow liquid then sunk my teeth into the roll itself, letting leftover butter spill into the white interior. As proud as my mother was of her brown-and-serve rolls, an admonishment followed my butter ritual without fail. “Don’t eat too many of those or you’ll spoil your appetite,” Mom would say. What she meant was, “You won’t have room for your vegetables.” I truly hoped that would be the case.
I grew up assuming that warm dinner rolls were an inalienable right. That was, of course, before I became gluten free and gave up all rights to a bread plate.
One day I caught a photo on the King Arthur Flour (KAF) Baking web site demonstrating the process for making dimpled dinner rolls with three little crowns. Although most of their recipes are filled with verboten ingredients, unless you visit their gluten-free section, I was inspired by the way the rolls were assembled to create the tri-cornered appearance of Mom’s brown-and-serve rolls. This little demonstration made me wonder if I could makeover Mom’s dinner rolls using the method shown by P.J. Hamel and her baking team. I had a technique. Now I just needed a good gluten-free bread formula.
The Balance of Liquid to Dry
I knew a gluten-filled bread recipe would be difficult to use. The balance of liquid to dry defies conventional food science. So I went back to my gluten-free bread formulas and worked with one that contains high protein flour. (Chickpea or quinoa flour works well.) To add the maximum elasticity, I also used 1 teaspoon of gum per cup of flour. It provides great texture without leaving a gummy mouthfeel and taste. (If you don’t like to use xanthan or guar gum, add an additional tablespoon of potato flour.) The recipe I used is inspired by one from bloggers Vic and Hallie Dolcourt in Sunnyvale, CA. Like me, they are bread people and mad scientitsts in the kitchen.
Food Chemistry and Gluten-Free Breads
Before I give you the recipe, I need to tell you something else about food chemistry and gluten-free breads. It’s called balance. The balance of wet to dry ingredients is critical in gluten-free bread baking. Enough liquid is needed to help the yeast do its best work without creating a bread or roll that rises too quickly and sinks the moment it comes out of the oven. So I look for a smooth, shiny texture when the dough is beaten. If it looks lumpy, I add more liquid, one teaspoon at a time. If the dough is soupy, I add a bit more flour blend, one teaspoon at a time. You get the picture. This trick can be applied to any bread recipe. And one last thing. When I tested this recipe, I thought the dough was a little stiff and lumpy. I added more warm water, one tablespoon at a time until I reached the point where the dough was smooth. You can do that too, although I don’t think you’ll need to change a thing in this recipe. The rolls are light and delicious – – just like Mom’s!
I hope you’ll give this recipe a try. It’s a good reason to bring back the bread plates.
Dinner Rolls Like Mom’s
Makes 18 rolls
Dry Ingredients:
1 ¼ cups chickpea or quinoa flour
1 cup brown or white rice flour
¾ cup + 2 tablespoons tapioca flour
¾ cup corn or potato starch
1/3 cup powdered dry milk*
¼ cup potato flour (not starch)
1/4 cup packed brown sugar
4 teaspoons xanthan gum
1 ½ teaspoons salt
1 tablespoon instant active dry yeast
1 ½ teaspoons baking powder
Liquids:
1 cup + 6 tablespoons warm water at 110 degrees
4 eggs separated
1 teaspoon cider vinegar
3 tablespoons honey
1/3 cup butter or dairy-free buttery spread, melted in microwave for 30 seconds
1 egg mixed with 2 tablespoons water to brush tops
Mix dry ingredients in a bowl and reserve. Put all liquid ingredients except butter and egg yolks into the work bowl of a mixer fitted with the “paddle” attachment. Add the dry ingredient mixture 1 cup at a time while mixing on low. Allow the dough to rest for 10 minutes in the bowl. Add the melted butter and egg yolks. Mix on medium-high until blended, 3 to 4 minutes. Scrape down the sides half way through.
Lightly oil 18 muffin cups. Scoop out bits of dough and roll into balls (about 1-inch in diameter) in oiled plastic wrap. Place three balls in each cupcake tin compartment. Cover and let rise.
Preheat oven to 375 degrees. Brush tops with egg wash. Bake 15 to 20 minutes or until a toothpick inserted in one of the rolls comes out with just a few moist crumbs. Turn onto cooling rack. Let cool for10 minutes before serving.
Note: If the top of the rolls becomes too dark while baking, reduce temperature to 350 degrees or cover top loosely with aluminum foil. Store at room temperature for 1 to 2 days or freeze. To reheat, wrap in aluminum foil and heating in a 350 degree oven. Thaw frozen rolls before reheating.
* Vance’s Dari-Free can be substituted
All contents © 2011 Gluten-Free Makeovers®
Categories: Recipes | Tags: bread, dinner rolls, gluten free, gluten-free makeover, rolls | No Comments »
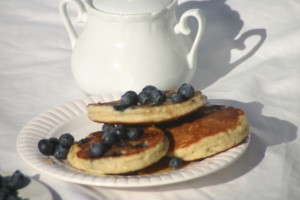
This time of year I dream in blueberries. Perhaps it’s because the local crop is out and the berries are so sweet. I also dream in pancakes. They seem to go together like love-and-marriage and milk-and-honey.
My dream goes this way. I see waiters delivering plates piled high with light, airy flapjacks. From behind a vegetable frittata, I see diners drizzling warm maple syrup over stacks of golden discs. I watch them sawing wedges three cakes deep and piercing them with forks. Then, mouths line up in receiving position and heads tilt until the triangular parcels disappear. And I drool into my fruit cup.
I’ll admit it. I have a chronic case of Pancake Envy. I miss the light-textured, gluten-filled pancakes of yester year, the ones that made me say, “Ah” when I bit into them, the delicate cakes kissed with warm blueberry juice. So many gluten-free pancakes disappoint me – – so gummy, so dense they lay in the bottom of my stomach for what seems like days.
The other day, as I thumbed through a cookbook written by friends, DeDe Lahman and Neil Kleinberg, I opened to a recipe called “Neil’s Pancakes.” The picture was beyond gorgeous. I wondred. Could I make them over? Would they come close to the pancakes I remembered in my dreams?
If anyone could give me the fundamentals for making perfect pancakes, I knew it was Neil. He and his wife, DeDe, own Clinton Street Baking Company, an acclaimed neighborhood restaurant on Manhattan’s Lower East Side. The duo serve five hundred orders of pancakes a week in their hole-in-the-wall 32-seat place. Imagine, 500 plates of pancakes!
Although Neil comes from a classical French culinary background, he is an amazing baker and he shares great tips as well as gorgeous recipes in the cookbook of the same name. Of course the book is written in gluten. There’s flour everywhere. But it’s tantalizing close-up photos make my mouth water and my fingers itch to convert the recipes so I can eat them. Who wouldn’t be wooed by Black and White Cake with chocolate frosting cascading gracefully over luscious white cake or a giant bowl of Corn and Clam Chowder, chunks of bacon, potato and corn kernels suspended in the rich broth? And the endless photos of pancakes – – topped with raspberries, blueberries, bananas and chocolate. Oh yum. Neil touches every culinary bone in my body.
So today I made over Neil’s famous Blueberry Pancakes. I want you to know they are, indeed, the best pancakes I’ve ever tasted. I know you’ll want to make them, too. But before you
begin, here are a few tips about making this recipe over.
(1) I started with a light self-rising flour blend using nutritionally dense sorghum and amaranth flour. It’s healthy besides being light and sorghum and amaranth contain protein. It helps add structure to gluten-free baking.
(2) I used 1 ½ teaspoons baking powder per cup of blend and added more to the pancake batter. It’s a lot of baking powder, but necessary to create the light, airy texture.
Then I followed some of Neil’s tips.
(1) Preheat the griddle before using.
(2) Fold in stiffly beat egg whites for additional lift. Once added, don’t over mix or batter can deflate.
(3) Add fruit after pancakes have set to prevent the blueberries from bleeding their color into the batter.
Blueberry Pancake Makeover
Makes 14-16, 3 inch pancakes
Inspired by a recipe in Clinton St. Baking Company Cookbook by DeDe Lahman and Neil Kleinberg.
2 cups self-rising flour blend
1 teaspoon baking powder
1/3 cup sugar
3 large eggs, separated or flax gel
1 ½ cups 2% milk, soy milk or milk of choice
¾ teaspoon vanilla extract
6 tablespoons melted unsalted butter or non-dairy buttery spread
1 cup fresh blueberries (frozen will not work as well) or bananas, sliced and chunked
Combine flour blend, baking powder, and sugar. Separate eggs. To yolks add milk, vanilla, and butter, whisking to combine. Add the dry ingredients and whisk to blend. In a
separate bowl, beat the whites until soft peaks. You’ll notice lines beginning to form and stay on the surface as you beat. Do not overbeat. Fold half the whites into the batter and blend. Fold remaining whites into mixture. Do not blend completely. (You will still see bits of white foam.)
Preheat griddle or flat pan to between 350 and 375 degrees. (Preferably use a non-stick pan.) Lightly oil the surface. Use a ¼ cup scoop and drop batter onto preheated griddle. After the batter has begun to set, sprinkle blueberries or banana pieces over the surface. When under side is golden brown, flip the pancakes and cook an addition 3-5 minutes or until browned on the other side.
Serve with real maple syrup, blueberry compote, or enjoy as is.
SELF-RISING FLOUR
Reprinted from Gluten-Free Makeovers (Da Capo Press, Oct 2011)
Mix up a big batch and store in the refrigerator. Use for muffin, quick bread and pancake recipes.
1¼ cups white rice flour (6.5 ounces)
1 cup sweet white sorghum flour (4 ounces)
¾ cup amaranth flour (3 ounces)
¾ cup cornstarch (3.5 ounces) or potato starch (4 ounces)
¼ cup tapioca starch/flour (1.1 ounces)
2 tablespoons baking powder
2 teaspoons xanthan gum
1½ teaspoons salt
All contents © 2011 Gluten-Free Makeovers®
Categories: Recipes | Tags: blueberries, breakfast, gluten free, makeover, pancakes | 4 Comments »


 Baking guru,