Monthly Archives: September 2012
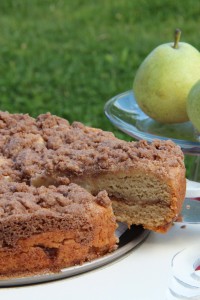
Pear Coffee Cake
As a baker, I am reluctant to let go of certain sacrosacnt ingredients. Eggs is one of those precious commodities. Then a colleague who is gluten and egg-free asked me if I could convert a coffee cake recipe so she could enjoy, too. I recalled that, back in the days when I owned the Gluten-Free Pantry, I had made many recipes where I replaced eggs with silken tofu, flax gel (1 tablespoon flax meal with 3 tablespoons of hot water) or even with applesauce. I dug out my favorite coffee cake recipe, already gluten-free, and went to work. The results were delicious.
This stunning coffee cake uses soy (or coconut) yogurt and pear puree. The yogurt adds back some of the protein from the eggs and the pear puree, like applesauce, contains pectin which tenderizes the cake. I added a little bit more baking powder to help it rise, usually another job done by the eggs. 
This is comfort food at its best and begs for a cup of coffee or tea. I also like to make this with apples and applesauce.
1 cup sugar
1 ½ cups All-purpose Gluten-Free Flour Blend
½ cup sorghum flour
2 teaspoons xanthan gum*
½ teaspoon salt*
2 teaspoons baking powder
1 teaspoon baking soda
1½ cups soy or coconut yogurt (flavored yogurt works well)
6 tablespoons vegetable oil
4 tablespoons pureed baby pear puree or unsweetened applesauce
½ cup peeled and chopped ripe Bartlett, Bosc or red pears, or diced canned pears
Crumble Topping (below)
Preheat the oven to 325°F and lightly oil a 9-inch springform pan.
Combine the sugar, flour blend, sorghum flour, xanthan gum, salt, baking powder, and baking soda in a large bowl. Set aside.
Combine the yogurt, vegetable oil, and pear puree in a mixing bowl and beat until smooth. Add the dry ingredients and beat until smooth. Fold in chopped fruit.
Spoon half the batter over the bottom of the prepared pan and smooth to the edges of the pan. Cover with half of the crumb mixture. Spoon the remaining batter over the crumb topping and smooth to the edges. Sprinkle the remaining topping over the top.
Bake 50 to 55 minutes, until cake tester comes out clean and center springs back when gently touched.
Cool 10 minutes in the pan. Remove the rim of the pan and cool completely on a wire rack. Serve.
*If your all-purpose blend contains salt and gum, omit the salt and reduce the gum to ½ teaspoon.
Crumble Topping
½ cup rice flour
½ cup packed brown sugar
2 teaspoons ground cinnamon
¼ teaspoon ground allspice
1/8 teaspoon ground cloves
¼ teaspoon salt
4 tablespoons unsalted butter or non-dairy buttery spread, at room temperature
Combine the flour, brown sugar, cinnamon, allspice, cloves, and salt in a large bowl. Mix well. Add the butter and use fingertips or a fork to mix just until crumbly.
This can be made ahead and stored in the refrigerator for up to 2 weeks.
Categories: Recipes | Tags: baked goods, coffee cake, coffee cake recipes, comfort food, dairy-free, egg-free, gluten free, Sweets | 2 Comments »
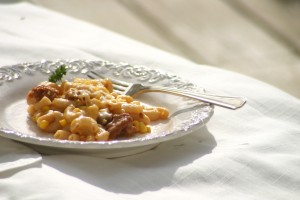
Quick Chili Mac and Cheese
I think of myself as the champion of substitution. But truthfully, I hit a wall when asked to come up with a Macaroni and Cheese recipe recently. I hadn’t made Mac and Cheese since my son was a little boy. So many steps – – making a cream sauce, grating the cheese, cooking the pasta. Oh yes, the pasta. Gluten-free pasta always turned out gummy and mushy when I made it. And the final dish was too rich for my taste. So what was the incentive? Where was the payoff?
Then I came up with a few shortcuts. I replaced the cream sauce with hot chicken broth and added spicy Jack Cheese and let it melt – – cream sauce in seconds without the cream! For flavor, I cooked spicy chicken sausage, crumbled it and stirred in corn and green chilies.
But the big discovery came when I cooked the pasta only half as long as the instructions indicated. I finished this recipe by microwaving it and the pasta finished cooking while it absorbed some of the wonderful flavors of the sauce.
This recipe has become my favorite, my go-to quick meal during the cooler months. And the pasta holds together. No mush in this dish and no fuss, either. This is Mac and Cheese all grown up and it’s so delicious and easy to make, I wonder why I waited so long.
This versatile recipe tastes even better the second day. To add more fire, use the hottest sausage you can find. If you prefer a vegetarian version, omit the sausage or use a vegetarian sausage that’s safe for your diet.
3 cups (12 ounces) dried elbow pasta or 3-4 cups (8-10 ounces) other short pasta, uncooked
3-4 hot or mild chicken, turkey or pork sausages
1½ cups frozen corn
1 small can chopped green chilies
1 cup gluten-free, dairy-free chicken stock
2 teaspoons gluten-free Mexican or dairy-free Taco spice blend
2½ cups shredded spicy Jack Cheese or dairy-free cheese substitute, divided
Lightly oil a deep ovenproof dish (7½x11-inch, 9×13-inch, 9-inch round).
Cook pasta in salted water for half the time specified on package. Pasta should be undercooked (slightly opaque but not brittle). Drain and transfer to prepared baking dish.
While pasta is cooking, remove sausage from its casing and crumble into a well-oiled saucepan. Sauté meat until brown. Add corn and chilies, stirring to combine.
Using a wooden spoon, gently fold meat mixture into pasta.
Heat chicken stock in the saucepan until hot but not boiling. Add the spice blend and stir well. Remove from heat and add 2 cups grated cheese. Stir until smooth and pour over pasta. Gently toss to coat.
Top mixture with remaining cheese. Cover dish with moist paper towel and microwave on medium-high for 5 minutes or until bubbly. Enjoy.
Categories: Recipes | Tags: back to school meal in minutes, gluten-free meal in minutes, gluten-free pasta, macaroni and cheese | 1 Comment »


 Baking guru,