
Blog Archives
Recipe By Beth Hillson
Makes 1 Boule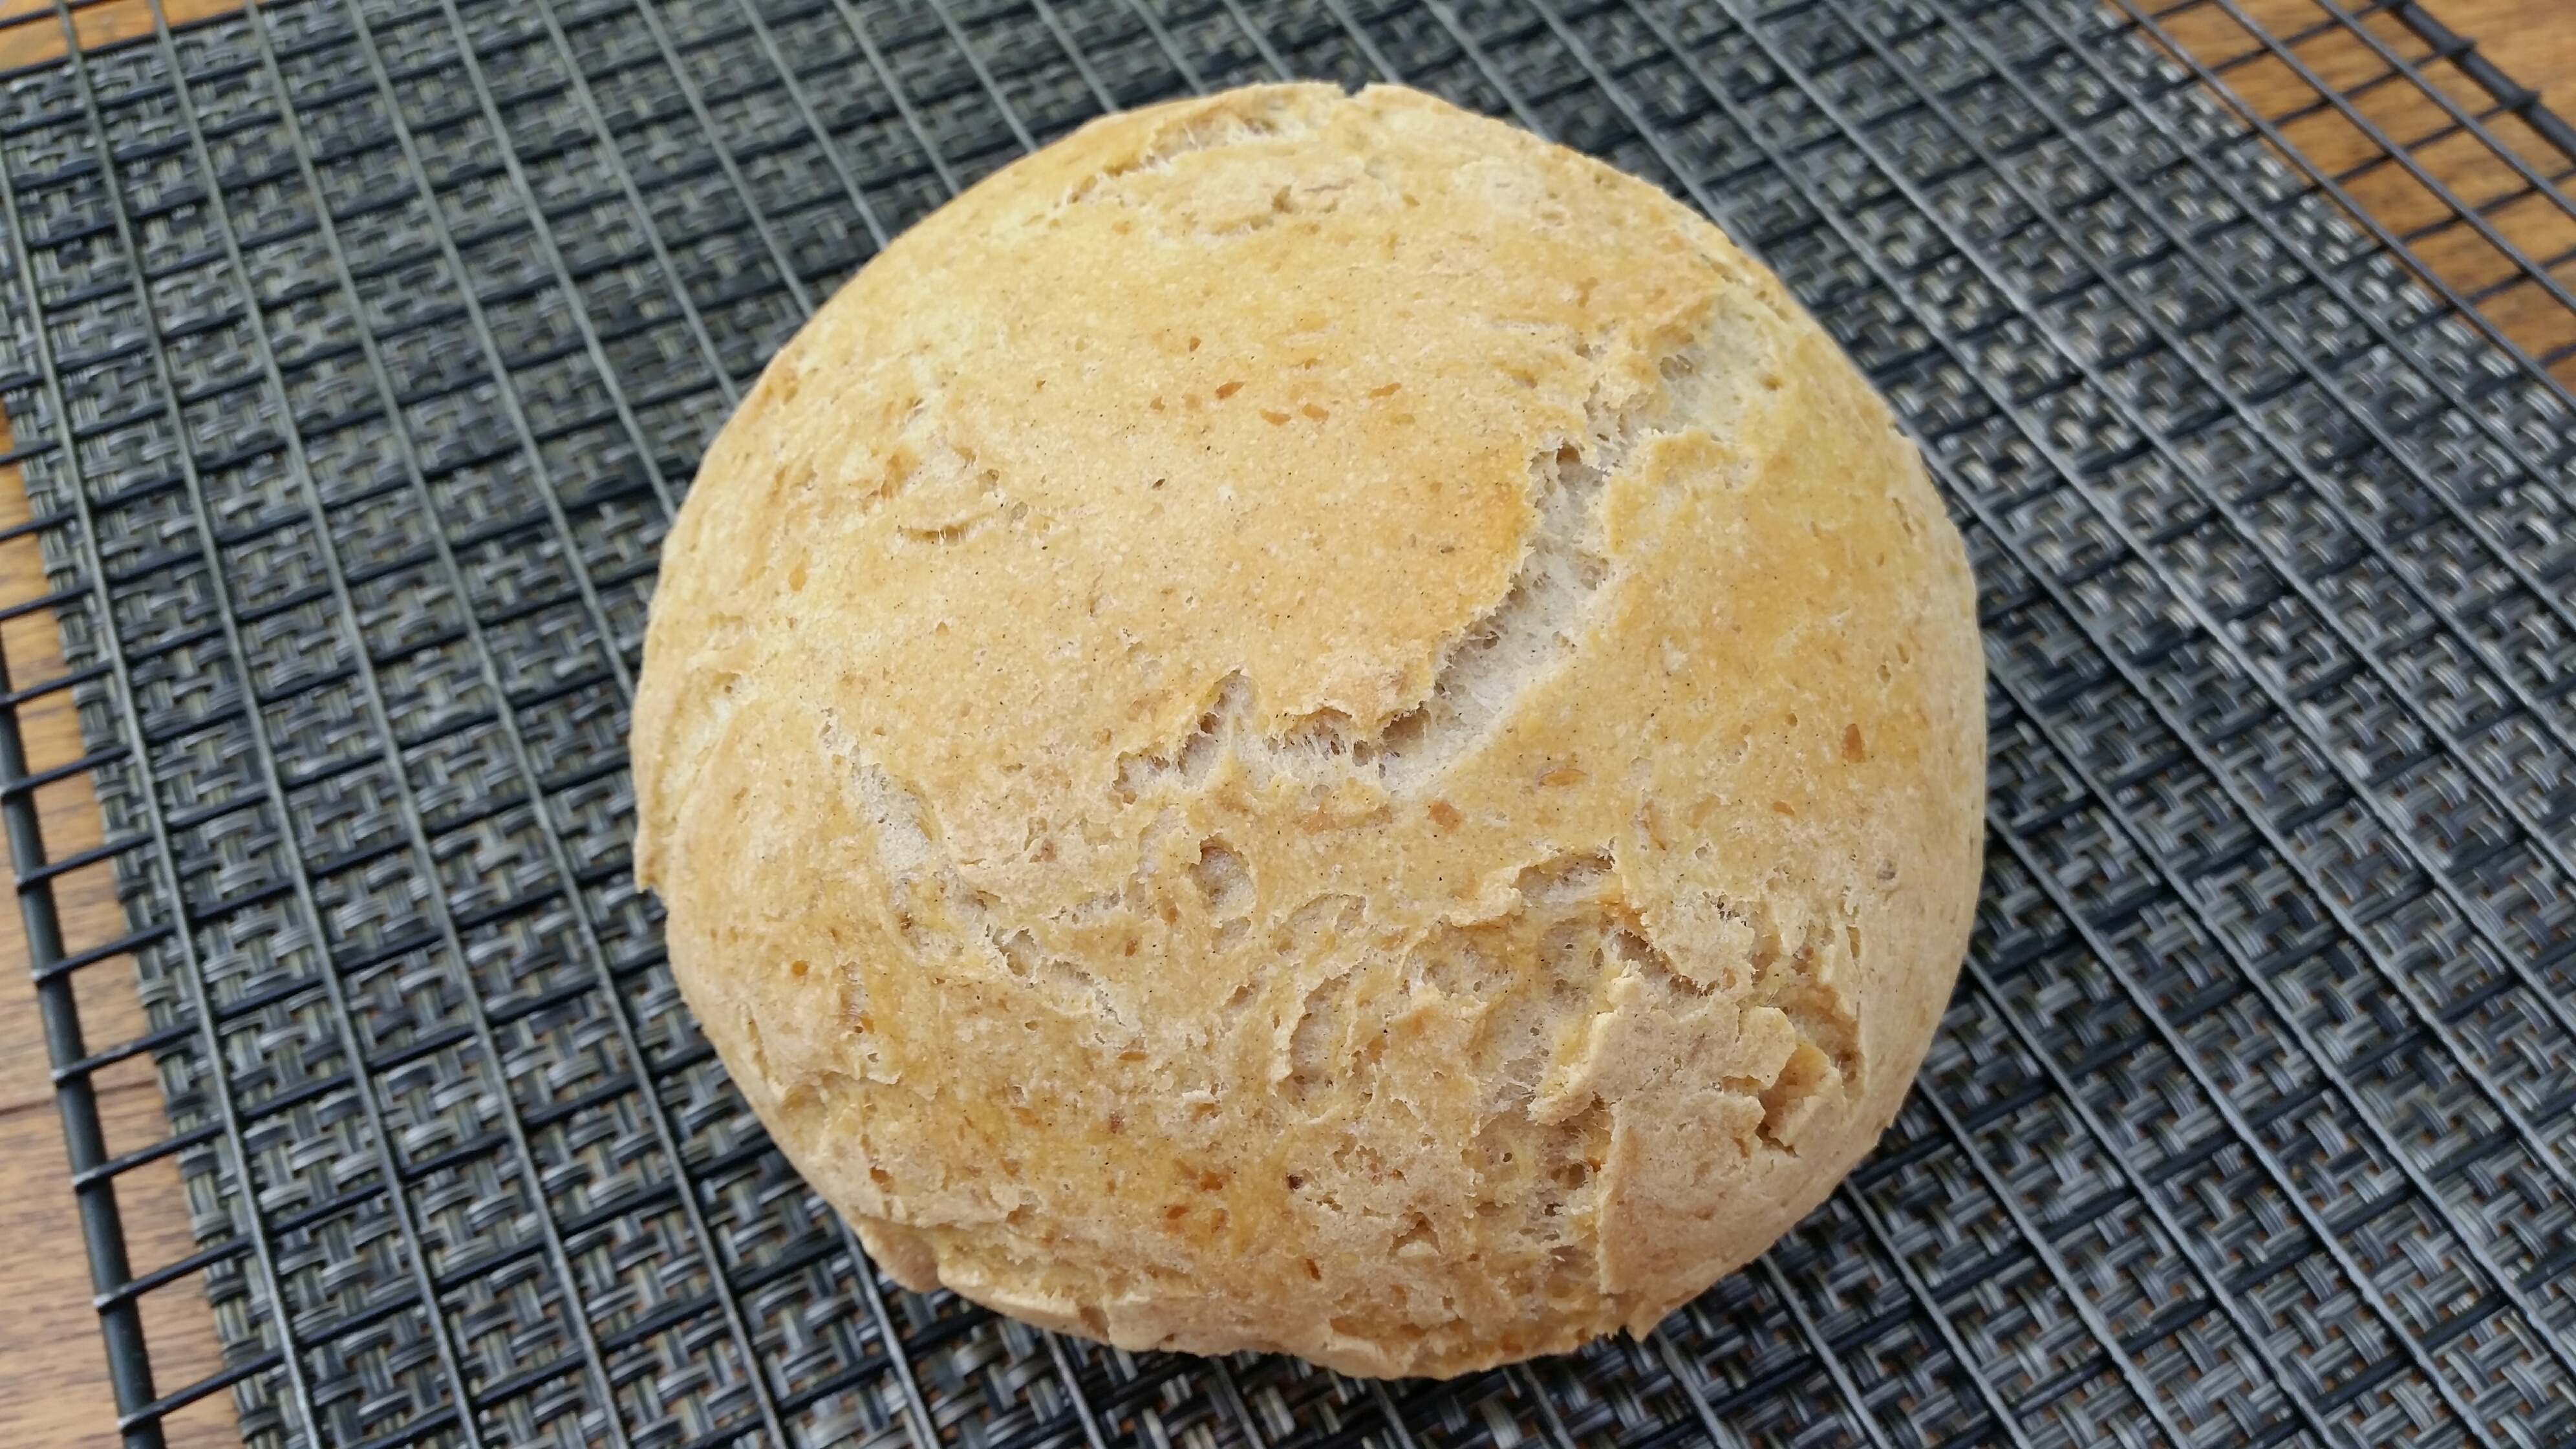
No-Knead Bread seems like an oxymoron to me. Aren’t we all looking for a texture that allows us to touch and knead our gluten free dough? Although you actually can knead the dough in this recipe, it’s not necessary.
This bread is a makeover from the wildly popular no-knead wheat loaf that’s based on a recipe published in the New York Times courtesy of Jim Lahey of Sullivan Street Bakery fame. I know a number of bread bakers who make this regularly. It’s beautiful, tastes terrific, requires no special ingredients and, best of all, it takes virtually no effort to produce a perfect loaf.
When no-knead bread became the rage a couple of years ago for people who bake with wheat flour, it caught my attention. Its popularity was based on an easy prep: Mix it up in a bowl, let it rest on the counter up to 18 hours and stick it in the oven. Voila! Homemade bread.
I used my makeover magic to create this great-tasting, gorgeous loaf, the gluten-free version of Jim Lahey’s recipe. I used flax meal so the structure benefitted from eggs but could rest on the counter overnight. In place of wheat flour, I used a blend of gluten-free flours, starches and xanthan gum.
The amount of water was the tricky part. Too much water made the dough clay-like in texture and produced a hard rather than crusty exterior. Too little resulted in a dry, crumby loaf.
The original recipe called for a tiny bit of yeast. That might work with wheat dough but didn’t produce enough lift for dense, gluten-free dough. I increased the amount of yeast to create a steady fermentation process and a subtle sourdough taste. My loaf did not benefit from a lengthy resting period. The original recipe suggests 18 hours. This dough seems best if you let is rest 8 to 12 hours or overnight.
If you have a Dutch oven, I recommend using it. This produces just enough steam to create a chewy crust. Otherwise, set the boule on a baking stone or baking sheet to bake.
I’ve doubled the recipe and pulled off dough for rolls and breadsticks, too. It’s pretty cool dough and very easy to make.
Note: A version of this recipe appears in the Oct/Nov 2016 issue of Gluten Free & More Magazine.
My Makeover of No-Knead Bread
2 tablespoons flax meal
6 tablespoons hot water
1 ½ cups sorghum flour
¾ cup potato starch
½ cup sweet rice flour
¼ cup tapioca starch flour
2 ½ teaspoons xanthan gum
1 teaspoon salt
2 teaspoons yeast
1 cup warm water, divided, more as needed
2 tablespoons honey
In a medium bowl, combine flax meal with hot water and let sit until thick, about 5 minutes. Meanwhile, mix together sorghum flour, potato starch, sweet rice flour, tapioca starch flour, xanthan gum and salt. Set aside.
Stir yeast, ½ cup warm water and honey into flax gel. Let sit for 15 minutes or until mixture becomes foamy.
Stir mixture into dry ingredients. Add remaining ½ cup warm water, 2 tablespoons at a time, until mixture is smooth and silky to touch but not sticky. It may take the full ½ cup of water. If mixture has dry spots, add 1 tablespoon additional warm water. Dough will be shaggy (not smooth) at this point.
Set in a bowl. Cover with plastic wrap and let the dough sit in a warm spot on the counter for 8 hours or overnight. It should rise, but won’t double in size. As the dough sits, it will give off moisture that will soften the texture.
Coat a sheet of parchment paper with oil. Set the dough on parchment and roll it to coat in the oil. Smooth into a ball. Set it in a 4-quart Dutch oven, cover with the lid and let it rise 1 hour.
Preheat the oven to 450 degrees. After 1 hour, remove the lid and score the top with a sharp knife. Brush with oil or egg wash, if desired. (This will cause the crust to brown.)
Cover and bake for 30 minutes. Remove the lid and bake another 20 to 30 minutes.
Cool completely before cutting.

Categories: Recipes | Tags: gluten free bread, gluten free bread makeover, gluten free quick rise bread, gluten free quick yeast bread | 5 Comments »
By Beth Hillson
I’ve worked with RYZE flour blends (yellow and blue) for several months now. Here are some of my findings. The blends produce superior results in many applications, cookies, biscuits, pie crust, scones, cakes, and muffins among them. These recipes show off the best of RYZE.
For other baked goods, specifically yeast breads, pizza and some cakes, the final results seem undercooked (gummy) on the inside although the outside is fully baked. Some other bakers have reported the same findings. For these items, I find that adding ½ to ¾ cup of an additional flour like sorghum, millet or corn flour brings out the best of RYZE’s characteristics.
Here’s why. RYZE is made up of a blend of rice flours. Just like rice itself, (think, short grain, sushi, or long grain rice) some of these rice flours absorb more liquid than others. That’s the beauty of RYZE. The added moisture produces baked goods that remain moist for several days even when I’ve left them on the counter. That’s amazing in itself since gluten free products dry out so quickly.
That isn’t necessarily the best when it comes to yeast bread recipes, I’ve found. The moisture retention produces a gummy inside texture. The fix is pretty simple. I added sorghum flour to “tame” those hydroscopic properties. In these baguettes, I also added almond flour and potato flakes. The result was terrific. The baguette recipe is one that you will want to make over and over.
RYZE is still revolutionary, even for these recipes. Think about it. You get the best of gluten free flour – products with great texture and moisture – and without any gums. I don’t know about you, but until now, I have always used a lot of gum in breads and pizza, so this is pretty liberating.
Want to try RYZE blends for yourself?
I’m doing a giveaway to ten lucky people. Just “Like’ Gluten-free Makeovers on facebook or send me an email at beth@glutenfreemakeovers.com and you’ll be entered to win. I’ll tell you more soon.
Culinary Curiosity
Meanwhile, I hope you’ll make these baguettes. Let me know what you think. If you’ve tried RYZE flour blends, share your findings on my facebook page, too. You can purchase RYZE flour blends at Amazon or wait for the drawing. Perhaps you’ll be one of our lucky winners.
Honey Sesame Baguettes
Makes 3 baguettes
This might just become your new favorite go-to bread. These chewy baguettes are full of flavor and texture thanks to a blend of RYZE Yellow flour and a few additional ingredients. The RYZE flour adds moisture, too, so the crumb is delicate and delicious. Cooled baguettes freeze well.
2 tablespoons ground flax seed
3 tablespoons hot water
2 cups RYZE Yellow Flour Blend
1 cup sorghum flour
¼ cup almond flour
¼ cup potato flakes
½ teaspoon baking powder
1 teaspoon kosher salt
3 teaspoons active dry yeast
1/3 cup safflower oil or other neutral oil
3 tablespoons honey
2 large eggs
1 ½ cups warm milk or water (about 100° F)
Beaten egg to brush on baguettes
Sesame seeds, optional
Line a 3-channel baguette pan with strips of parchment paper. Each should be a little wider than the channel. Spray the parchment sheets with PAM spray and set aside.
In a small bowl, combine the flax and hot water and set aside until mixture thickens.
In the bowl of a stand mixer fitted with the paddle attachment (or a large bowl, if blending by hand), place Ryze flour, sorghum flour, almond flour, potato flakes, baking powder, and salt. Mix on low speed until well combined. Add the yeast and mix again until well combined.
Combine oil, honey, eggs, and flax mixture and mix. Add egg mixture and milk to dry ingredients.
Turn the mixer up to medium speed and beat for 4 minutes. The dough should be thick and smooth.
Scoop an equal amount of the dough into each of the 3 baguette forms. Smooth the dough with the sides of the parchment paper.
Cover the pan with plastic wrap and place in a warm, moist, draft-free spot to rise for 30 to 40 minutes.
While the baguettes are rising, preheat oven to 375°F. When nearly doubled in size, brush the top of each baguette with the beaten egg and sprinkle the top with sesame seeds, if using.
Bake for 25 to 30 minutes in the preheated oven until lightly browned. Cover baguettes with aluminum foil or parchment paper after about 20 minutes if the tops are browning too quickly.
Remove to a cooling rack and cool completely before slicing. Or pull apart pieces of warm bread, dip in olive oil and enjoy.
Categories: Recipes | Tags: easy gluten free recipes, gluten free baking, gluten free bread, gluten free RYZE flour | 3 Comments »
Makes 6 Burgers
Recipe By Beth Hillson

Memorial Day signals the unofficial start of summer. It’s time to start your barbecues! Here’s one of my go-to recipes that is part of every barbecue at my house. Vary the add-ins and add-ons to suit your taste. Try adding chopped shiitake mushrooms when you sauté the onions. Top the burgers with fresh sauerkraut, tangy pickles or fruit slaw. Serve these with your favorite condiments, too. Whatever way you present these, they are sure to be a hit.
The secret is to use ground turkey. (I prefer the dark meat.) It pairs well with so many flavors. Sautéing the onions (and other veggies) first lends a nice punch to the burgers as well. Don’t forget to pick up some of your favorite gluten free buns.
1 small onion, chopped
1 tablespoon olive oil
3 slices gluten free bread
1 ½ pounds ground dark meat turkey
¼ cup flavorful gluten-free barbecue sauce, smoked or tangy is best, more to top burgers
1 cup shredded cheddar cheese
Salt and pepper to taste
Gluten-free coleslaw
6 gluten free hamburger rolls (Udi’s or Canyon Bakehouse are my two faves)
Heat a grill to medium heat or preheat oven to 375 degrees.
Set a large lightly oiled ovenproof skillet on the stovetop or on the grill and heat to medium high. Sauté onion (other veggies, too) in olive oil until soft and slightly caramelized. Set aside to cool. Keep the skillet handy. You’ll need it for the burgers.
Microwave bread for 30 to 45 seconds or just until soft. Tear into small pieces. In a large mixing bowl, combine bread pieces, ground turkey, barbecue sauce, cheese, and salt and pepper. Add onions (other veggies, too) and mix well.
Form into six burgers. Put the skillet back on the stovetop or on the grill. The skillet should still have a coating of oil. If not, add a tiny bit more (1 to 2 teaspoons). Add burgers and brown for about 3 minutes. Flip to brown the other side.
Close the lid on the grill to finish cooking the burgers, about 10 minutes or until they are no longer pink in the center or set skillet with burgers in the oven and bake 10 to 15 minutes or until center is no longer pink.
Here’s another way to grill the burgers: Start burgers in the cast iron skillet placed on the grill with the temperature set at medium heat. Cover the grill and cook for 5 minutes. The outside will become firm, preventing the burger from sticking to the grids. Turn the burgers onto the grid to grill and brown for an additional 10 minutes, flipping midway through.
Toast or warm rolls. Serve one burger on each roll with coleslaw and extra barbecue sauce.
Categories: Recipes | Tags: gluten free barbecue, gluten free bread, gluten free burgers, gluten free rolls, gluten-free recipes, summer recipes | 1 Comment »
Christine from New Zealand wrote to say, “I haven’t had a Crumpet for years and wondered if you had a recipe for gluten free crumpets?”
She piqued my interest as I had never had one. So I did a bit of research. Crumpets are made with a rather thin yeast batter and are cooked on a bake stone or griddle in crumpet or English muffin rings. The distinguishing feature of real crumpets is their pliable texture and the characteristic holes into which butter deliciously melts and oozes.
After reading a mainstream formula, I developed this recipe makeover. These crumpets are soft, light in texture and quite tasty. You will not be disappointed. Add your favorite jam or slather with butter. I like both. If you are not able to get one of the all-purpose flour blends I mentioned here, you can use any flour blend you have available.
Crumpets by Beth Hillson 
This recipe makes 8 to 10 crumpets.
1 ½ cups all-purpose gluten-free flour blend such as Gluten-Free Pantry All-Purpose Flour or King Arthur Multi-Purpose Flour
½ cup sorghum flour
2 ¼ teaspoons dry active yeast
1 teaspoon of sugar
½ teaspoon cream of tartar
¾ cup warm milk (about 110 degrees)
½ cup warm water (about 110 degrees)
1 ½ teaspoon baking powder
1 teaspoon baking soda
1 tablespoon melted butter
TIP: If using a blend that does not contain gum and salt, add 1 teaspoon xanthan gum and ½ teaspoon salt.
1) Combine flours, yeast, sugar, cream of tartar and blend. Add warm milk and water and beat for 3 minutes. Cover with plastic wrap and let stand in a warm place for about 20 minutes. The thick batter should double in size.
2) Add baking powder, baking soda and butter and beat for 1 minute or until well mixed. Cover and let stand 10 minutes.
3) Preheat a griddle to 350 degrees. Coat 8 to 10, 3 ½ inch English muffin rings well with vegetable spray. Set on griddle, bake stone or large skillet (see note below).
4) Place enough mixture into the center of each ring to come halfway to the top of the ring. Cook for 4-6 minutes over medium heat, until bubbles appear over the entire surface, and the dough appears ‘dry’.
5) Use tongs to remove the ring. Turn the crumpet over and cook an additional 2 to 4 minutes to brown the top. Remove from the pan and cool on a baking rack. Split and enjoy. Or, if thin enough, do not split before eating.
Notes: Alternatively, make thinner crumpets by filling only one-third of the way up the rings. These do not need to be cooked on the second side. If you don’t have a griddle, heat a heavy cast iron skillet and line it with as many rings as possible. You’ll need to make these in more than one batch.
Categories: Recipes | Tags: gluten free, gluten free bread, gluten free crumpets, gluten free recipe, gluten-free makeover | 2 Comments »
Follow Us Online
More Cookbook Stuff
Gluten-Free Makeovers - - Nearly 200 recipe makeovers for everyone to enjoy. Buy it at glutenfreeandmore.com, Amazon.com and barnesandnoble.com.
About This Blog
 Baking guru, Beth Hillson, transforms favorite foods into recipes that are safe for your gluten-free diet.


