Blog Archives
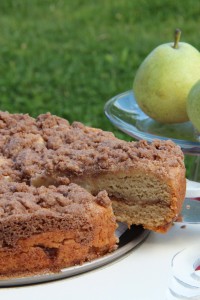
Pear Coffee Cake
As a baker, I am reluctant to let go of certain sacrosacnt ingredients. Eggs is one of those precious commodities. Then a colleague who is gluten and egg-free asked me if I could convert a coffee cake recipe so she could enjoy, too. I recalled that, back in the days when I owned the Gluten-Free Pantry, I had made many recipes where I replaced eggs with silken tofu, flax gel (1 tablespoon flax meal with 3 tablespoons of hot water) or even with applesauce. I dug out my favorite coffee cake recipe, already gluten-free, and went to work. The results were delicious.
This stunning coffee cake uses soy (or coconut) yogurt and pear puree. The yogurt adds back some of the protein from the eggs and the pear puree, like applesauce, contains pectin which tenderizes the cake. I added a little bit more baking powder to help it rise, usually another job done by the eggs. 
This is comfort food at its best and begs for a cup of coffee or tea. I also like to make this with apples and applesauce.
1 cup sugar
1 ½ cups All-purpose Gluten-Free Flour Blend
½ cup sorghum flour
2 teaspoons xanthan gum*
½ teaspoon salt*
2 teaspoons baking powder
1 teaspoon baking soda
1½ cups soy or coconut yogurt (flavored yogurt works well)
6 tablespoons vegetable oil
4 tablespoons pureed baby pear puree or unsweetened applesauce
½ cup peeled and chopped ripe Bartlett, Bosc or red pears, or diced canned pears
Crumble Topping (below)
Preheat the oven to 325°F and lightly oil a 9-inch springform pan.
Combine the sugar, flour blend, sorghum flour, xanthan gum, salt, baking powder, and baking soda in a large bowl. Set aside.
Combine the yogurt, vegetable oil, and pear puree in a mixing bowl and beat until smooth. Add the dry ingredients and beat until smooth. Fold in chopped fruit.
Spoon half the batter over the bottom of the prepared pan and smooth to the edges of the pan. Cover with half of the crumb mixture. Spoon the remaining batter over the crumb topping and smooth to the edges. Sprinkle the remaining topping over the top.
Bake 50 to 55 minutes, until cake tester comes out clean and center springs back when gently touched.
Cool 10 minutes in the pan. Remove the rim of the pan and cool completely on a wire rack. Serve.
*If your all-purpose blend contains salt and gum, omit the salt and reduce the gum to ½ teaspoon.
Crumble Topping
½ cup rice flour
½ cup packed brown sugar
2 teaspoons ground cinnamon
¼ teaspoon ground allspice
1/8 teaspoon ground cloves
¼ teaspoon salt
4 tablespoons unsalted butter or non-dairy buttery spread, at room temperature
Combine the flour, brown sugar, cinnamon, allspice, cloves, and salt in a large bowl. Mix well. Add the butter and use fingertips or a fork to mix just until crumbly.
This can be made ahead and stored in the refrigerator for up to 2 weeks.
Categories: Recipes | Tags: baked goods, coffee cake, coffee cake recipes, comfort food, dairy-free, egg-free, gluten free, Sweets | 2 Comments »
I recently asked people what they missed most after they became gluten-free. The number one answer was Chicken and Dumplings followed by Roasted Turkey with Gravy and Stuffing, Chicken Pot Pie, and Lasagna – – comfort foods we all equate with nourishing goodness.
Comfort food and I go back a long way. Before I was diagnosed with celiac disease, when my tummy didn’t feel right, I would walk to the nearest Brigham’s in downtown Boston and order a hot turkey sandwich. The plate would be heaped with slices of turkey that had already left their indentation on two slices of Wonder Bread and their intention imprinted on my heart. The sandwich was swimming in turkey gravy, a mound of sage and celery dressing was casually deposited to the side and a little white pleated paper cup of cranberry sauce was propped against the meat. It was the only color on the otherwise anemic plate that matched my pasty complexion in those days. As I took the first bite, a fork full of equal parts turkey, bread and stuffing, I could feel wellness heading my way. This was my comfort food. But, ironically, I was dosing myself with the same medicine that was making me sick. Who knew?!
As I got sicker, my craving for comfort food increased. If it wasn’t a hot turkey sandwich, I ordered chicken and dumplings, or chicken pot pie. They engaged my soul and I felt good. My body, however, was another story. Hours later, I would feel that familiar tightening in my tummy, that slow burn and indigestion. By then the memories of my comfort food were far away. I would not correlate the meal I had eaten four hours ago with the queasiness I was experiencing now. For many years, I would not realize that the food I loved did not love me back.
When people on a gluten-free diet picked the same foods I craved before diagnosis, it made me wonder if they had similar memories. Perhaps they, too, remembered the days when they sought out these dishes in hopes of feeling better, in hopes of finding comfort. Perhaps “comfort food” has a double meaning for all of us who are gluten intolerant – – an unrequited love of old and a new, gluten-free love fulfilled.
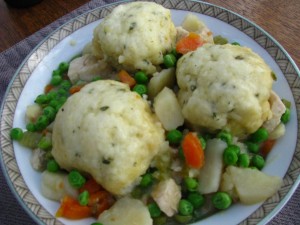
Hands down, the ultimate comfort food seems to be Chicken and Dumplings, the recipe I am asked to makeover more than any other. It sends me back to those days when I tried to find comfort at Brigham’s lunch counter, when I knew something was missing and tried to replace it with a nourishment that was ultimately my undoing.
And it sent me to my recipe files for a makeover because it seems that making this dish into a delicious gluten-free recipe is a challenge. Readers say the dumplings are too hard, or they break apart in the liquid; they are too dense, too dry. I had the same experience at first. I dug out the dish from my past, the one my mother made in our Yankee kitchen (although this recipe has its roots in Southern traditional), and I tried to create something equal to the taste and texture of the meal I remembered. After several tries, I got it just right!
Here’s How I Made it Over
The first time I made this with a high protein flour blend. The results were tasty but too dense. The dumplings didn’t rise and fill the pot as I expected. Then I opted for a white flour blend and added baking powder and butter. This time, they were just right. The dumplings had doubled in size; they filled the pan! The texture was light and they had the mouthfeel I remembered from my gluten-filled years.
The first time, I poached a whole chicken in broth and vegetables, the way my mother had done. But no one has time to wait that long for a delicious meal. Next time, I poached boneless chicken breasts. They take 5 to 10 minutes. You could also purchase a cooked rotisserie chicken, as long as it’s gluten-free, and remove the meat from the bone. As a final tip, you’ll want to scoop the dumpling dough onto simmering (not boiling) liquid and cover the pot tightly. Don’t peek while the dumplings cook. These aren’t as tasty as leftovers, so you’ll have to eat them all in one sitting which should not be difficult.
This is a food that will nourish your soul AND your tummy.
Chicken and Dumplings Serves 4
1 quart gluten-free chicken stock, more as needed
1/4 cup dry sherry or vermouth (optional)
1 clove garlic, crushed
1 pound boneless, skinless chicken breast
Salt and freshly ground pepper
1 medium onion, roughly chopped
2 celery stalks, trimmed and chopped
3 medium carrots, peeled and chopped
3 medium parsnips, peeled and chopped
2 medium potatoes peeled and cubed
1 teaspoon dried thyme
3/4 cup frozen peas, thawed
1/4 cup minced fresh parsley leaves
Ground black or white pepper
Dumplings
(Makes about 12 dumplings)
2 cups all-purpose gluten-free flour blend*
3 teaspoons baking powder
3/4 teaspoon salt
2 to 3 tablespoons minced fresh chives or other fresh herbs
2 tablespoons butter, melted
3/4 cup + 2 tablespoons milk of choice
1 large egg, beaten
Heat the chicken stock to a gentle simmer in a medium saucepan. Add sherry, if used, and garlic. Add chicken breasts and salt and pepper to taste. Poach covered for 5 minutes. Using a slotted spoon, remove the breasts and cool. Skim foam off the surface of the liquid.
Return the pot of chicken broth to medium-high heat. Add the onion, celery, carrot, parsnips, potatoes, and thyme. Cover and simmer vegetables until just fork tender (about 10 minutes), while making the dumplings.
Make the dumpling batter by sifting together flour, baking powder, and salt in a medium bowl. Add chopped chives or other fresh herbs. Add melted butter, milk and egg to the dry ingredients. Gently mix with a wooden spoon or fork until mixture is moist and comes together. Do not overmix or dumplings will be too dense.
Cube the chicken and return to the pot. Add additional broth if mixture is too thick or liquid has cooked down too much. Return to a simmer.
Drop dumpling batter into the simmering stew by heaping tablespoonfuls, over the surface of the stew. (Note that the dumplings will double in size as they cook.) Cover and simmer until dumplings are cooked through, about 15 minutes. Do not uncover and peek while the dumplings are cooking. In order for the dumplings to be light and fluffy, they must steam, not boil. Uncovering the pan releases the steam. If after 15 minutes they are still not cooked through (use a toothpick or skewer to test) cover pan again, and cook for another 5 minutes.
Gently stir in peas and parsley. Ladle portions of meat, sauce, vegetables, and dumplings into soup plates and serve. Note that the stew will continue to thicken as it sits.
* If all-purpose flour blend contains salt, do not add additional salt. If blend does not contain xanthan or guar gum, add 1 teaspoon gum to the dry ingredients.
Here’s the blend I like to use:
Basic Blend
2 ¾ cups rice flour
1 ¼ cups corn or potato starch
1/3 cup tapioca flour
Categories: Recipes | Tags: chicken and dumplings, comfort food, dinner, gluten free, main dishes, meals, one dish makeovers, recipes | 24 Comments »


 Baking guru,