
Blog Archives
Makes 24 large cookies
Looking for an easy, last-minute cookie to round out your holiday baking? These are just the thing. Soft and chewy with the right amount of crispness, these cookies will become a staple in your house. Bites of candied ginger add a delightful explosion of flavor and a blend of vibrant spices – cinnamon, allspice and ground ginger- lend festive notes to these simple cookies. They are even tastier the second day.
If you prefer crispy cookies (aka ginger snaps), bake 10 to 11 minutes. Otherwise, cook a smidge under 10 minutes. Cookies may seem a little underdone when they come out of the oven, but will firm up as they cool. If you can get your hands on RYZE Blue Flour Blend, it adds remarkable chewiness to these cookies. However, you can make them with any all-purpose gluten-free flour blend. (Increase the amount of flour to 2 cups and add 1 teaspoon xanthan gum if it is not in the blend.)
1 ¾ cups Ryze Blue Flour Blend or 2 cups gluten-free flour blend with 1 teaspoon xanthan gum
2 teaspoons baking soda
2 to 3 teaspoons ground ginger (depending on your taste buds)
1 teaspoon ground cinnamon
½ teaspoon ground allspice
¼ teaspoon salt
¾ cup organic shortening
1 cup packed light brown sugar
1 large egg
¼ cup light (Original flavor) molasses
1 teaspoon cider vinegar
½ cup finely chopped candied ginger
Line 2 baking sheets with parchment paper. Preheat oven to 375 degrees.
In a medium bowl, whisk together flour blend, baking soda, ginger, cinnamon, allspice, and salt. Set aside.
In a medium bowl, beat the shortening and the sugar until mixture is fluffy, about 2 minutes.
Add the egg, molasses, and vinegar and beat well.
Add the flour mixture and beat until smooth. Fold in the chopped candied ginger.
Scoop out generous tablespoon-size portions of dough. Roll in a ball and set on baking sheets, at least 1 inch apart. Flatten each ball into a disk about ¼ inch in thickness.
Sprinkle with granulated sugar. Bake 8 to 10 minutes or until the tops of the cookies are set and slightly brown on the edges. Do not overbake. Remove from the oven and let rest on the pans for 5 minutes before turning onto a wire rack to cool completely.
Cooled cookies may be frozen.
Makes 24 large cookies

A Recipe by Beth Hillson
Yield: 24 bars
This is my latest go-to dessert. I take it to pot luck dinners, bake sales, you name it! It’s easy, delicious and amazingly versatile. Use whatever fruit is in season. Vary the sweetness of this recipe by adding more or less sugar depending on your tastebuds and the natural sweetness of the fruit. The bars freeze well.
I made these using RYZE Blue Flour Blend. Instead of measuring out a bunch of flours, I use 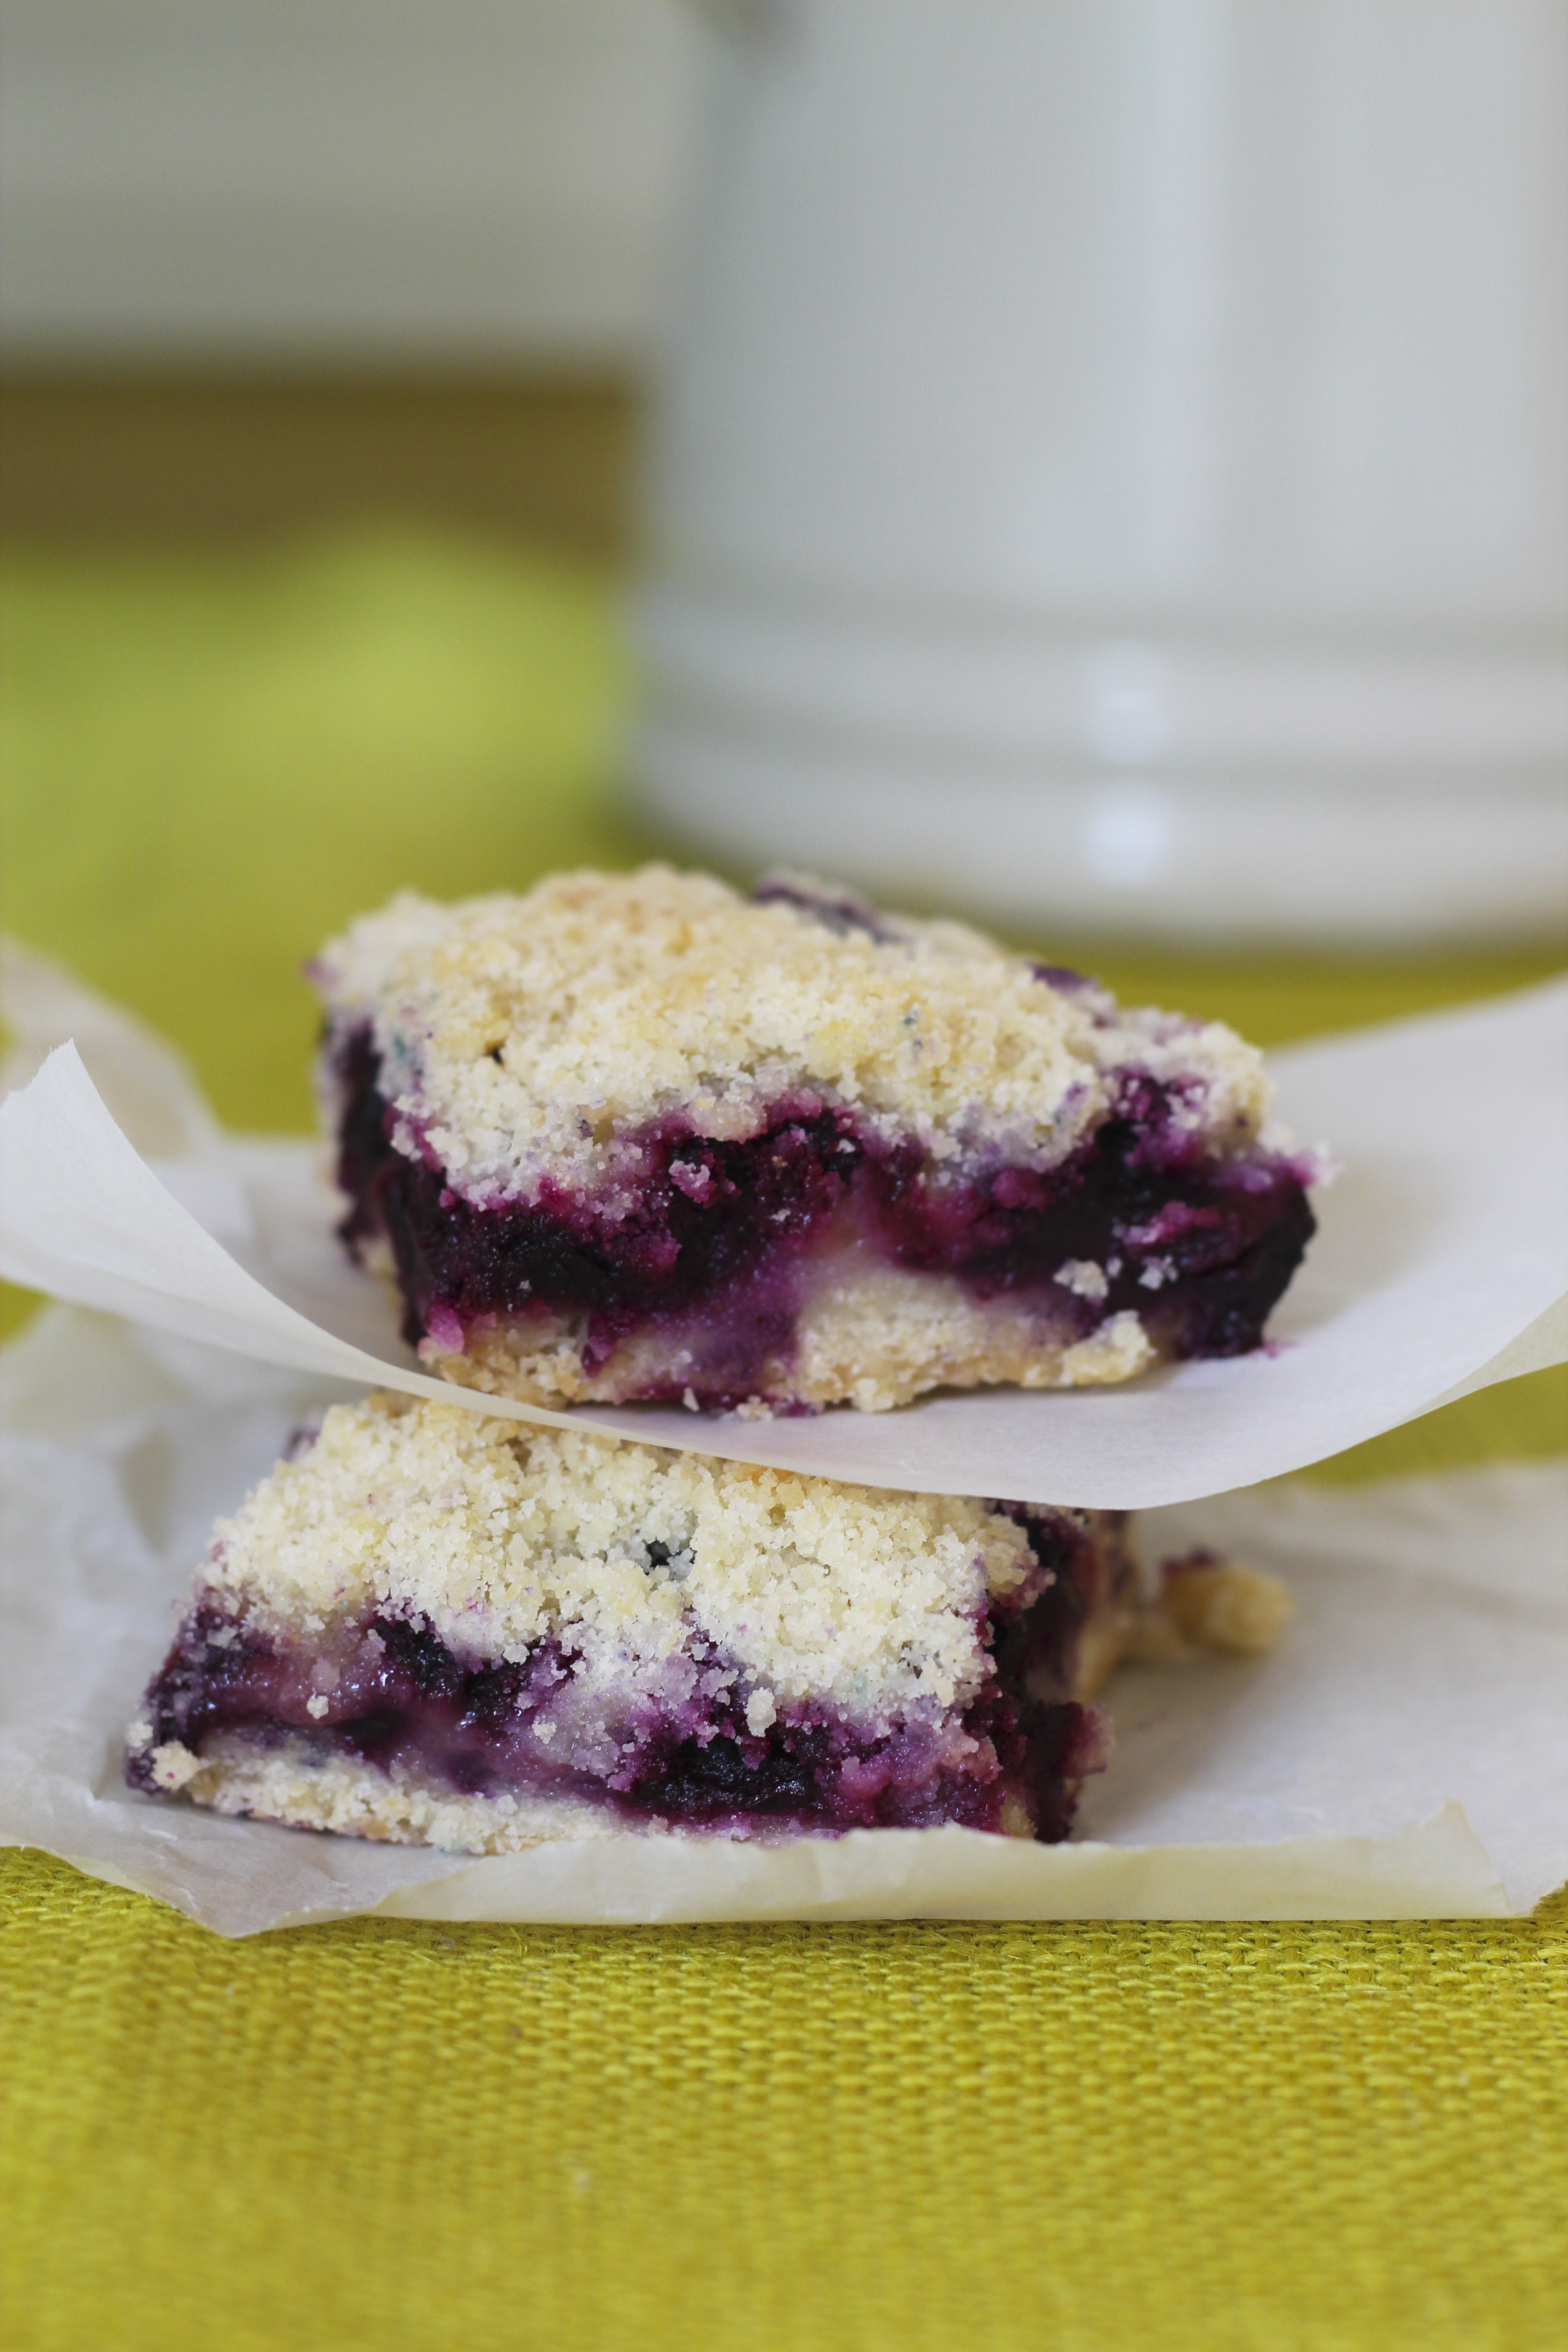 one ingredient. However, you could certainly make this with any A/P flour blend. Make sure it contains xanthan gum or add 1 teaspoon xanthan gum to the recipe.
For the Dough
3 cups RYZE Blue Flour Blend or an A/P Gluten-Free Flour Blend that contains xanthan gum
1 cup granulated sugar
1 teaspoon baking powder
¼ teaspoon salt
1 cup (2 sticks) unsalted butter, cold, cut into small pieces
1 large egg, lightly beaten
For the Filling
4 cups (2 pints) fresh blueberries of 5 cups peeled, sliced peaches or apples (about 6-7)
1 tablespoon lemon juice
1 teaspoon vanilla
½ cup RYZE Blue Flour Blend or an A/P Gluten-Free Flour Blend that contains xanthan gum
½ to ¾ cup granulated sugar
¼ teaspoon salt
½ teaspoon ground cinnamon
¼ teaspoon ground nutmeg
Preheat the oven to 375 degrees F. Line a 9×13-inch baking pan with aluminum foil and coat with vegetable spray.
Make the Dough: In the bowl of a food processor fitted with the knife blade, add the flour, sugar, baking powder and salt. Pulse several times to combine. Add butter and pulse until mixture resembles coarse meal (about 10 pulses). Add the egg and pulse briefly. Empty contents into a large bowl. With a fork, mix the dough until egg is distributed evenly. Dough will be crumbly. Or combine dry ingredients in a medium bowl. Use a pastry blender to cut in the butter, and then the egg.
Pat half of the dough into the prepared pan. Place the pan and the remainder of the dough in the refrigerator to stay cold while preparing the filling.
Make the Filling: Place the washed and drained blueberries in a large bowl and sprinkle with lemon juice and vanilla. Mix gently. In a separate bowl, whisk together the flour, sugar, salt, cinnamon and nutmeg. Sprinkle over the fruit and toss gently with a wooden spoon.
Spread the fruit mixture evenly over the crust. Crumble the remaining dough over the blueberries.
Bake in the preheated oven for 45 minutes, or until the top is slightly brown. Cool completely before cutting into squares.
Categories: Recipes | Tags: baking, blueberries, dessert recipes, easy quick gluten-free dessert, gluten free baking, gluten-free recipes, Sweets | No Comments »
By Beth Hillson
I’ve worked with RYZE flour blends (yellow and blue) for several months now. Here are some of my findings. The blends produce superior results in many applications, cookies, biscuits, pie crust, scones, cakes, and muffins among them. These recipes show off the best of RYZE.
For other baked goods, specifically yeast breads, pizza and some cakes, the final results seem undercooked (gummy) on the inside although the outside is fully baked. Some other bakers have reported the same findings. For these items, I find that adding ½ to ¾ cup of an additional flour like sorghum, millet or corn flour brings out the best of RYZE’s characteristics.
Here’s why. RYZE is made up of a blend of rice flours. Just like rice itself, (think, short grain, sushi, or long grain rice) some of these rice flours absorb more liquid than others. That’s the beauty of RYZE. The added moisture produces baked goods that remain moist for several days even when I’ve left them on the counter. That’s amazing in itself since gluten free products dry out so quickly.
That isn’t necessarily the best when it comes to yeast bread recipes, I’ve found. The moisture retention produces a gummy inside texture. The fix is pretty simple. I added sorghum flour to “tame” those hydroscopic properties. In these baguettes, I also added almond flour and potato flakes. The result was terrific. The baguette recipe is one that you will want to make over and over.
RYZE is still revolutionary, even for these recipes. Think about it. You get the best of gluten free flour – products with great texture and moisture – and without any gums. I don’t know about you, but until now, I have always used a lot of gum in breads and pizza, so this is pretty liberating.
Want to try RYZE blends for yourself?
I’m doing a giveaway to ten lucky people. Just “Like’ Gluten-free Makeovers on facebook or send me an email at beth@glutenfreemakeovers.com and you’ll be entered to win. I’ll tell you more soon.
Culinary Curiosity
Meanwhile, I hope you’ll make these baguettes. Let me know what you think. If you’ve tried RYZE flour blends, share your findings on my facebook page, too. You can purchase RYZE flour blends at Amazon or wait for the drawing. Perhaps you’ll be one of our lucky winners.
Honey Sesame Baguettes
Makes 3 baguettes
This might just become your new favorite go-to bread. These chewy baguettes are full of flavor and texture thanks to a blend of RYZE Yellow flour and a few additional ingredients. The RYZE flour adds moisture, too, so the crumb is delicate and delicious. Cooled baguettes freeze well.
2 tablespoons ground flax seed
3 tablespoons hot water
2 cups RYZE Yellow Flour Blend
1 cup sorghum flour
¼ cup almond flour
¼ cup potato flakes
½ teaspoon baking powder
1 teaspoon kosher salt
3 teaspoons active dry yeast
1/3 cup safflower oil or other neutral oil
3 tablespoons honey
2 large eggs
1 ½ cups warm milk or water (about 100° F)
Beaten egg to brush on baguettes
Sesame seeds, optional
Line a 3-channel baguette pan with strips of parchment paper. Each should be a little wider than the channel. Spray the parchment sheets with PAM spray and set aside.
In a small bowl, combine the flax and hot water and set aside until mixture thickens.
In the bowl of a stand mixer fitted with the paddle attachment (or a large bowl, if blending by hand), place Ryze flour, sorghum flour, almond flour, potato flakes, baking powder, and salt. Mix on low speed until well combined. Add the yeast and mix again until well combined.
Combine oil, honey, eggs, and flax mixture and mix. Add egg mixture and milk to dry ingredients.
Turn the mixer up to medium speed and beat for 4 minutes. The dough should be thick and smooth.
Scoop an equal amount of the dough into each of the 3 baguette forms. Smooth the dough with the sides of the parchment paper.
Cover the pan with plastic wrap and place in a warm, moist, draft-free spot to rise for 30 to 40 minutes.
While the baguettes are rising, preheat oven to 375°F. When nearly doubled in size, brush the top of each baguette with the beaten egg and sprinkle the top with sesame seeds, if using.
Bake for 25 to 30 minutes in the preheated oven until lightly browned. Cover baguettes with aluminum foil or parchment paper after about 20 minutes if the tops are browning too quickly.
Remove to a cooling rack and cool completely before slicing. Or pull apart pieces of warm bread, dip in olive oil and enjoy.
Categories: Recipes | Tags: easy gluten free recipes, gluten free baking, gluten free bread, gluten free RYZE flour | 3 Comments »
Recipe from Beth Hillson
Serves 16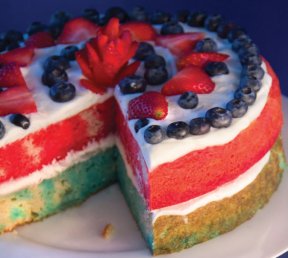
Here’s a great way to celebrate the Fourth of July. Layers are colored red and blue with the help of Jell-O. Fresh strawberries and blueberries are a no-fuss decoration and whipped cream makes the cake look luscious. The cake can be stored, well wrapped, for 3 days in the refrigerator. Do not freeze.
Make this easy, decorative dessert for any celebration by varying the Jell-O flavors and colors to match the holiday. This works with natural gelatin products, too. If you can’t find the color you want, use unflavored gelatin and color with natural food dye. Add a few drops of a flavor extract of your choice, if desired.
1 recipe (2 layers) baked Perfect Layer Cake (below)
2 cups boiling water, divided
1 (3-ounce) package Jell-O raspberry or strawberry gelatin
1 (3-ounce) package Jell-O berry blue gelatin
1 (8-ounce) container very cold heavy cream, coconut cream or prepared whipped topping, divided
1 cup confectioners’ sugar
½ teaspoon pure vanilla extract
1 cup fresh blueberries
1 cup sliced fresh strawberries
Prepare Perfect Layer Cake. Cool the 2 baked layers in their pans. Pierce each cake with a fork at ½-inch intervals.
Using 2 medium bowls, add 1 cup boiling water to each Jell-O flavor. Stir well to dissolve. Pour raspberry-flavored Jell-O over 1 cake layer and berry blue over other cake layer. Refrigerate several hours until firm.
Make whipped cream by beating heavy cream on medium speed, then high speed until thick. Add confectioners’ sugar and vanilla and beat until mixture is very thick. Refrigerate until ready to use. (If using prepared dairy-free whipped topping, skip this step.)
To unmold cake layers, place each pan in a sink with hot water touching just the bottom of the pan for 15 to 30 seconds. Unmold one layer by inverting it onto a cake plate. Spread 1 cup whipped cream on top. Unmold other layer and place on top of whipped cream.
Frost top of cake with more whipped cream. If desired, use extra whipped cream to frost sides of the cake. Decorate with berries. Refrigerate about 1 hour before serving.
Perfect Gluten-Free Layer Cake
Makes 2, 9-inch layers
This makes a great layer cake that can be decorated any way you wish. For other cakes, you’ll want to dust the layer cake pans with white rice flour. For the Fourth of July Cake, do not dust the pans.
2½ cups Cake & Pastry Flour Blend (follows)
4 teaspoons baking powder
1¼ teaspoons xanthan gum
½ teaspoon baking soda
½ teaspoon salt
¾ cup (1½ sticks) unsalted butter, room temperature
1 ½ cups sugar
4 large eggs
2 teaspoons pure vanilla extract
¾ cup milk of choice
Preheat oven to 350°F. Lightly grease two 9-inch round cake pans that are 2 inches deep. Do not dust with flour if making Fourth of July Cake.
Combine flour blend, baking powder, xanthan gum, baking soda and salt in a large bowl. Whisk until well blended. Set aside.
In a large mixing bowl, beat together butter and sugar until smooth and fluffy. Add eggs and vanilla and beat on medium speed 2 minutes or until batter is smooth. Mix in dry ingredients. Add milk and beat until smooth.
Divide batter evenly between prepared pans and smooth tops. Place in preheated oven and bake 23 to 25 minutes or until tops are golden brown and a toothpick inserted in the center comes out clean.
Remove from oven and let cool in the pans. Follow directions above to make Fourth of July Cake or let cool 10 minutes in pans and turn layers out onto a wire rack to cool completely before frosting.
Baker’s Tip: Use this recipe to make 24 cupcakes. To make cupcakes, spoon batter evenly into cups, filling about 2/3 full, and bake in preheated oven 15 to 18 minutes or until tops are golden brown and a toothpick inserted in the center comes out clean. Cool 10 minutes in pans before turning onto a wire rack to cool completely. Frost when cool.
Cake & Pastry Flour Blend
MAKES 2½ CUPS
1 cup white rice flour
¾ cup sorghum flour
¾ cup cornstarch, tapioca starch/flour or potato starch (not potato flour)
Whisk ingredients together. Store in a tightly covered container in the refrigerator. Bring to room temperature before using.
From Beth Hillson
When I was diagnosed with celiac disease in 1976, I lived in Europe. Glorious food was everywhere, but I didn’t know what I could and couldn’t eat. Sure, I stayed away from the obvious like brioche, croissant and pizza. (It brings tears to my eyes to think about all the goodies I missed.) But the subtle hidden sources of gluten were a problem and for that I went to culinary school – Cordon Bleu and Dieppe Cooking School for starters – to better understand the important components of baking and cooking. Along with learning important questions to ask (Is the fish dusted in flour? Is the sauce thickened?), I also learned to bake flaky crusts and brioche that, of course, I couldn’t eat.
Being a pioneering woman, I started to make over those recipes, maintaining the ratios but replacing the flour with rice flour and cornstarch, the only two ingredients I had in my pantry at the time. The results were decent enough to keep me returning to my mixing bowls. But I knew there was room for improvement – sometimes those crusts were more crumbly than flaky and rolls often bounced or served as doorstops. I shudder to think of how many gluten free sandwiches have fallen apart in my hands depositing mayonnaise, cold cuts and chunks of dry bread in my lap.
I knew I had a long way to go to replicate those rich baked goods that Chef La Court had taught us to make in France. But I was willing to try. After all, I reaped the benefits!
Admittedly, my Gluten-Free Pantry (GFP) mixes were light years ahead of anything else available in the eighties and nineties – revolutionary, almost. They provided many, many celiac patients with delicious homemade breads, muffins, brownies and such, and raised the standard we came to expect of our gluten free baked goods.
Since creating GFP in 1993, each iteration of gluten free baking has come closer to perfect. Don’t get me wrong. I’ve consumed my share of gritty, crumbly and dry food in my quest for excellent products. I’ve also tasted some amazing food along the way.
So, when RYZE Gluten Free asked me to try their new products (think, baking blends), I didn’t know what to expect – more gritty muffins and cookies or a product that might raise the bar once again.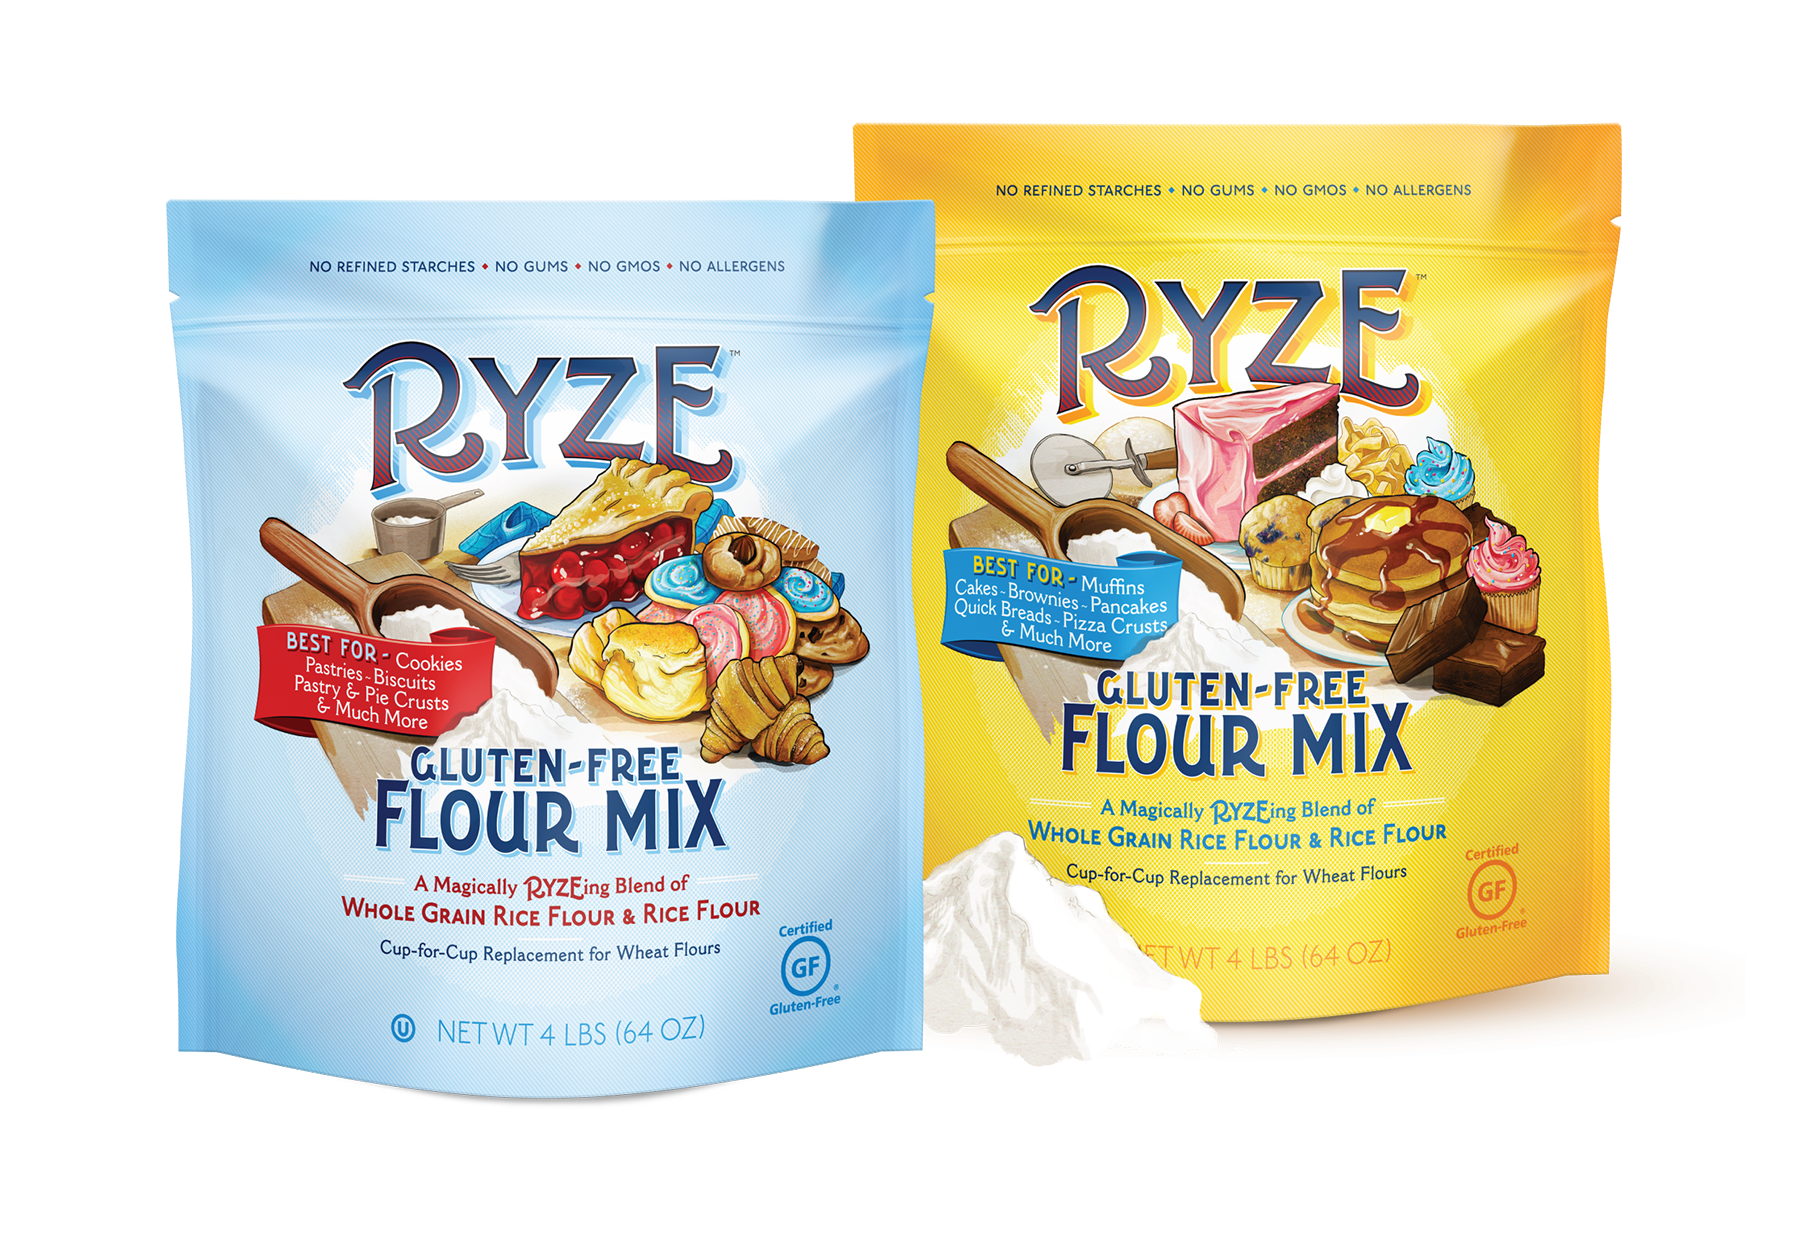
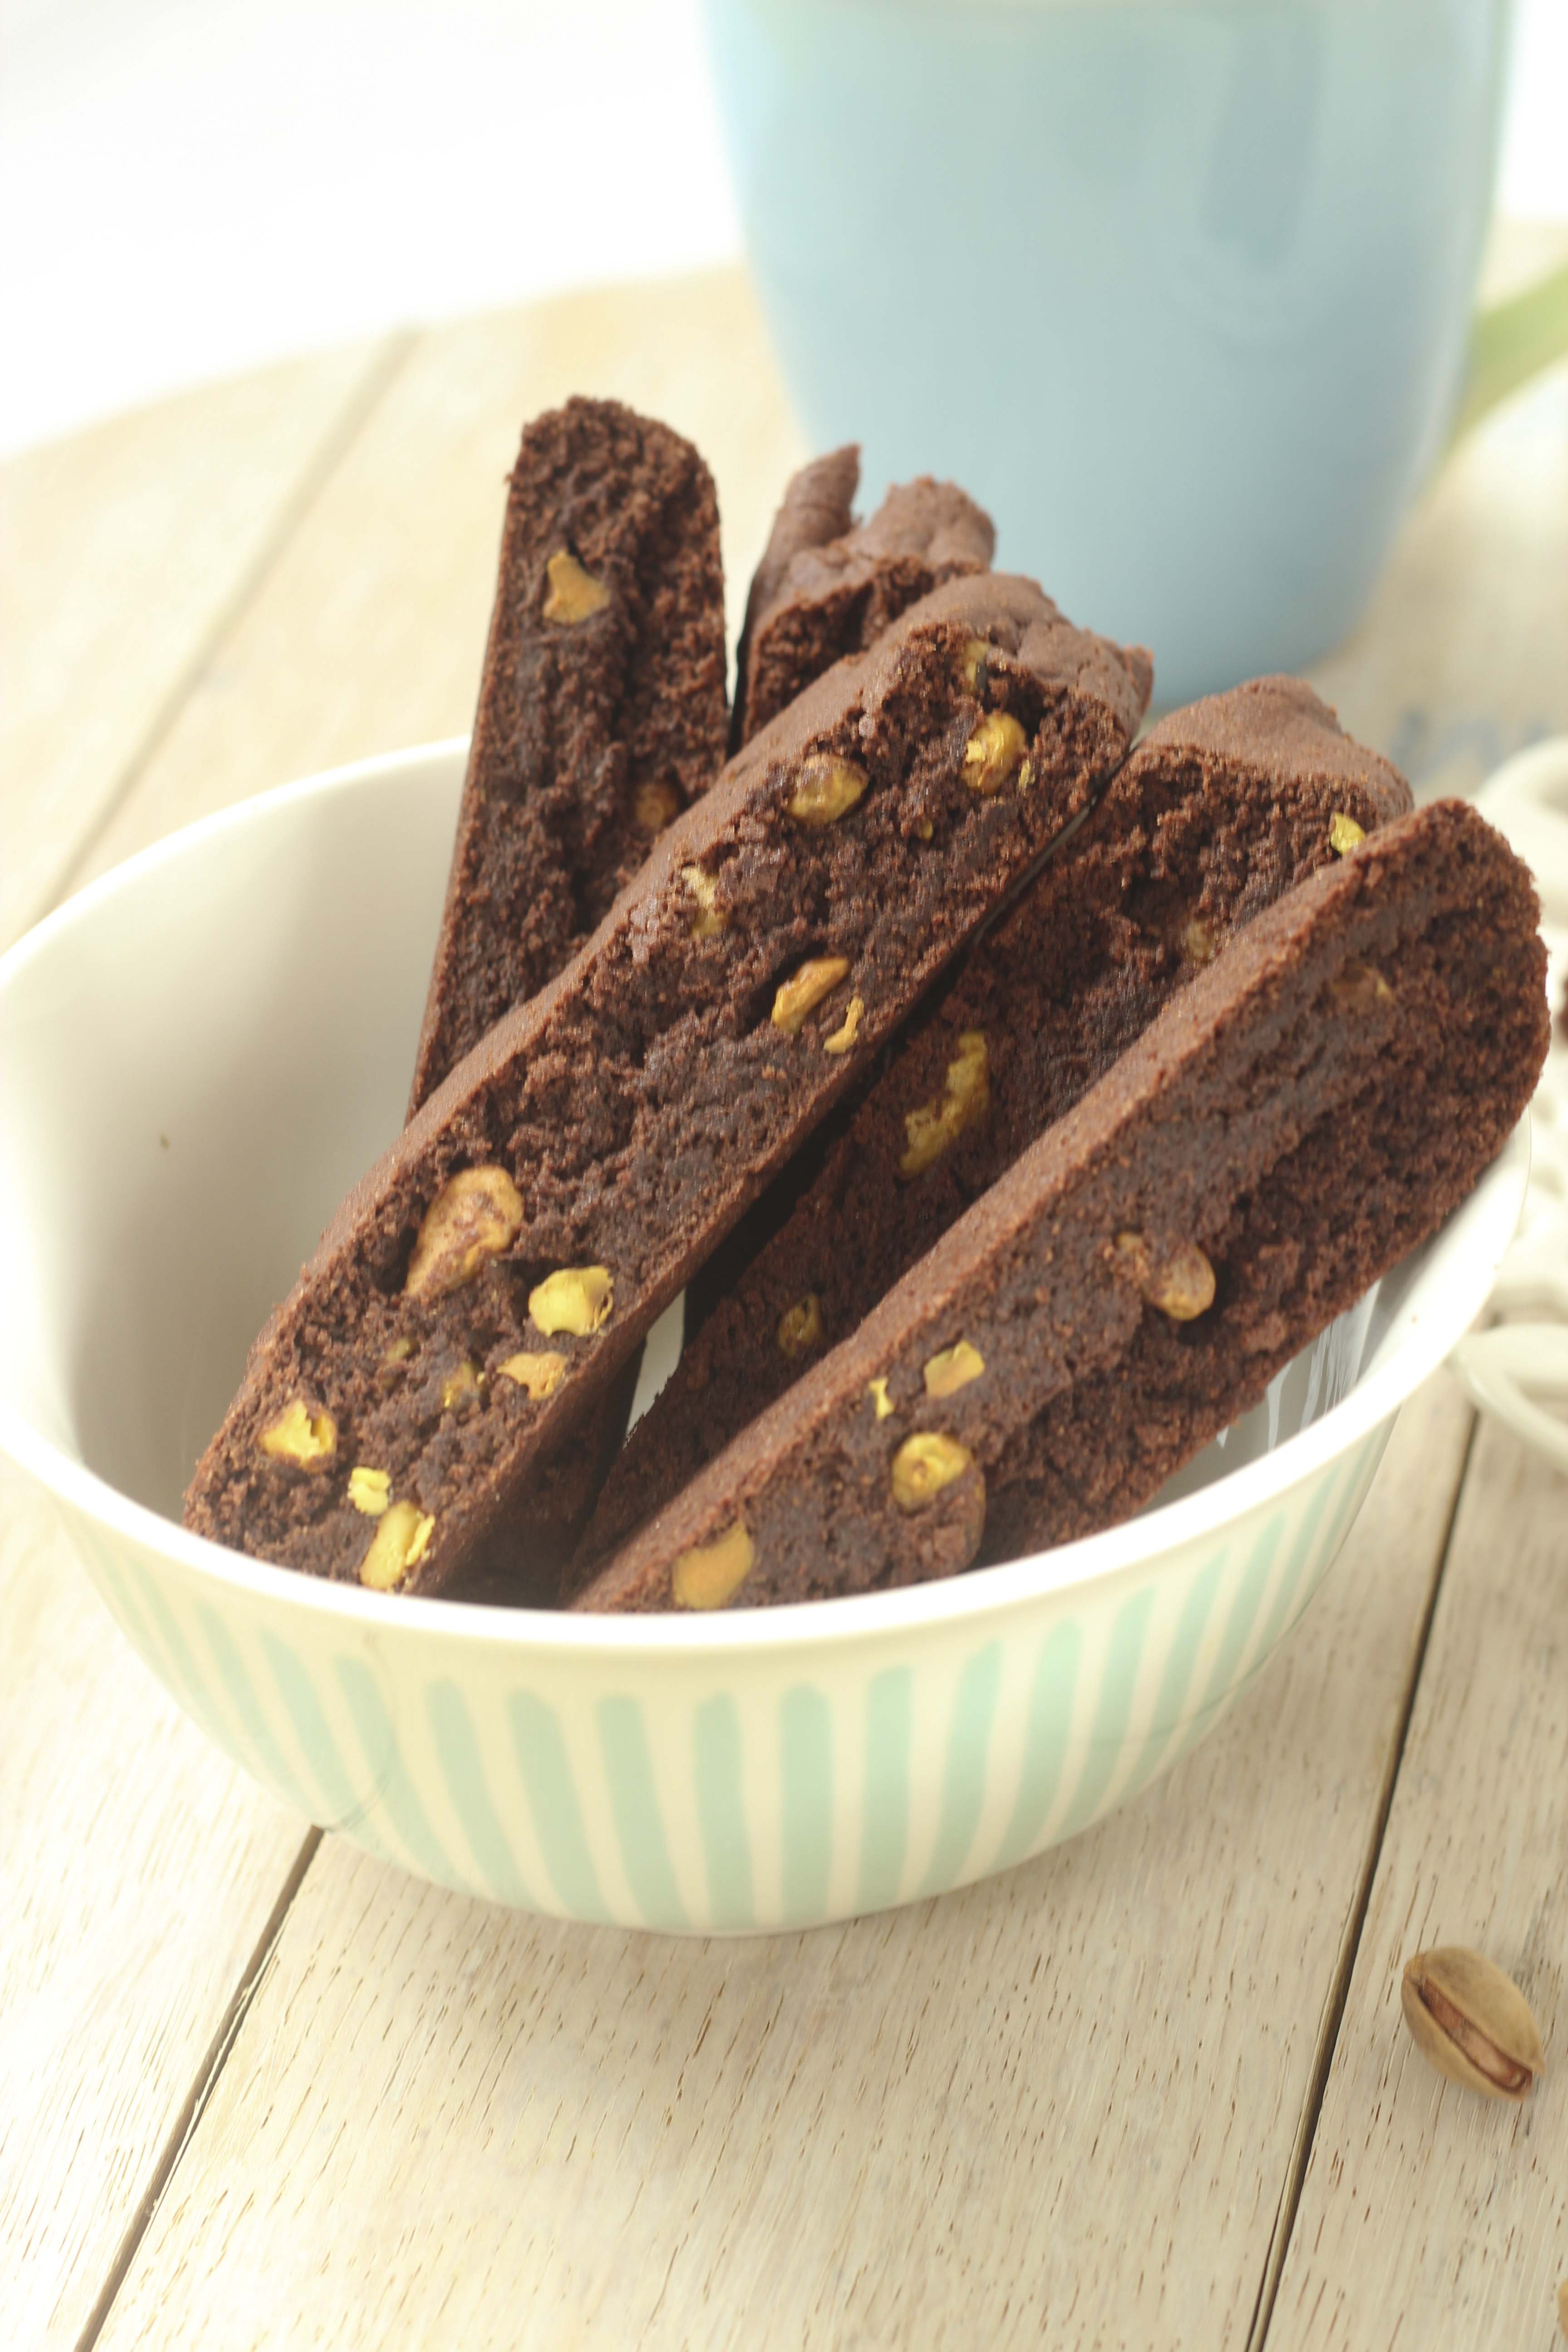
I tried their flour in my favorite biscotti recipe – chocolate pistachio biscotti, a recipe I know is already great. It seemed like that would be a good benchmark, a great way to compare something new with something tried and true.
I replaced my complicated flour blend with an equal amount of RYZE flour. Yup, just one ingredient (well, actually two- whole grain brown rice and white rice), no gums, no starches. Without starches and gums, RYZE also has a better nutritional profile than most flour blends.
I wondered how RYZE would stand up to a pantry-full of flours. I mixed up the recipe and formed it into a log. Then I popped it into the oven for the first baking. Here comes the tricky part. Gluten free biscotti is difficult to cut. I always lose some slices to breakage and crumbling. I cooled the log, transferred it to a cutting board and began to slice. The first slice came away whole – no breakage; no crumbled edges. The second was the same. I was able to cut the third, fourth, and fifth without losing a single slice. Hmmm. Pretty amazing.
When I finished cutting the biscotti, I baked them again, cooled them and stored them. I brought some to my sister who is also a gluten free baker. The biscotti recipe is really hers. Her first question was, what did you do to keep them from crumbling?
I knew then that I was on to something– something revolutionary.
I’ve since made focaccia, biscuits, cookies and much more. All are moist, light and have a delicate crumb. I’ll share more recipes another time. For now, I have to say that RYZE Gluten Free raises the bar … and lucky for all of us gluten free bakers.
Here’s my recipe to Chocolate Pistachio Biscotti and a picture of the RYZE packages.
Chocolate Pistachio Biscotti
Makes 20 Biscotti
I’ve made the biscotti with pistachios and with hazelnuts. Both are equally tasty.
1 ½ cups RYZE Blue Blend
¾ cup unsweetened cocoa powder
1 teaspoon baking powder
½ teaspoon baking soda
1/4 teaspoon salt
½ cup unsalted butter (1 stick) softened
1 cup sugar
2 large eggs
1 teaspoon pure vanilla extract
¾ cup shelled pistachios or chopped toasted hazelnuts
Preheat the oven to 350 degrees F. Line a shallow baking sheet with parchment paper.
Whisk together the dry ingredients: RYZE Blend, cocoa powder, baking powder, baking soda, and salt.
In a medium bowl, beat the butter with the sugar until light and fluffy (about 3 minutes).
Add the eggs and vanilla to the butter mixture and beat until blended. Add the dry ingredients and beat until incorporated.
Fold in the nuts. Knead mixture with your hands until smooth and nuts are well incorporated.
On prepared baking sheet, form the mixture into a log that is about 16 inches long and about 5 inches wide.
Bake 30 minutes. Remove from the oven to cool for 10 minutes. Maintain the oven temperature.
When cool enough to touch, gently transfer the log to a cutting board. Cut into about 20 slices of even thickness. Turn the biscotti on their sides on the baking sheet and bake 20 minutes.
Cool and store in an airtight container for several days or in the freezer for up to 3 months.
RYZE has two formulas – blue and yellow. Both are simply whole grain brown rice and white rice – no gums, no starches. They are designed for specific types of baking, spelled out on each package. The web site, just launched, has lots more recipes to try. In addition, you’ll have good luck replacing your flour blend with one of the RYZE blends in a 1 to 1 replacement for all your favorite recipes. RYZE products will be available at Amazon.com beginning in May.
Categories: Recipes | Tags: gluten free baking, gluten-free recipes, RYZE Gluten Free | 1 Comment »
From Beth Hillson
Makes 1 loaf (14 servings)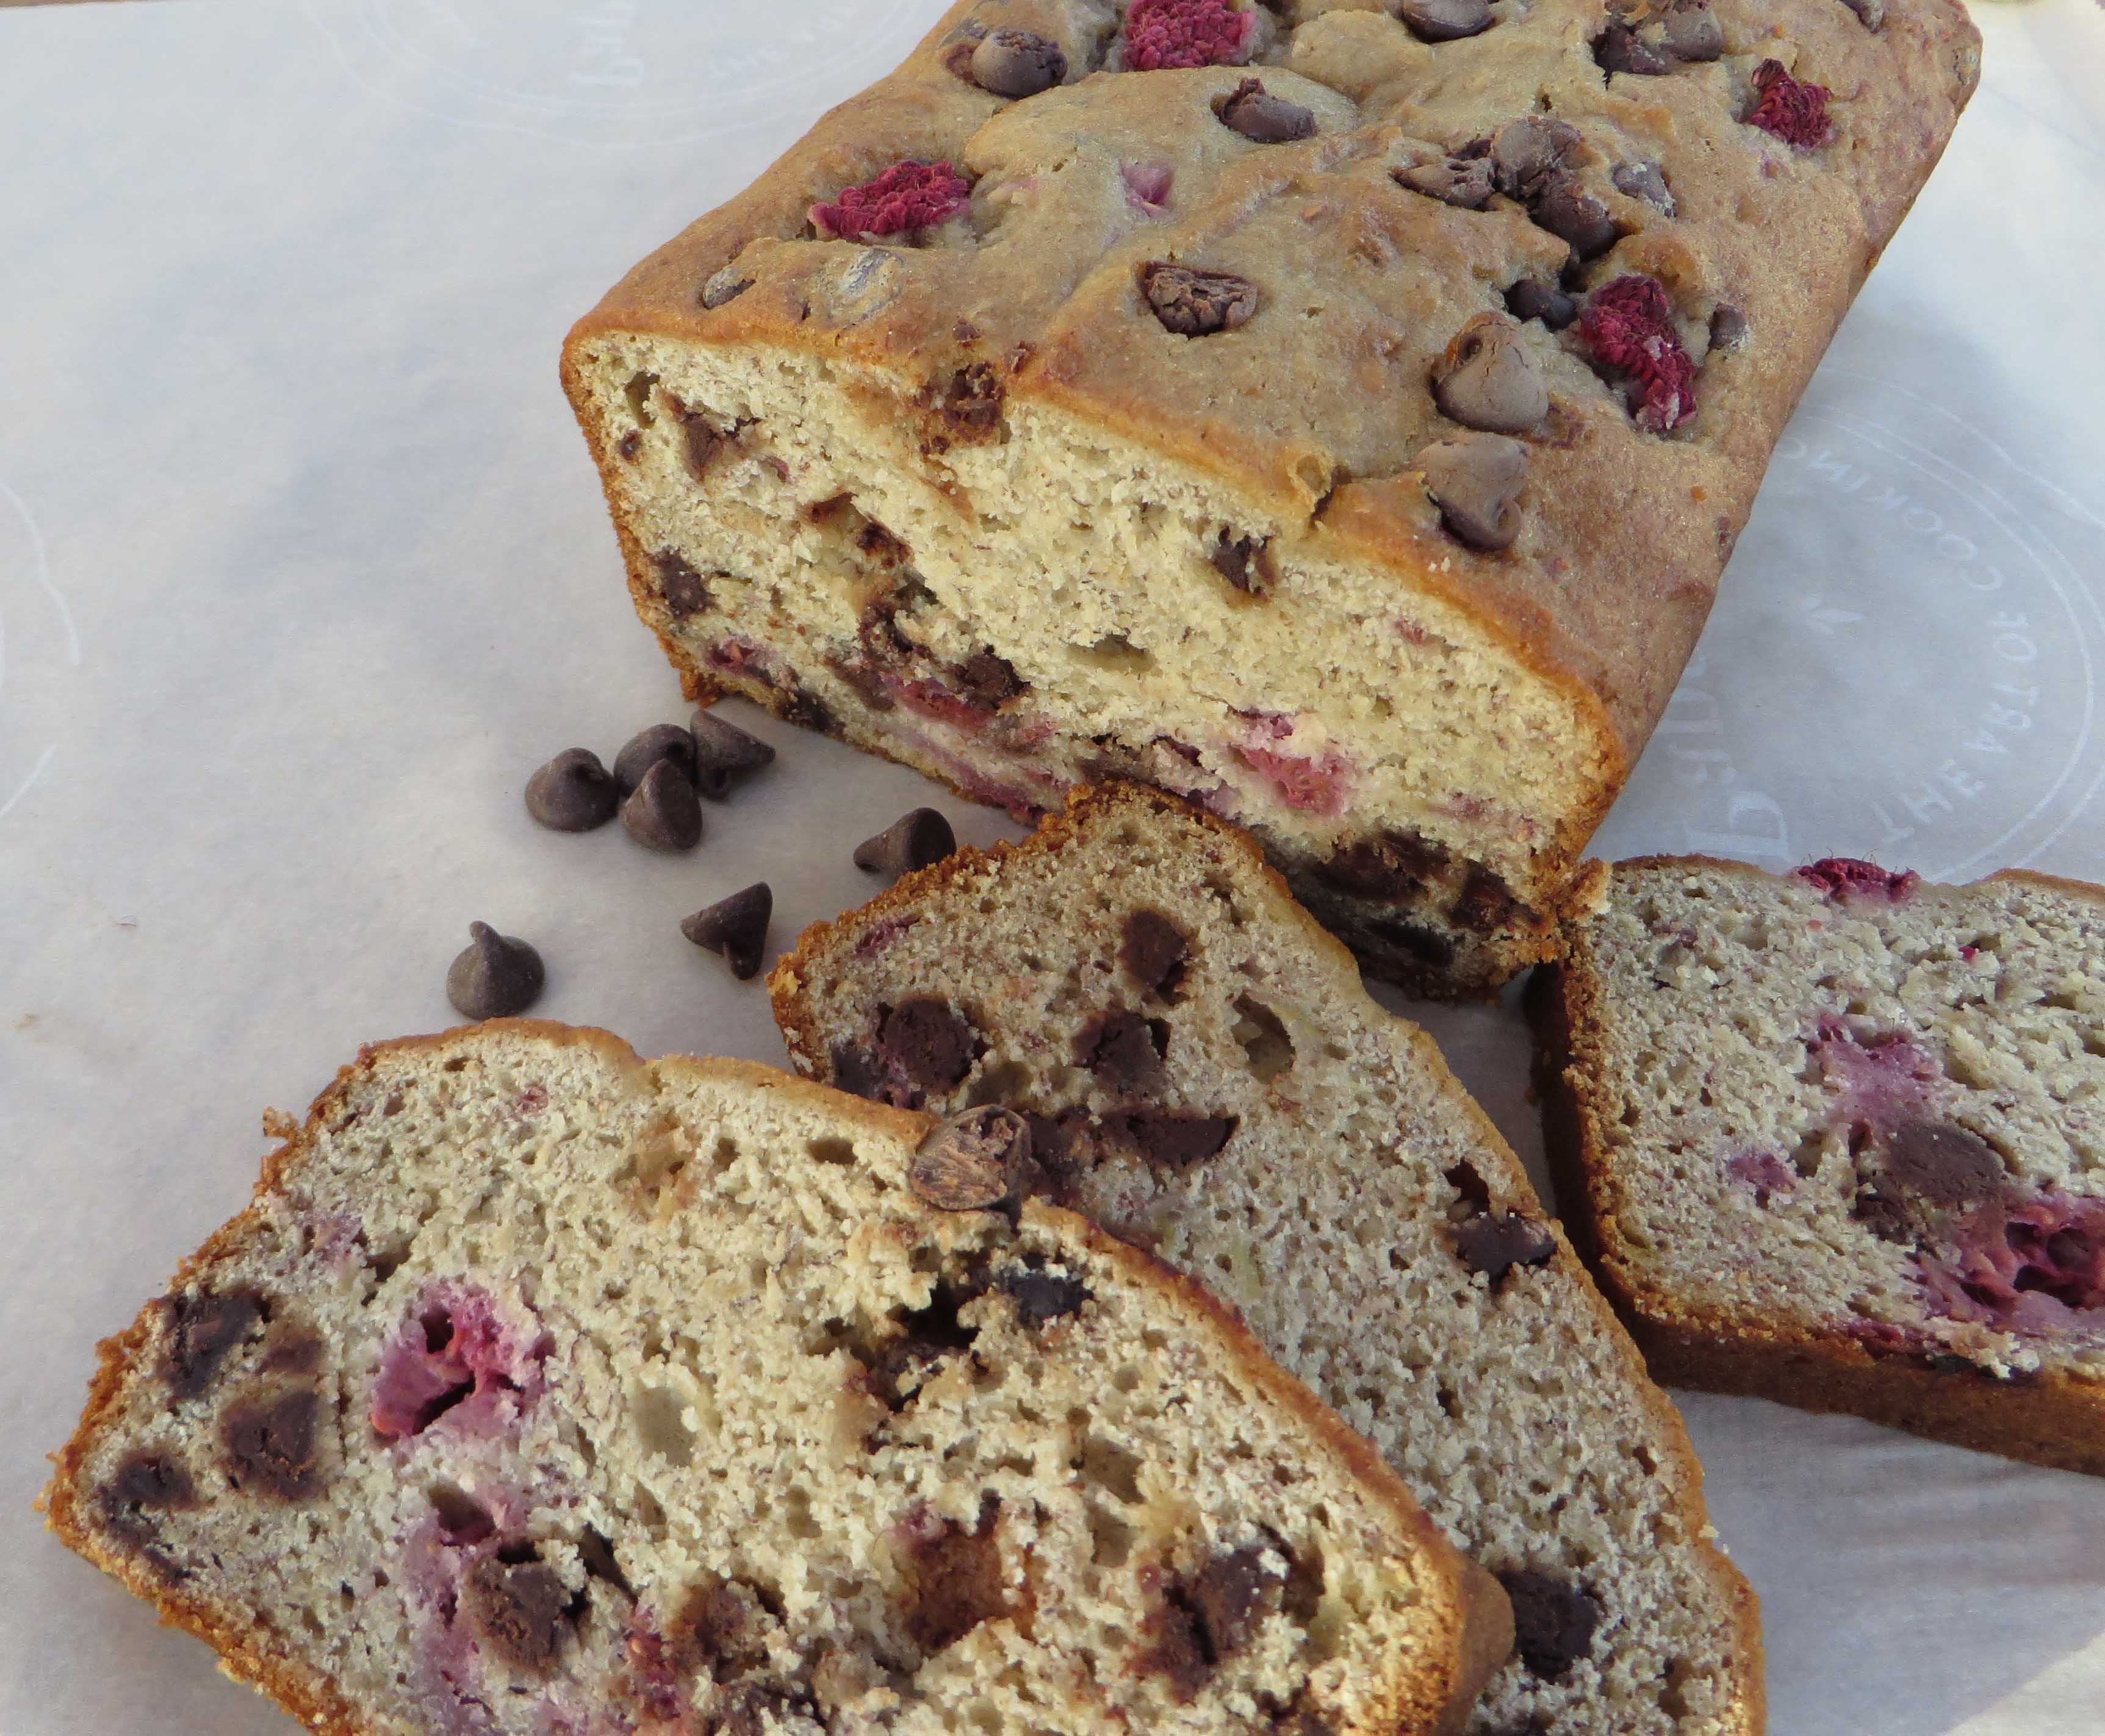
Could anything be better than having three favorite flavors packed into one recipe? In this loaf, raspberries, banana and chocolate blend together to make a slightly sweet loaf that is as pretty as it is delicious. Leftovers can be sliced and frozen. Thaw and reheat in a 350 degree oven for 10 minutes.
2 cups Beth’s Gluten-Free Quick Bread Flour Blend + 1 tablespoon (next)
3/4 teaspoon baking soda
1 cup granulated white sugar
4 tablespoons (1/2 stick) unsalted butter, at room temperature
2 large eggs
1 1/4 cups mashed ripe banana (about 3 medium bananas)
1/3 cup plain low fat yogurt
1 teaspoon vanilla extract
1 cup dark or semisweet chocolate chips
1 cup halved raspberries
Additional raspberries and chocolate chips for topping, optional
Preheat oven to 350°F. Spray a 9×5-inch loaf pan with cooking spray. In a medium bowl, whisk together the 2 cups of flour blend and baking soda.
In a separate large bowl, beat the sugar and butter with an electric mixer at medium speed until well blended (about 1 minute). Add the eggs one at a time, beating well after each addition. Add the banana, yogurt, and vanilla; beat until blended. Stir in the flour mixture. Mix just until moist. Fold in the chocolate chips. Gently toss the raspberries with the remaining 1 tablespoon of flour blend and fold into batter.
Spoon the batter into the prepared pan. Top with a few additional chocolate chips and raspberries, if desired.
Bake for 60 to 65 minutes or until a wooden pick inserted in center comes out clean and the top feels firm to the touch.
Cool 15 minutes in the pan on a wire rack. Remove from pan and cool completely on the wire rack.
Beth’s Gluten-Free Quick Bread Flour Blend
Several flours are interchangeable in this flour blend. You’ll see them noted here. I prefer using cornstarch as it produces a lighter quick bread loaf. However, potato starch produces a chewier texture in the beer bread. Take your pick according to preference and food sensitivities.
Combine these ingredients. Blend well, then scoop out the amount needed for your recipe.
1 cup sorghum flour (or corn or brown rice flour)
¾ cup rice flour (or buckwheat flour)
¾ cup cornstarch (or potato starch or tapioca starch flour)
½ cup amaranth flour (or quinoa, buckwheat, or millet flour)
2 ½ teaspoons xanthan gum
1 ¼ teaspoons salt
Categories: Recipes | Tags: gluten free, gluten free baking, gluten free quick breads, gluten free quick recipes, yeast free breads | No Comments »
Recipe by Beth Hillson
Makes 30 to 32 cookies
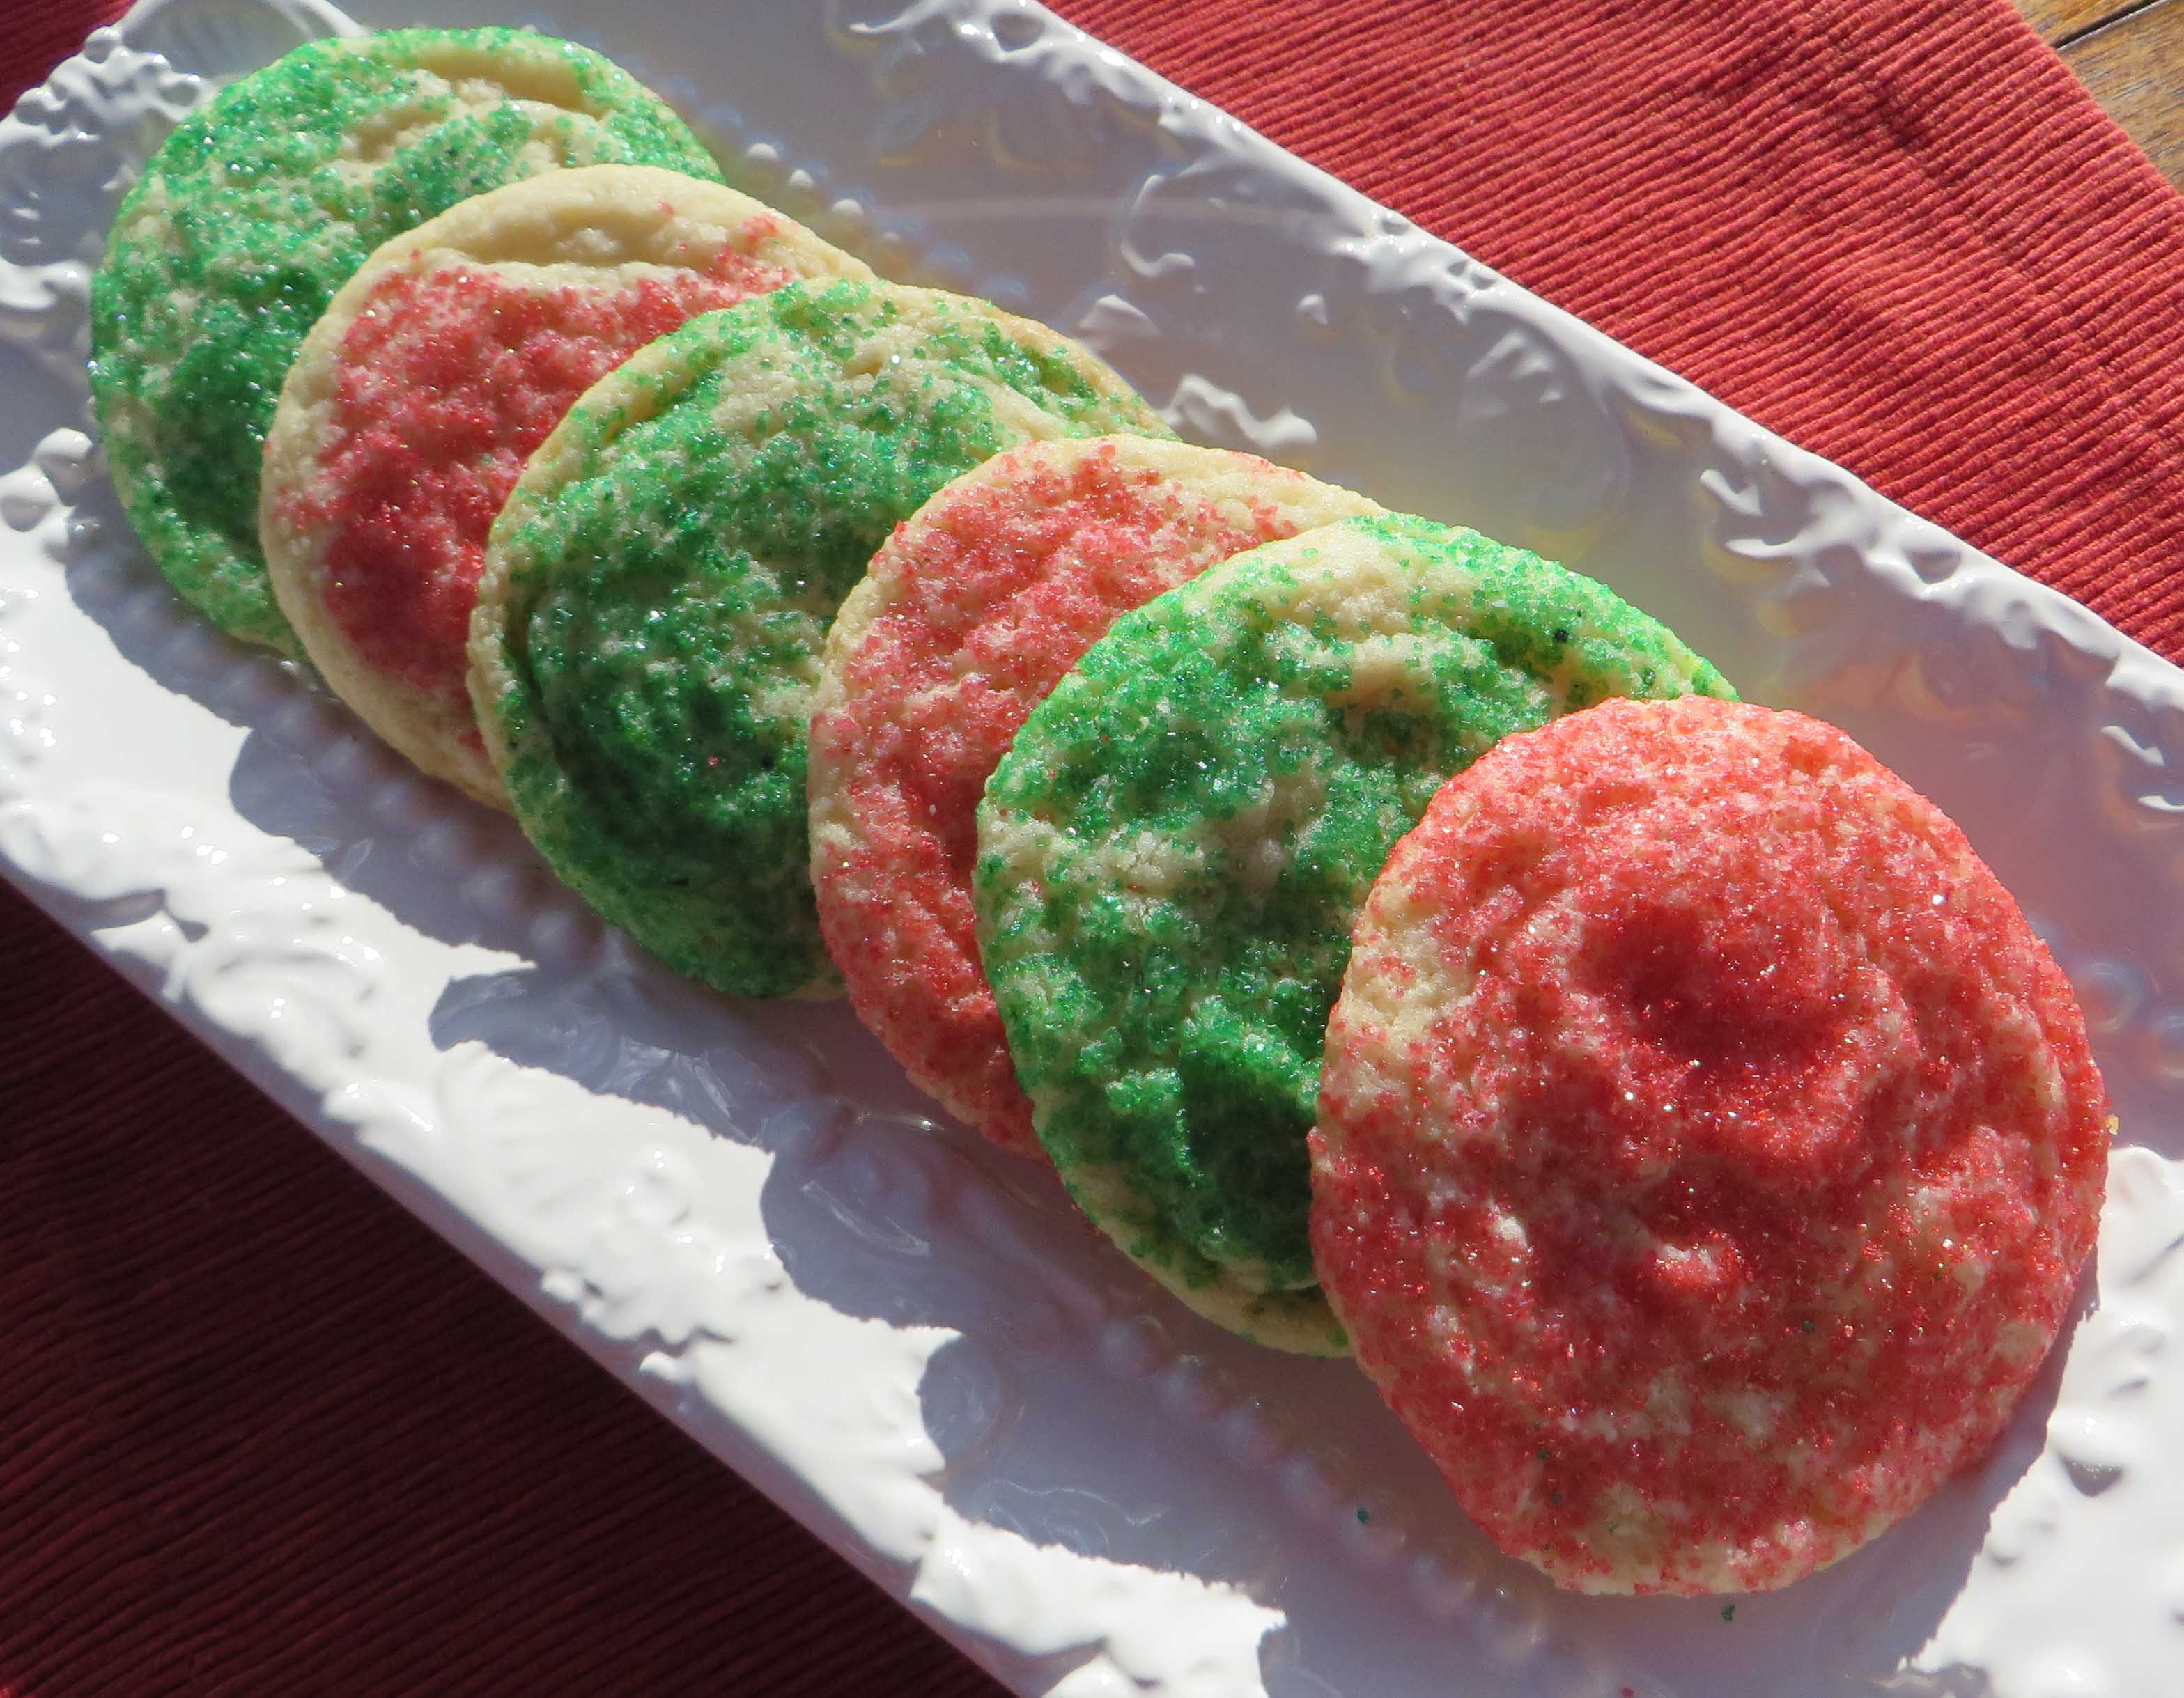
These rich, buttery cookies are slightly crisp on the outside with a chewy center. They have quickly become my favorite cookies; they’ll be yours, too.
Dip dough in colorful sanding sugar to turn them into beautiful holiday cookies. Top with chopped pecans or fold chopped, toasted nuts into the batter to create another variety. Perfect for cookie swaps and gifting, you’ll be making these cookies for occasions all year long.
1 cup (2 sticks) unsalted butter, room temperature
1½ cups granulated sugar
1 large egg
1½ teaspoons vanilla extract
2 cups cookie and cake flour blend (below)
1 teaspoon baking powder
1/4 teaspoon baking soda
1/4 cup sour cream
Sanding sugar or sprinkles (optional)
In a large bowl, cream together butter and sugar with an electric mixer until light and fluffy, about 3 minutes. Scrape down sides with spatula. Add egg and vanilla. Mix until combined.
In a separate bowl, whisk together flour blend, baking powder, and baking soda. Add half to wet ingredients, mixing on low speed. Then add sour cream and combine. Finally, add the rest of the dry ingredients. Mix until the dough is well blended. Cover with plastic wrap and chill for 30 minutes.
Preheat oven to 350F. Line cookie sheets with parchment paper. Roll dough into walnut-size balls. Dip one side in sugar (if using). Place sugar-side up on parchment-lined baking sheets, two inches apart as dough will spread.
Bake for 15 minutes, until edges start to brown slightly.
Cool for 10 minutes in pans before removing to wire racks to cool completely. Cooled cookies will keep in an air-tight container at room temperature for several days and can be frozen for up to 2 months.
TIP: Can’t have dairy products? Replace butter with dairy-free buttery sticks from Earth Balance and sour cream with dairy-free sour cream from Tofutti or Follow Your Heart. For lactose-free sour cream, check out Green Valley Organics.
Cake and Cookie Flour Blend
This makes enough flour blend for several batches of your favorite cookie recipes.
2 cup sweet white sorghum flour
2 cup white rice flour
1 ½ cups cornstarch
3 teaspoons xanthan gum (or guar gum)
1 teaspoon salt
Mix to combine. Store leftover blend in a zip-lock bag in the refrigerator.
Categories: Recipes | Tags: Cookies, dairy-free, dessert, dessert recipes, easy gluten free holiday cookies, easy gluten free recipes, gluten free baking | No Comments »
A Quick Recipe from Beth
Merri-Mint Chocolate Brownie Trifle
Serves 6 to 8
People think I am an amazing chef when I serve them gluten free brownies, mind you, straight from the freezer. When I am in a rush, brownies are my go-to dessert. Top them with designer ice cream or a layer of chocolate ganache and the crowd goes wild. But this recipe takes brownies to a whole new level, a simple (but decadent) dessert that I pull out of my bag of gluten-free tricks when company is coming and I’m pressed for time like during the holidays.
Assemble this in one big glass bowl for a buffet or individual glass goblets for a sit down meal. Either way, this luscious chocolaty mint dessert will make you giggle when you bite into the rich chewy brownies layered with peppermint-laced whipped cream, crushed candy canes, and shaved chocolate. Could anything be better? This time, I used Glutino Gooey Chocolate Merry Mint Brownie Mix . They already come with a hint of peppermint and a topping of white chocolate fudge. But you could add peppermint extract to any brownie mix and top with white chocolate chips. If you are making this for an adult-only gathering, use Crème de Menthe liqueur in place of peppermint extract. Add nuts, mini marshmallows or hot fudge if you wish. There are no rules, just the promise of lots of holiday merri-mint.
1 package of gluten free brownie mix 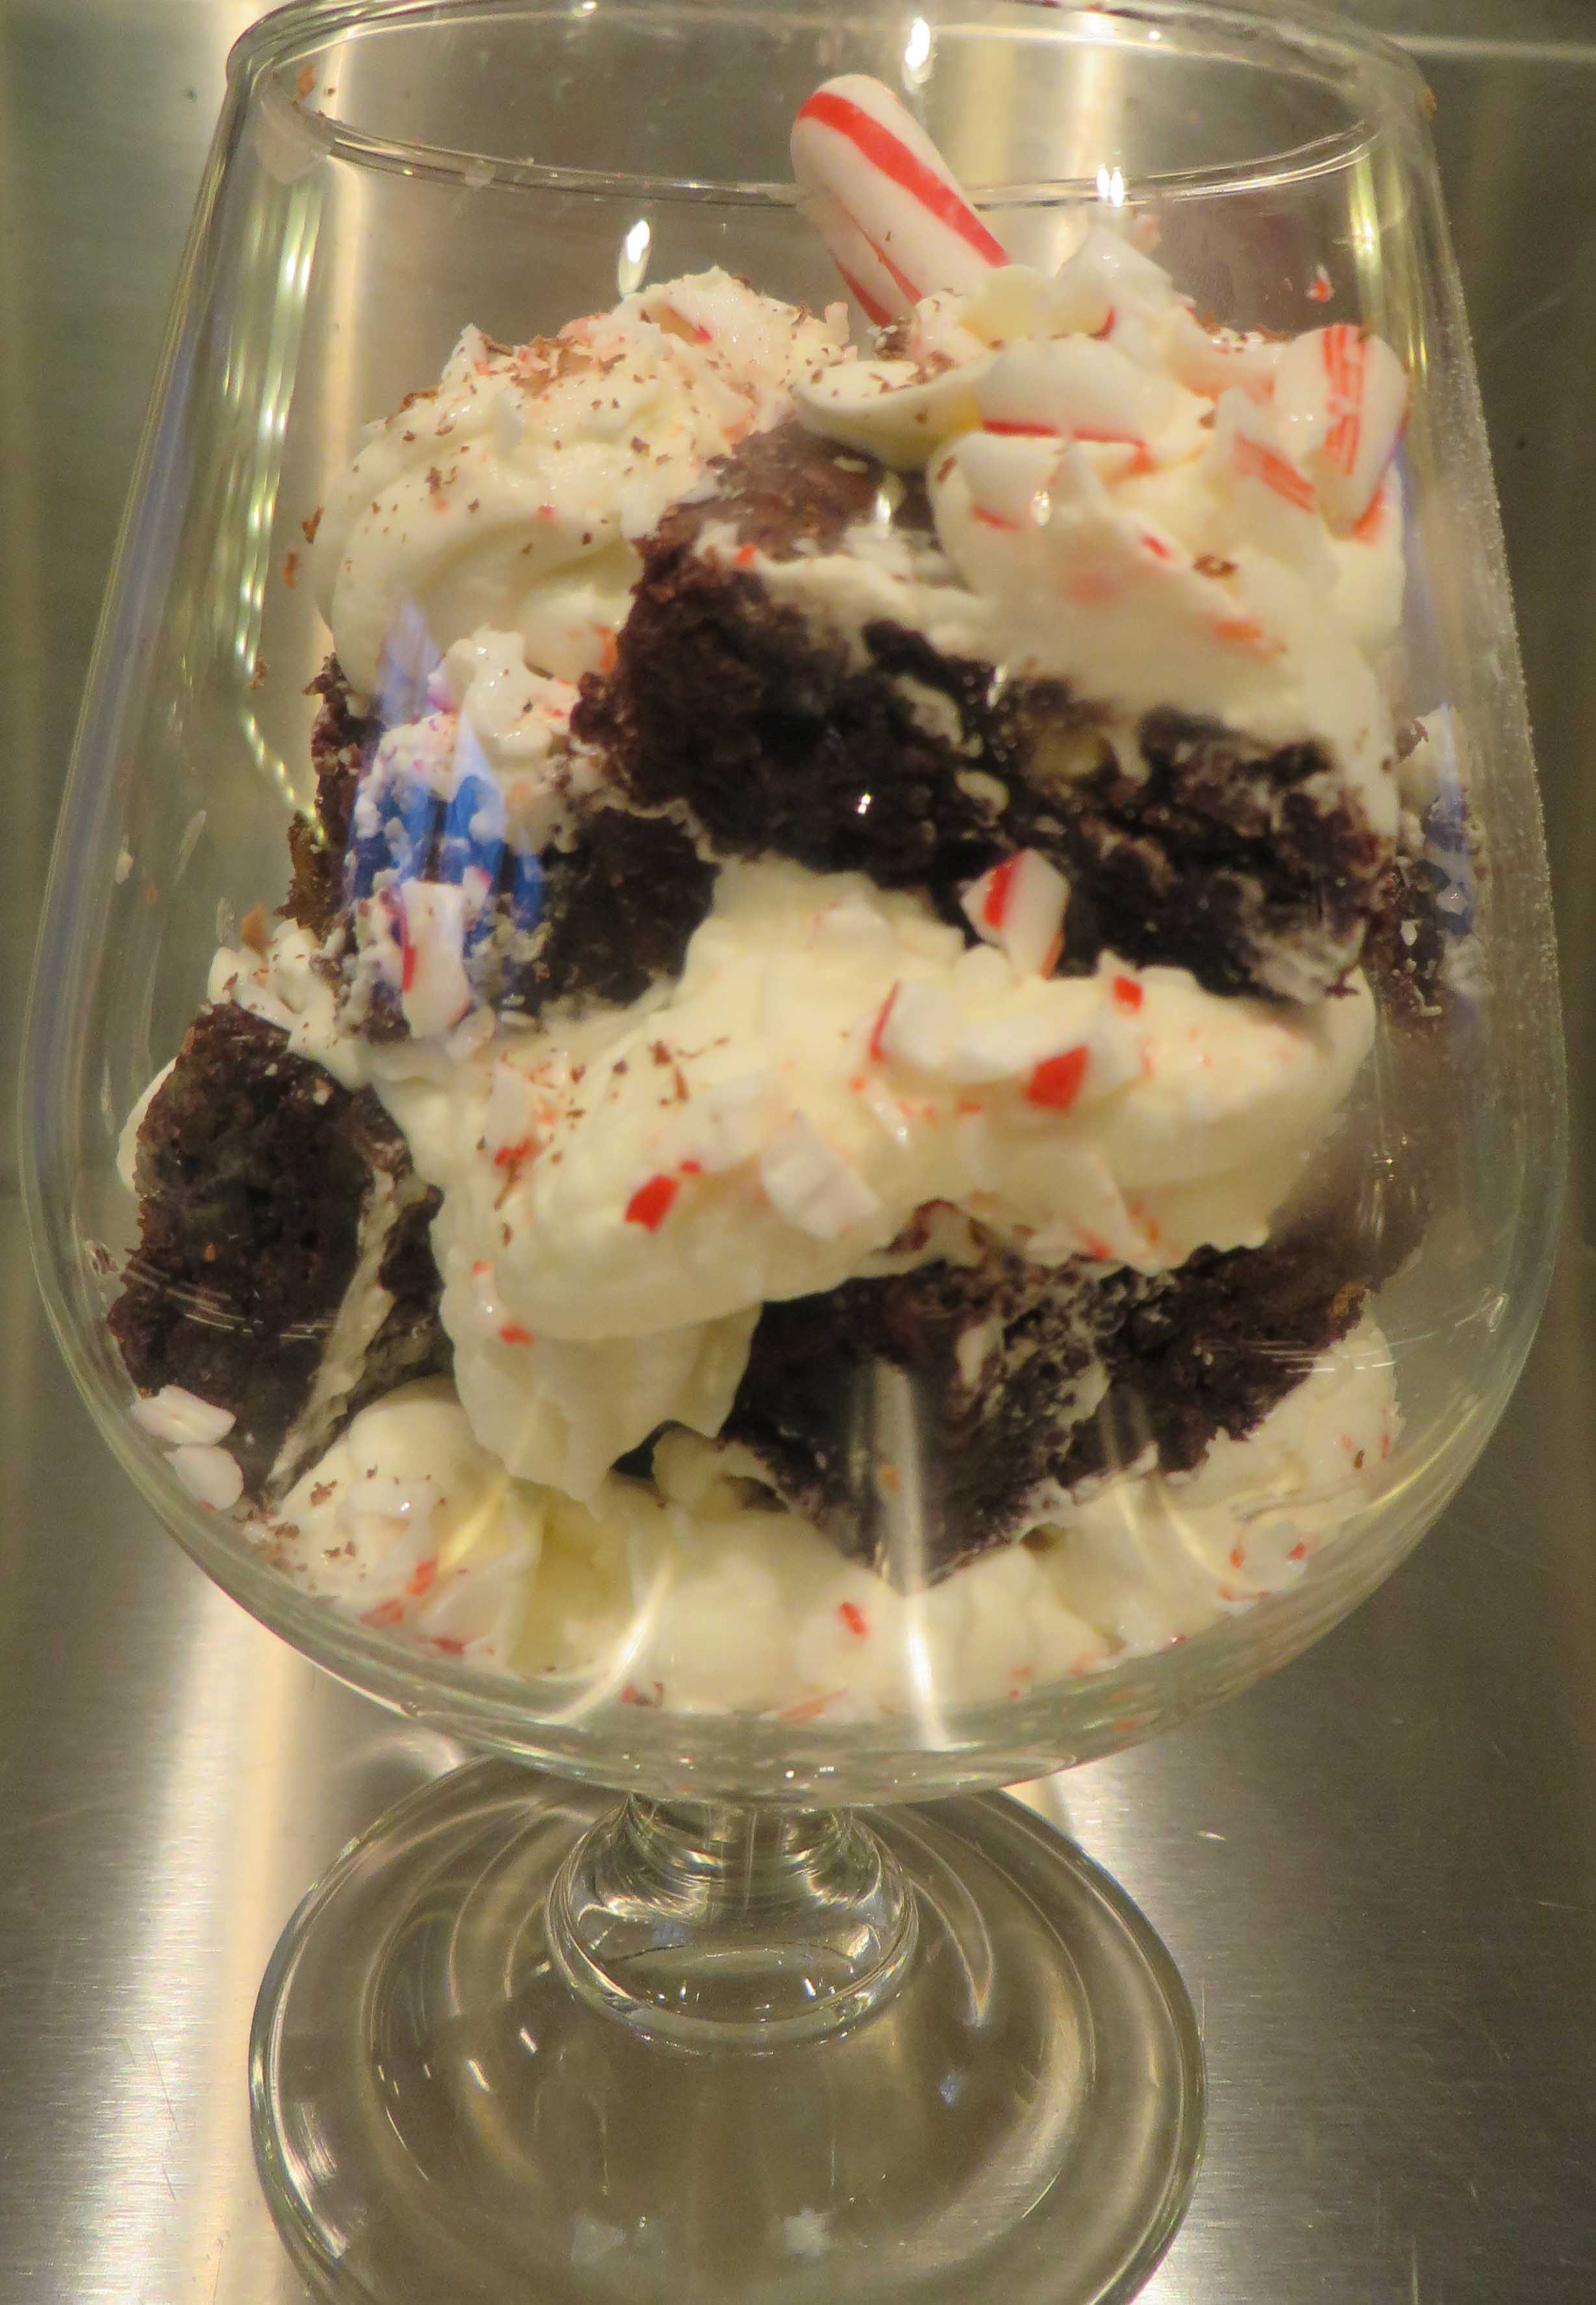
¼ teaspoon peppermint extract*
1/3 cup white chocolate chips*
*omit if using Glutino Merry Mint Brownies
Whipped Cream
¾ cup (12 ounces) whipping cream, very cold
¼ cup confectioners’ sugar
½ teaspoon vanilla extract
¼ teaspoon peppermint extract or 1 tablespoon Crème de Menthe liqueur
1/3 cup crushed candy canes, leave extras whole for decoration
Shaved Semisweet or Bittersweet chocolate for garnish
Prepare the brownie mix according to the directions on the package. Bake in a foil lined 7×11 inch pan. I like to under bake these by about 2 minutes so they are very chewy. Remove and cool completely.
Beat the cream in a chilled bowl until half whipped. Add sugar and extracts and beat until cream forms stiff peaks. Refrigerate.
Remove the brownie from the pan using the foil edges and set on a cutting board. Cut the brownie into ¾ inch squares, trimming the edges if desired. In individual glass dishes (like large brandy snifters) or one large glass bowl, layer brownie squares alternating with dollops of whipped cream and crushed candy canes. Top with more dollops of whipped cream and crushed candy canes and finish with shaved chocolate. Chill for 2 hours or overnight. Garnish with whole candy canes.
Categories: Recipes | Tags: easy gluten free recipes, gluten free baking, gluten free brownies | No Comments »
For my birthday, I couldn’t decide between chocolate and vanilla. I solved the problem by making a marble cake. That way I didn’t have to choose! Orange juice and orange zest added a special brightness to this treat. Instead of a layer cake with lots of frosting and lots of extra calories, I made a Bundt cake and topped it with thin layer of orange glaze. The results were yummy.
Now, here’s the best part. I made this from chocolate and a vanilla gluten-free cake mixes. Quick, delicious and such a nice gift!
Orange Marble Birthday Cake 
Serves 10 to 12
1 box (15 ounces) Gluten-Free Yellow or White Cake Mix*
1 box (15 ounces) Gluten-Free Chocolate Cake Mix*
2 sticks unsalted butter or dairy-free alternative, softened, divided
4 large eggs, divided
3 teaspoons vanilla extract, divided
2 cups buttermilk, divided (a tad less than 2 cups, really)
Juice and zest of one orange
Preheat oven to 350 degrees. Lightly oil a 10-cup Bundt cake pan.
Make the Yellow Cake. Cream 1 stick of butter until light and fluffy. Add yellow cake mix and beat until crumbly. Add 2 large eggs and beat until smooth. Beat in 1 ½ teaspoons vanilla and 1 cup buttermilk. Beat until smooth. Set aside.
Make the Chocolate Cake. Cream 1 stick of butter until light and fluffy. Add chocolate cake mix and beat until crumbly. Add 2 large eggs and beat until smooth. Pour orange juice into a 1 cup measure. Add enough buttermilk to measure 1 cup. Add 1 ½ teaspoons vanilla and 1 cup buttermilk mixture to the cake mix. Fold in zest. Beat until smooth. Set aside.
To Assemble. Start with dollops of yellow cake batter, then chocolate cake batter and keep alternating until both batters are used up. Use a sharp knife, swirl the batter to create a marble effect. Set on middle rack in preheated oven. Bake 50-60 minutes or until toothpick comes out clean. Rest 10 minutes on rack then invert, remove pan, and cool completely.
Orange Glaze
3 tablespoons orange juice
¾ to 1 cup confectioners’ sugar
Grated peel of half an orange
Combine juice and sugar and blend until smooth. Add grated peel and mix to combine. Drizzle over the top of the cake before serving.
*Hodgson Mill, Betty Crocker, and Gluten-Free Pantry cake mixes are all good choices as they all weigh 15 ounces. Many other gluten-free cake mixes will work, too. Just weigh out 15 ounces of each mix before using.
Categories: Uncategorized | Tags: easy gluten free recipes, gluten free baking, gluten free birthday cake, gluten free diet | 7 Comments »
Follow Us Online
More Cookbook Stuff
Gluten-Free Makeovers - - Nearly 200 recipe makeovers for everyone to enjoy. Buy it at glutenfreeandmore.com, Amazon.com and barnesandnoble.com.
About This Blog
 Baking guru, Beth Hillson, transforms favorite foods into recipes that are safe for your gluten-free diet.


