
Blog Archives
Makes 24 large cookies
Looking for an easy, last-minute cookie to round out your holiday baking? These are just the thing. Soft and chewy with the right amount of crispness, these cookies will become a staple in your house. Bites of candied ginger add a delightful explosion of flavor and a blend of vibrant spices – cinnamon, allspice and ground ginger- lend festive notes to these simple cookies. They are even tastier the second day.
If you prefer crispy cookies (aka ginger snaps), bake 10 to 11 minutes. Otherwise, cook a smidge under 10 minutes. Cookies may seem a little underdone when they come out of the oven, but will firm up as they cool. If you can get your hands on RYZE Blue Flour Blend, it adds remarkable chewiness to these cookies. However, you can make them with any all-purpose gluten-free flour blend. (Increase the amount of flour to 2 cups and add 1 teaspoon xanthan gum if it is not in the blend.)
1 ¾ cups Ryze Blue Flour Blend or 2 cups gluten-free flour blend with 1 teaspoon xanthan gum
2 teaspoons baking soda
2 to 3 teaspoons ground ginger (depending on your taste buds)
1 teaspoon ground cinnamon
½ teaspoon ground allspice
¼ teaspoon salt
¾ cup organic shortening
1 cup packed light brown sugar
1 large egg
¼ cup light (Original flavor) molasses
1 teaspoon cider vinegar
½ cup finely chopped candied ginger
Line 2 baking sheets with parchment paper. Preheat oven to 375 degrees.
In a medium bowl, whisk together flour blend, baking soda, ginger, cinnamon, allspice, and salt. Set aside.
In a medium bowl, beat the shortening and the sugar until mixture is fluffy, about 2 minutes.
Add the egg, molasses, and vinegar and beat well.
Add the flour mixture and beat until smooth. Fold in the chopped candied ginger.
Scoop out generous tablespoon-size portions of dough. Roll in a ball and set on baking sheets, at least 1 inch apart. Flatten each ball into a disk about ¼ inch in thickness.
Sprinkle with granulated sugar. Bake 8 to 10 minutes or until the tops of the cookies are set and slightly brown on the edges. Do not overbake. Remove from the oven and let rest on the pans for 5 minutes before turning onto a wire rack to cool completely.
Cooled cookies may be frozen.
Makes 24 large cookies

A Recipe by Beth Hillson
Yield: 24 bars
This is my latest go-to dessert. I take it to pot luck dinners, bake sales, you name it! It’s easy, delicious and amazingly versatile. Use whatever fruit is in season. Vary the sweetness of this recipe by adding more or less sugar depending on your tastebuds and the natural sweetness of the fruit. The bars freeze well.
I made these using RYZE Blue Flour Blend. Instead of measuring out a bunch of flours, I use 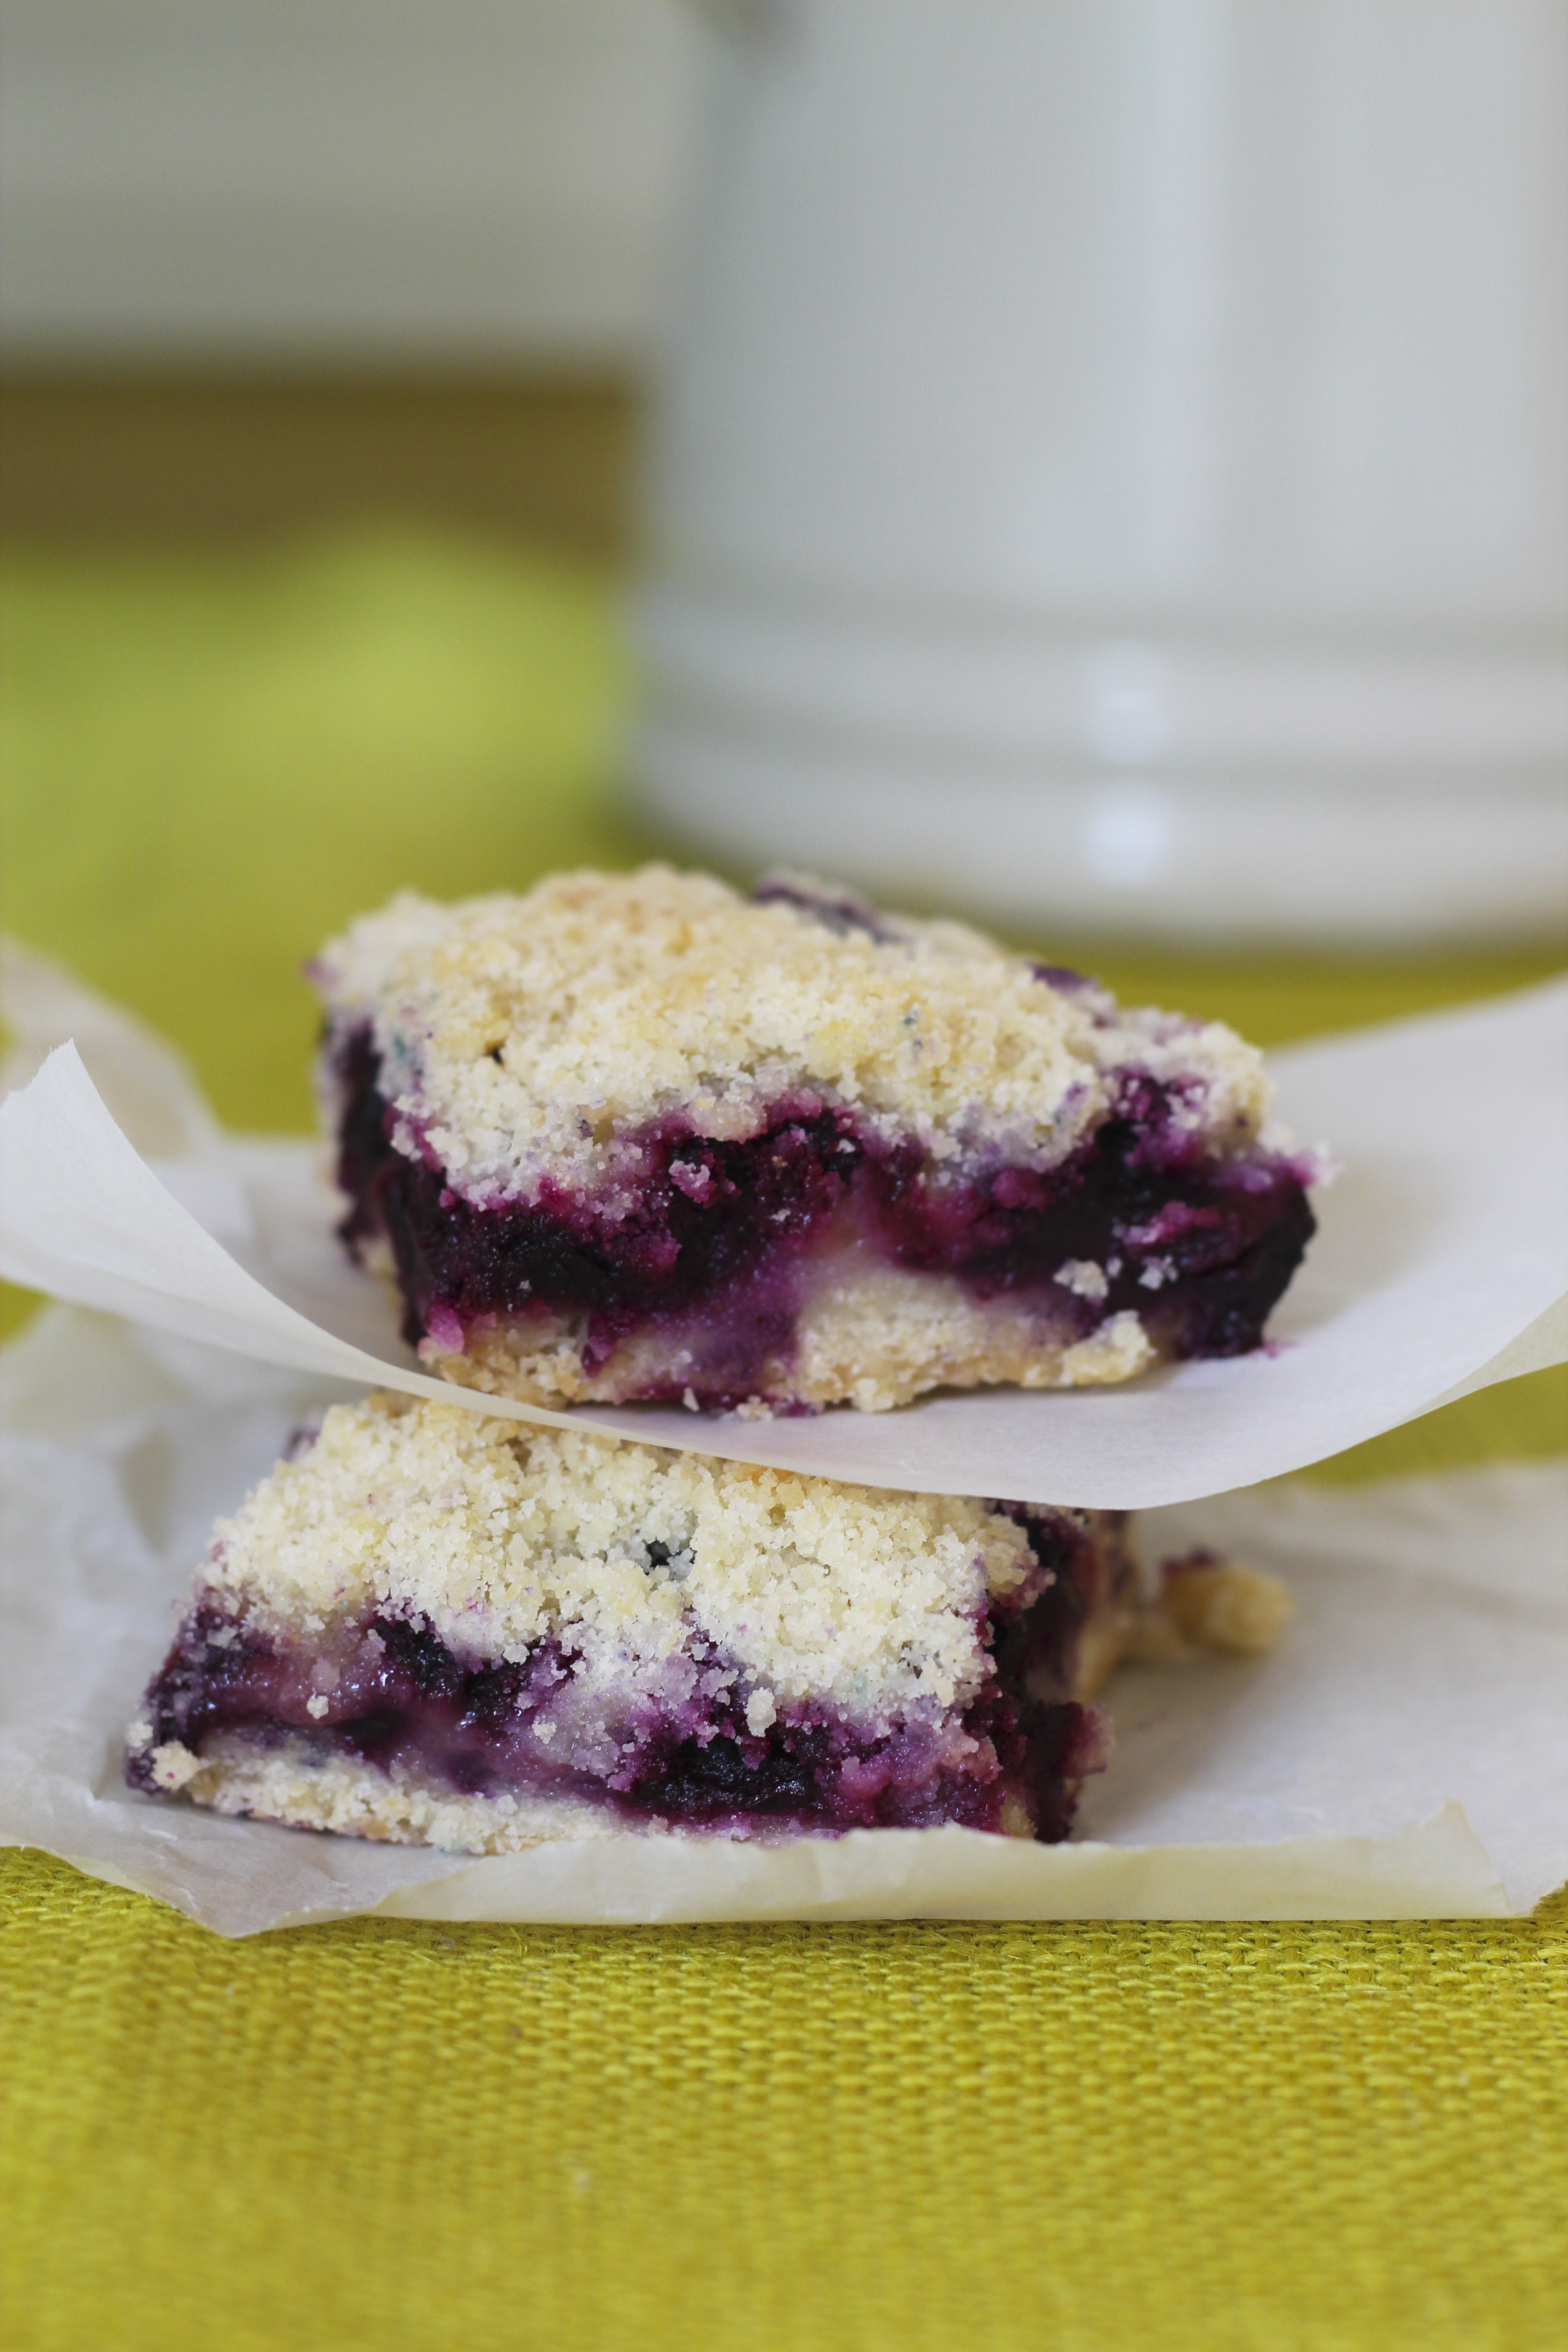 one ingredient. However, you could certainly make this with any A/P flour blend. Make sure it contains xanthan gum or add 1 teaspoon xanthan gum to the recipe.
For the Dough
3 cups RYZE Blue Flour Blend or an A/P Gluten-Free Flour Blend that contains xanthan gum
1 cup granulated sugar
1 teaspoon baking powder
¼ teaspoon salt
1 cup (2 sticks) unsalted butter, cold, cut into small pieces
1 large egg, lightly beaten
For the Filling
4 cups (2 pints) fresh blueberries of 5 cups peeled, sliced peaches or apples (about 6-7)
1 tablespoon lemon juice
1 teaspoon vanilla
½ cup RYZE Blue Flour Blend or an A/P Gluten-Free Flour Blend that contains xanthan gum
½ to ¾ cup granulated sugar
¼ teaspoon salt
½ teaspoon ground cinnamon
¼ teaspoon ground nutmeg
Preheat the oven to 375 degrees F. Line a 9×13-inch baking pan with aluminum foil and coat with vegetable spray.
Make the Dough: In the bowl of a food processor fitted with the knife blade, add the flour, sugar, baking powder and salt. Pulse several times to combine. Add butter and pulse until mixture resembles coarse meal (about 10 pulses). Add the egg and pulse briefly. Empty contents into a large bowl. With a fork, mix the dough until egg is distributed evenly. Dough will be crumbly. Or combine dry ingredients in a medium bowl. Use a pastry blender to cut in the butter, and then the egg.
Pat half of the dough into the prepared pan. Place the pan and the remainder of the dough in the refrigerator to stay cold while preparing the filling.
Make the Filling: Place the washed and drained blueberries in a large bowl and sprinkle with lemon juice and vanilla. Mix gently. In a separate bowl, whisk together the flour, sugar, salt, cinnamon and nutmeg. Sprinkle over the fruit and toss gently with a wooden spoon.
Spread the fruit mixture evenly over the crust. Crumble the remaining dough over the blueberries.
Bake in the preheated oven for 45 minutes, or until the top is slightly brown. Cool completely before cutting into squares.
Categories: Recipes | Tags: baking, blueberries, dessert recipes, easy quick gluten-free dessert, gluten free baking, gluten-free recipes, Sweets | No Comments »
A Recipe from Beth Hillson
Makes 36 to 40 cookies 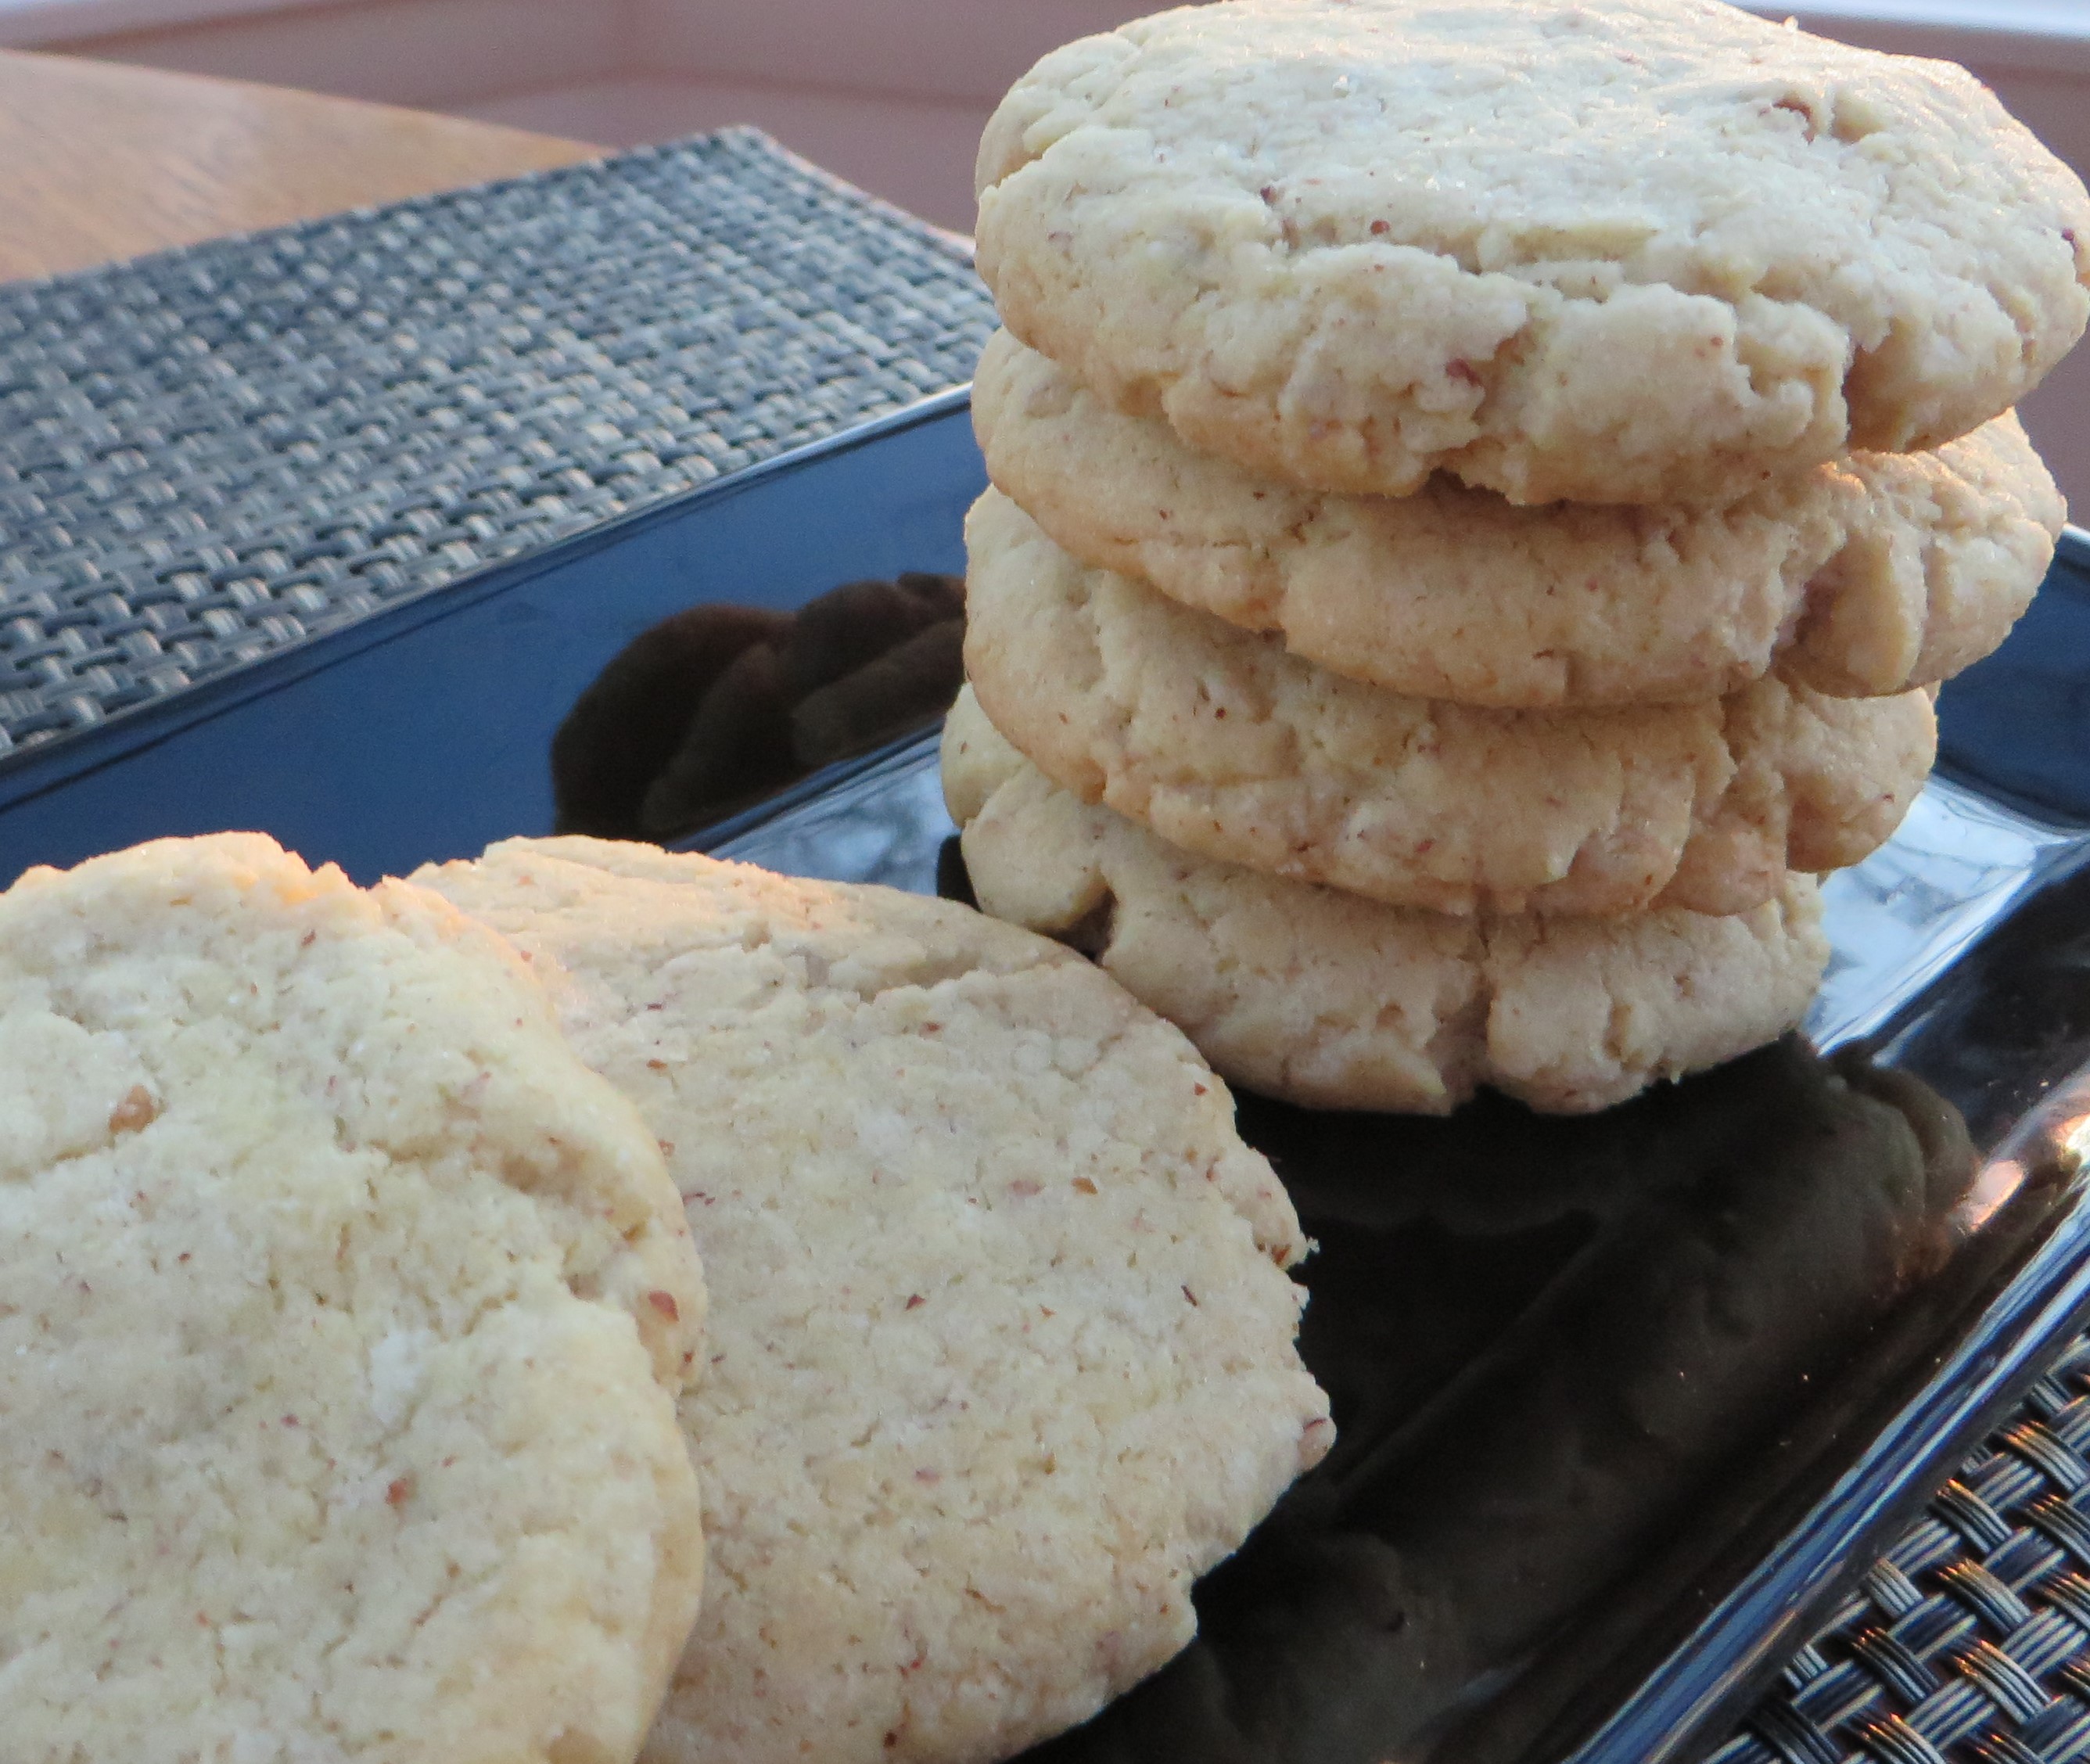
These Pecan Sandies were inspired by Keebler cookies or, perhaps, it’s the other way around. One thing is for sure, these cookies will inspire you. They are a hit with everyone who tries them. Easy to make, they freeze well and can be mailed without breaking. I used RYZE Blue flour blend but you could use another all-purpose gluten-free flour blend, too. I like RYZE because it does not contain gums and I think their Blue blend works well for cookies. If you use another flour blend, add 1 teaspoon xanthan or guar gum and 2 tablespoons additional corn or potato starch.
1 ¾ cups RYZE Blue flour blend
½ teaspoon cream of tarter
½ teaspoon baking soda
½ cup organic non-hydrogenated shortening (like Spectrum)
½ cup granulated sugar
½ cup confectioners’ sugar
2 large eggs, lightly beaten
¼ teaspoon salt
1 teaspoon vanilla extract
½ cup finely chopped pecans
Line 2 cookie sheets with parchment paper. Set aside.
Combine flour, cream of tartar, and baking soda. Mix well.
In a large mixing bowl, beat the shortening and the sugars until fluffy. Add the eggs, salt and vanilla and beat to combine. Add the flour mixture, about 1/3 at a time, beating after each addition. Fold in the pecans.
Chill the dough for 30 minutes. Preheat the oven to 350 degrees.
Roll the dough into walnut-size pieces (about 1-inch balls) and set on cookie sheets. Flatten each until it is about ¼ inch thick. Bake 12 to 14 minutes or until the edges are slightly golden. Cool and enjoy.
These are even better the second day and can be wrapped and stored in the freezer for up to 6 weeks.
Recipe From Beth Hillson
Makes one 9-inch springform pie or two 9-inch pies
What’s easy as pie and three times more decadent? How about a Cherry Chocolate Hot Fudge Sundae Pie nestled in a chocolate macaroon crust? I drool just thinking about this incredible treat. Besides, the preparation is quick. Just assemble and freeze until about 20 minutes before serving. Your guests will be impressed!
I’ve made this as a dairy-free ice cream pie (yup, dairy-free) by using Coconut Bliss Cherry Amaretto Frozen Dessert. However, I’ve also made it with Ben & Jerry’s Cherry Garcia ice cream or frozen yogurt. The results are always amazing. Perfect for all the summer picnics at hand or make this for a festive winter party, too. Cut the crust into biscuit-size circles and layer with ice cream and hot fudge sauce in pretty glasses, too.
Macaroon Crust 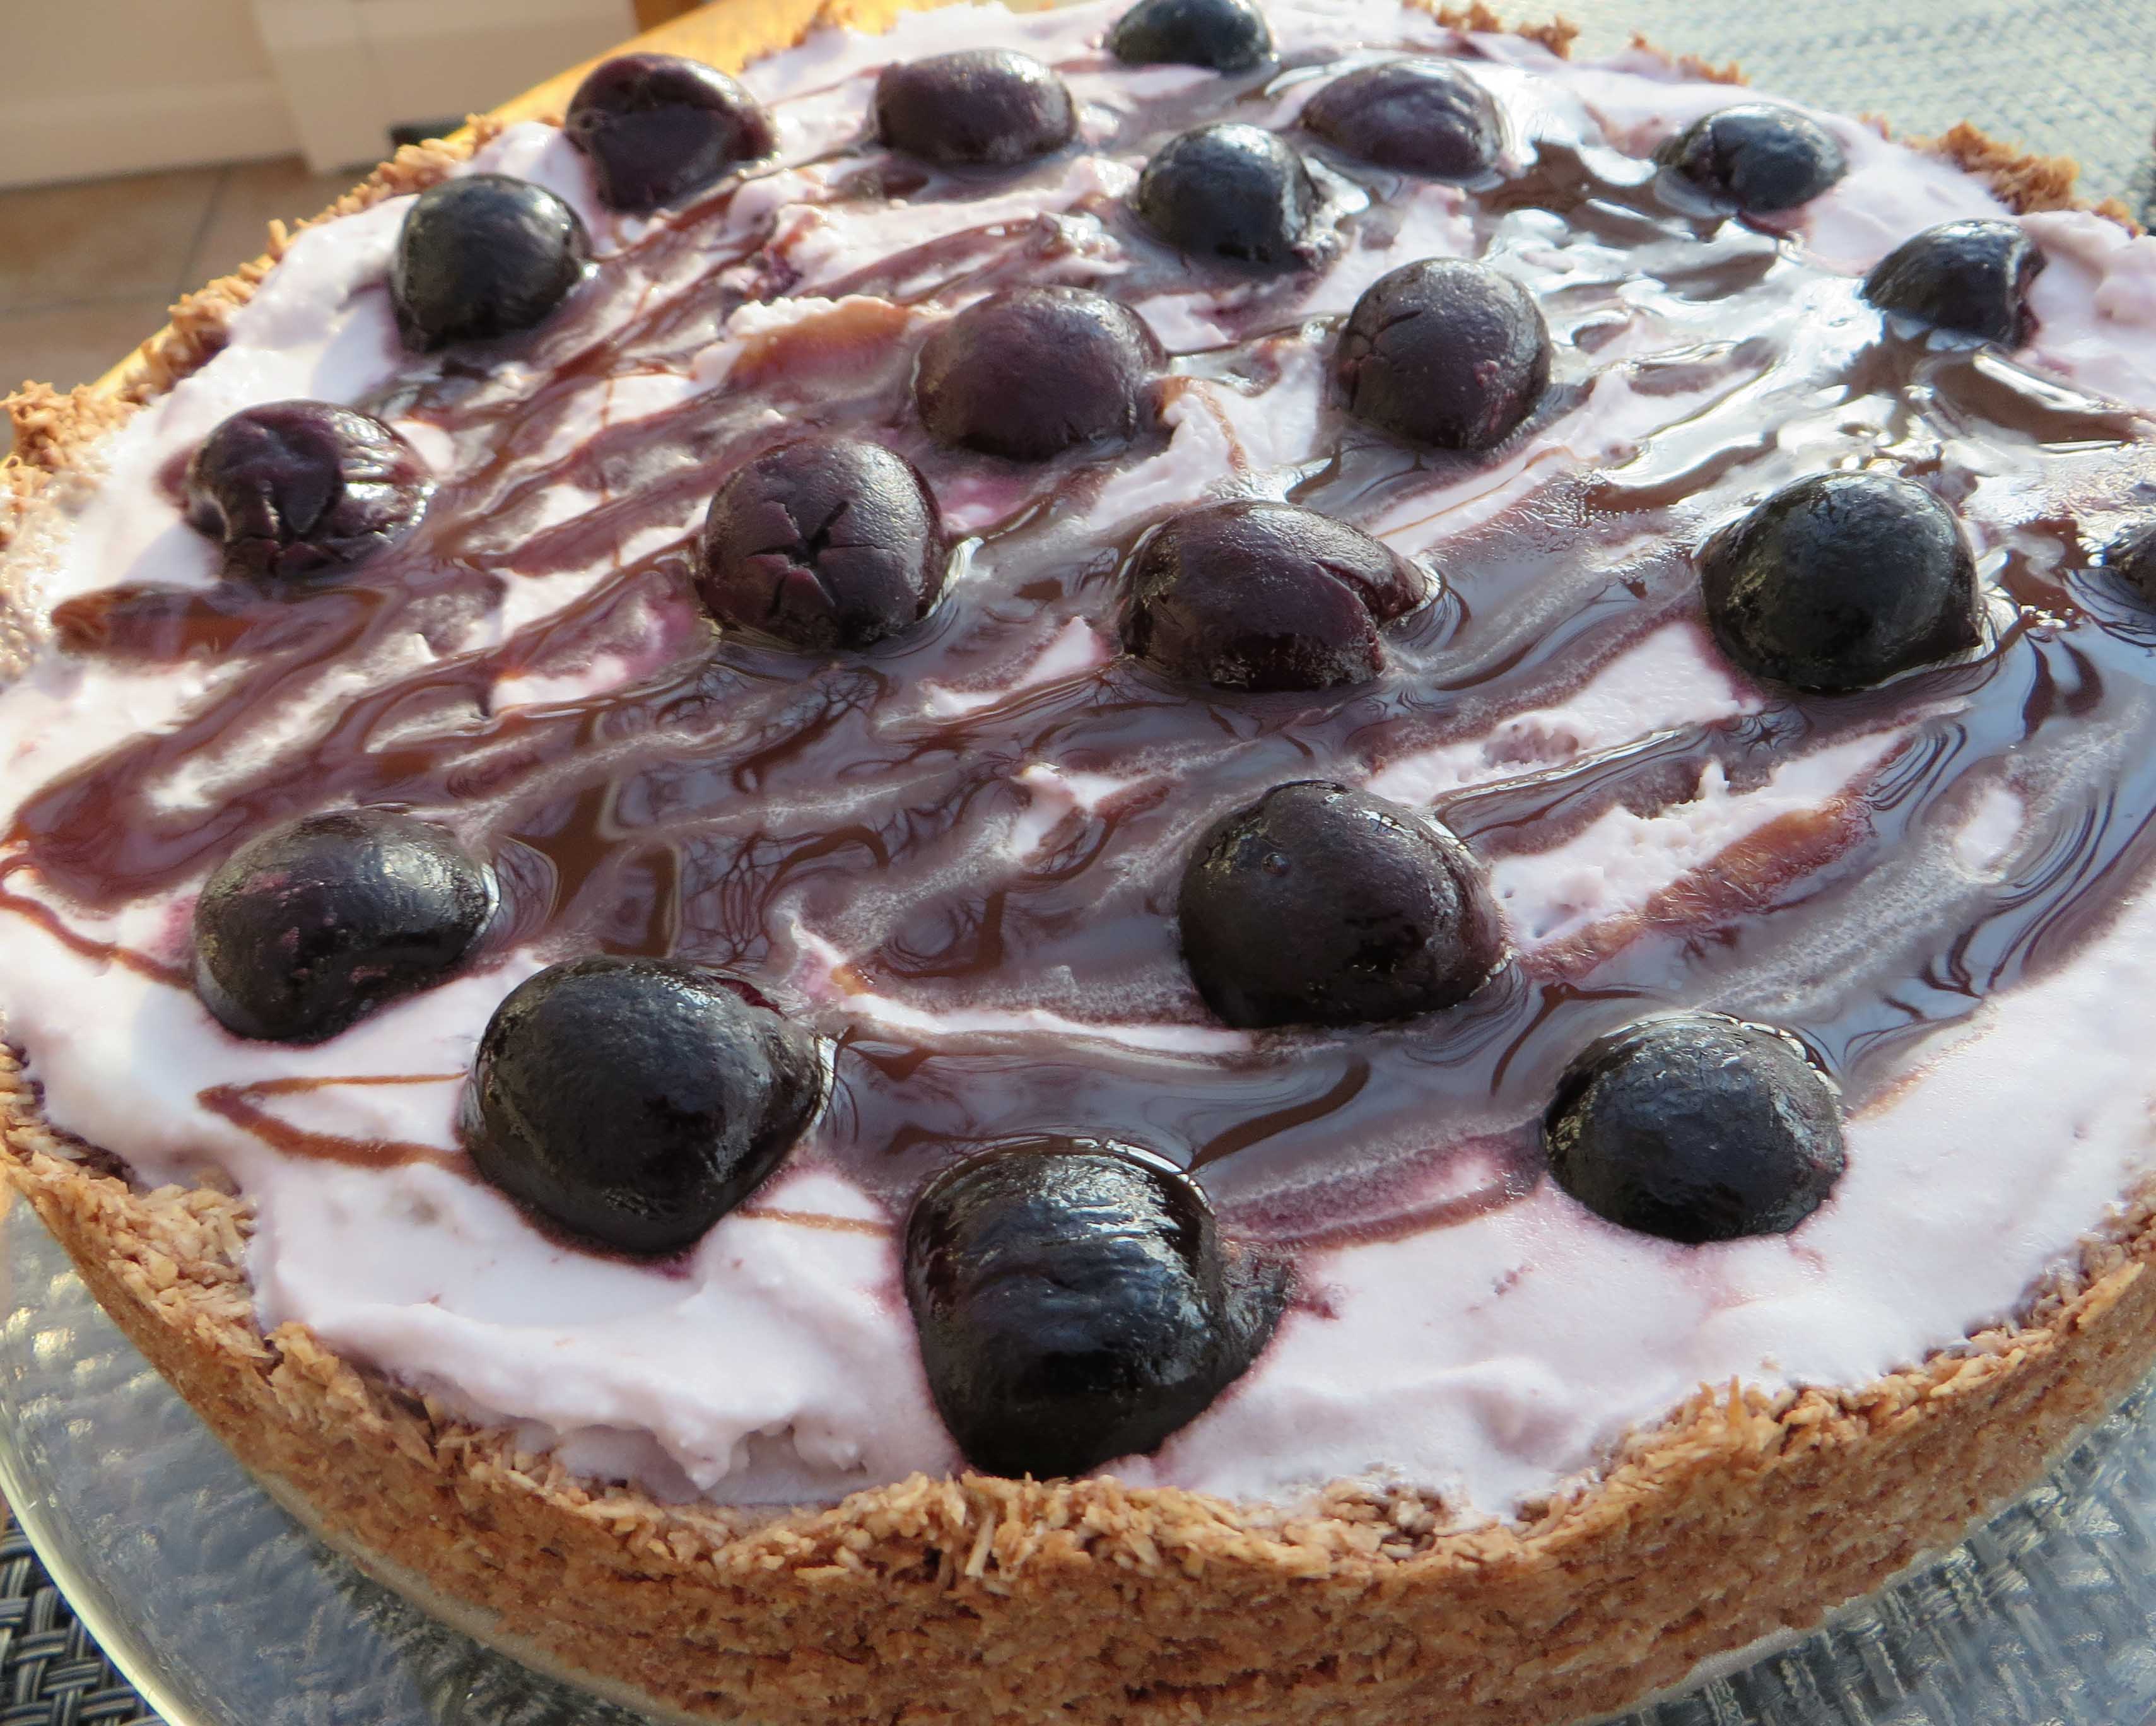
1 tablespoon safflower or coconut oil
1/3 cup chocolate chips, melted
3 1/4 cups unsweetened, shredded coconut
1/3 cup sugar
2 large egg whites
1/4 teaspoon salt
To Make the Crust
Preheat the oven to 325 degrees F. In a microwavable bowl, combine oil and chocolate chips. Microwave on medium power for 30 second intervals until chips are just melted. Set aside.
In a large bowl, combine the coconut, sugar, egg whites, and salt, mixing until all of the coconut is moistened. Fold in the melted chocolate mixture. Press the mixture into a 9-inch springform pan pressing evenly over the bottom of the pan and up the sides. Alternatively, press into the bottom of 2, 9-inch pie pans. Place the pan (s) on a baking sheet and bake for 20-25 minutes, or until golden and slightly crispy. Let cool completely.
To Make the Filling
2 pints Coconut Bliss Cherry Amaretto Frozen Dessert or use your favorite ice cream
Gluten-free hot chocolate fudge sauce, warmed or Hershey’s Chocolate Sauce
Pitted dark cherries, frozen or fresh, for topping
While preparing the crust, set the ice cream on the counter to soften slightly. Spread one pint of ice cream over the cooled crust. Smooth the top. Spread the second pint over the first layer. Spread evenly on top. (You may not need all of the second pint.) Freeze until the ice cream is totally frozen, about 4 to 6 hours or overnight. Right before serving, drizzle with warm hot fudge sauce. Top with cherries, if desired.
To slice, let sit at room temperature for a few minutes. Use a large knife dipped in warm water to cut the slices. Serve immediately with extra chocolate fudge sauce and cherries.
Categories: Recipes | Tags: dairy free dessert, easy quick gluten-free dessert, gluten free, gluten free ice cream pie, gluten free picnic foods | No Comments »
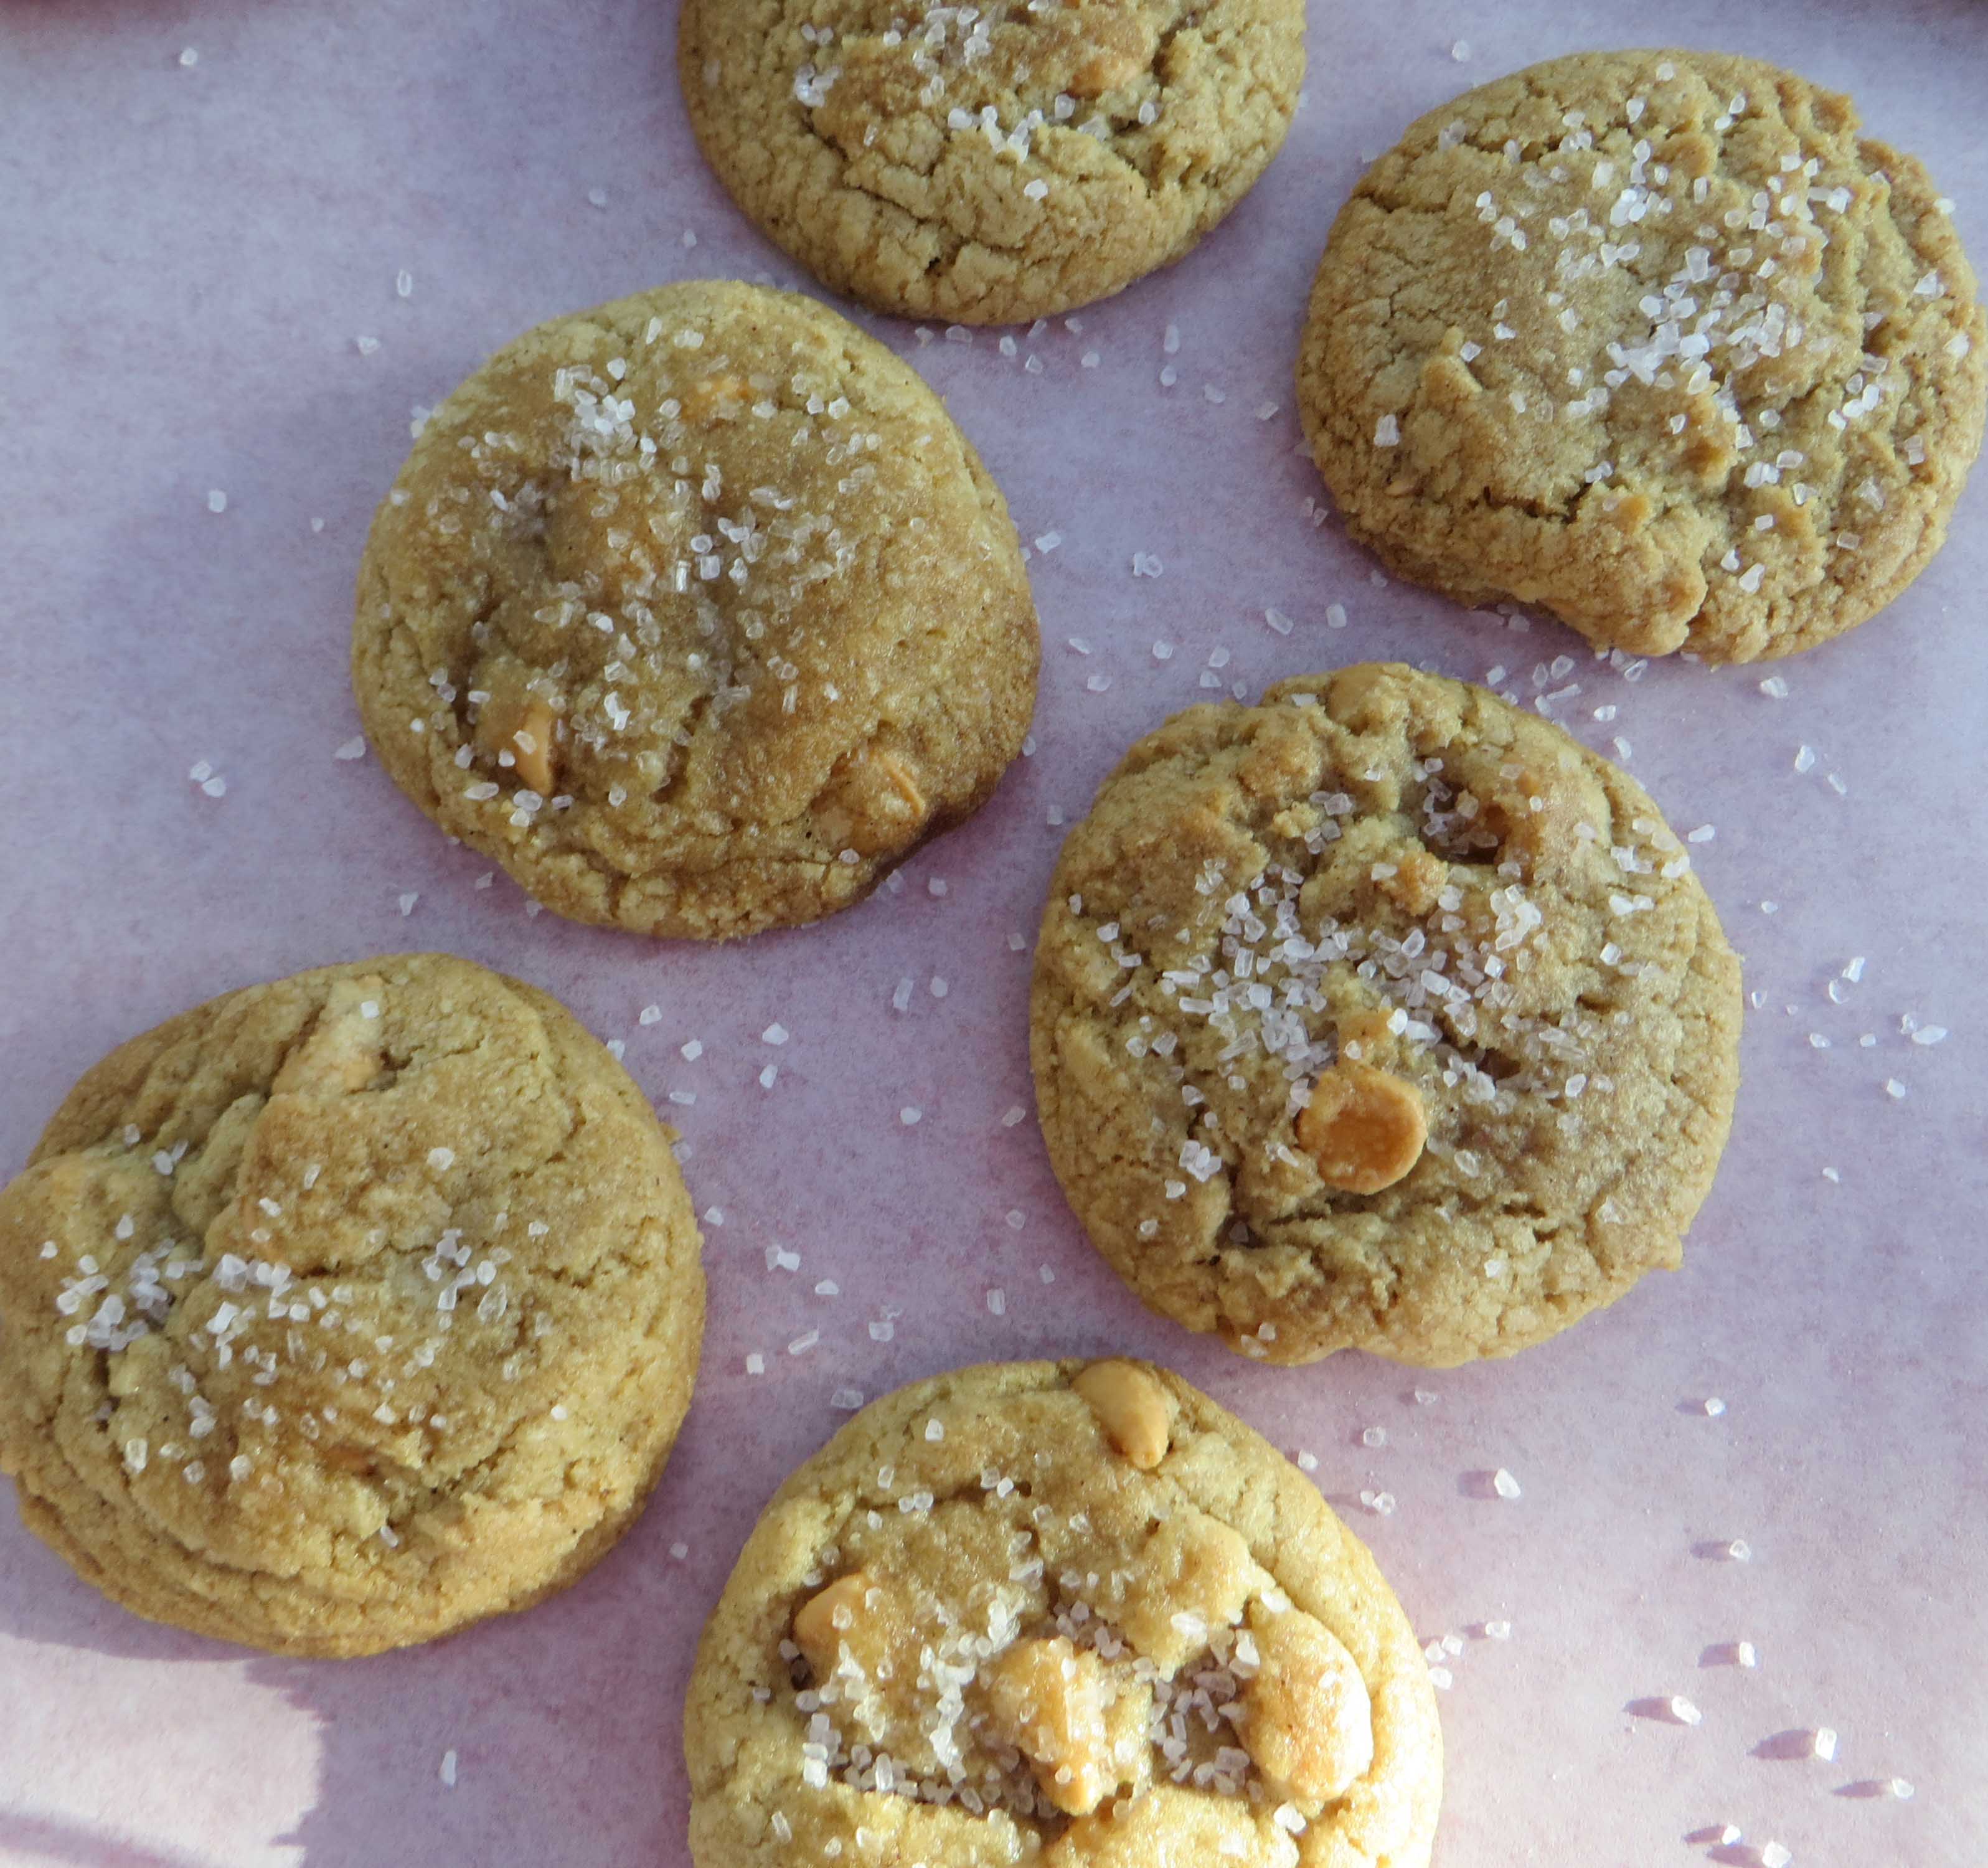
Recipe from Beth Hillson
Makes 36 cookies
These chewy cookies are laced with brown sugar and sweet butterscotch chips. Adding a sea salt topping creates an explosion of flavors. Easy to make, these are perfect for holiday cookie swaps and gifting but you’ll want these on your table for every occasion.
2 cups gluten free cake and cookie blend (below)
2 teaspoons baking soda
1/2 teaspoon ground cinnamon
3/4 cup unsalted butter, at room temperature
1 1/4 cups light brown sugar
1 large egg
1 teaspoon vanilla extract
3/4 cup gluten free butterscotch chips such as Hershey or Guittard brand
Sea salt, for garnish, optional
Preheat oven to 350 degrees F. Line 2 cookie sheets with parchment paper. Set aside.
In a medium bowl, whisk together flour blend, baking soda, and cinnamon. Set aside.
Place butter and brown sugar in the large mixing bowl. Beat on medium speed until light and fluffy, about 3 minutes. Scrape down the sides of the bowl with a spatula. Add the egg and vanilla. Beat on medium speed until combined.
Add the dry ingredients. Mix until the just combined. Stir in the butterscotch chips.
Using a spoon or cookie scoop, form tablespoons size balls of cookie dough. Top with a sprinkle of sea salt. Press into the dough. Place on balls on prepared baking sheet, about 2 inches apart. Bake cookies for 10 to 12 minutes, or until lightly browned around the edges. Do not over bake. Cool on the pan for 5 minutes. Transfer cookies to a wire cooling rack and cool completely. Store in an air-tight container for up to 4 days or freeze for up to 3 months.
Cake and Cookie Flour Blend
This makes enough flour blend for several of your favorite holiday cookie recipes.
2 cup sweet white sorghum flour
2 cup white rice flour
1 ½ cups cornstarch
3 teaspoons xanthan gum (or guar gum)
1 teaspoon salt
Mix to combine. Store leftover blend in a zip-lock bag in the refrigerator.
Recipe By Beth Hillson
Serves 12
You’ll love this winning combination of chocolate and banana. Not only does it make for a moist cake, but one that can also be Passover-friendly by using potato starch and almond flour in place of the flour blend. (Scroll down for that recipe.) I’ve served this with a chocolate glaze and sliced strawberries or sliced bananas to dress it up. But it’s also delicious as it is.
5 large eggs at room temperature, separated 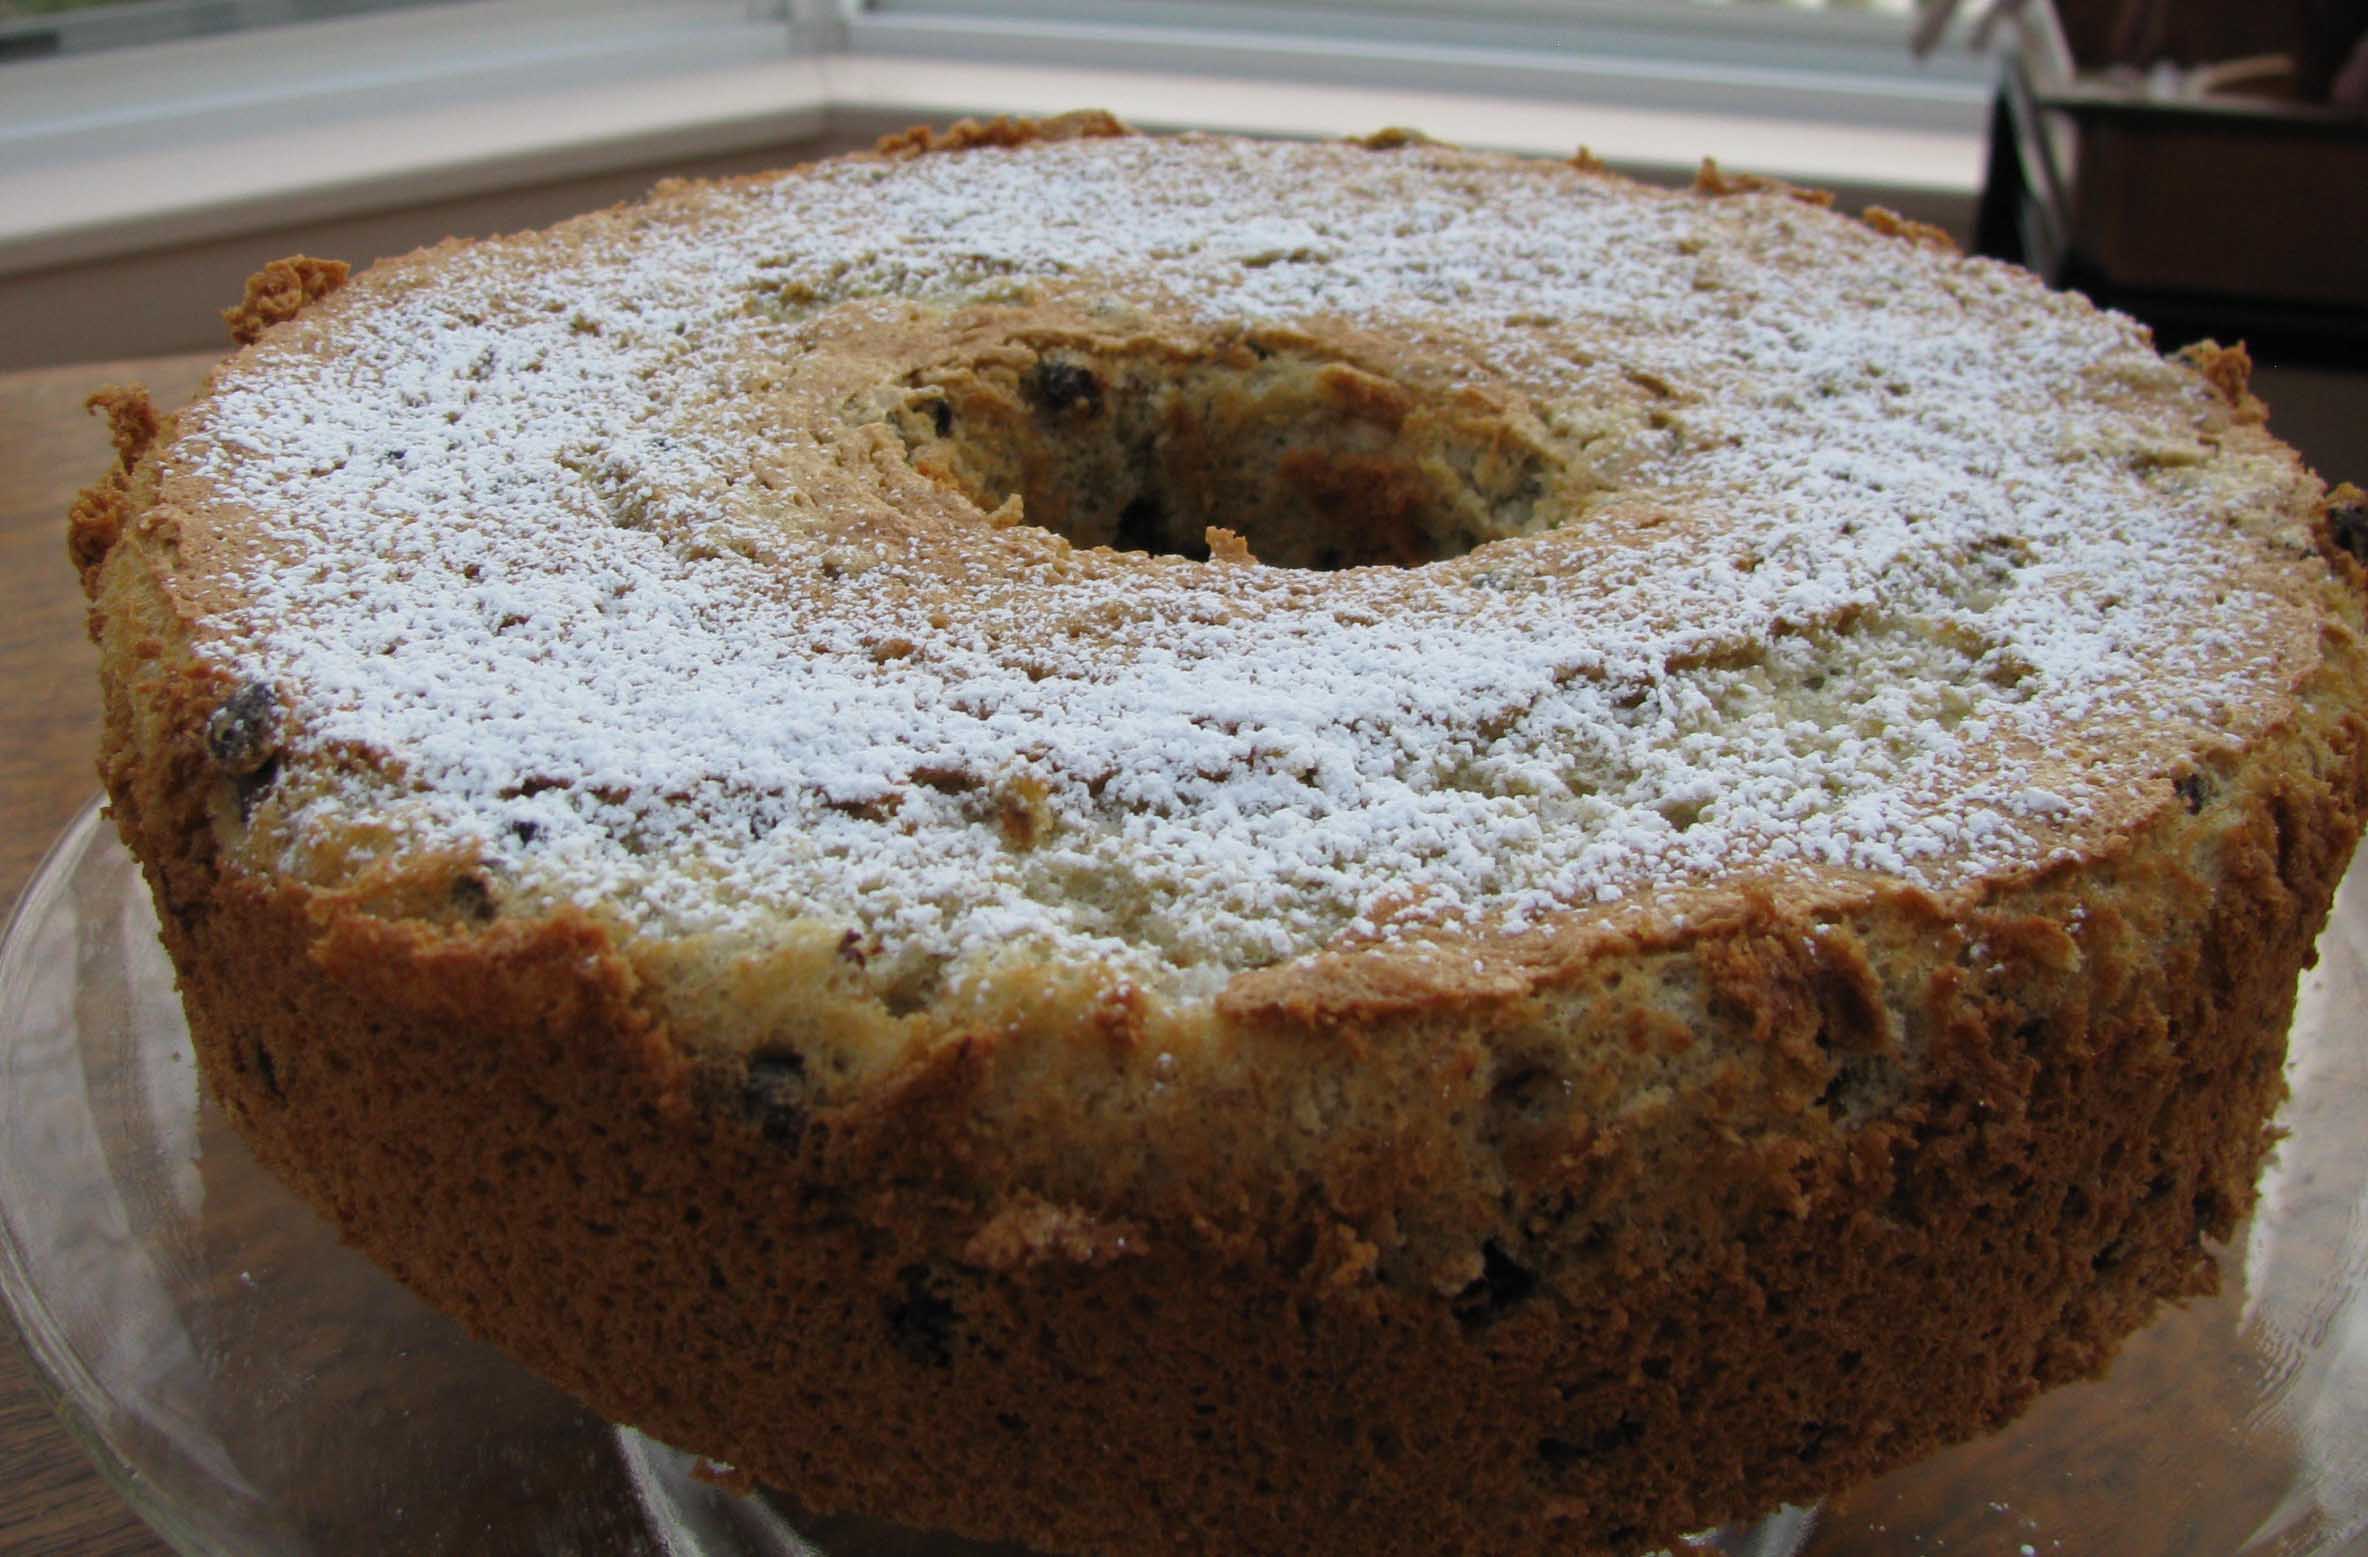
¾ cup sugar
1 cup Gluten Free Pantry all/purpose flour or other g-f all/purpose blend*
1/4 cup vegetable oil
1 teaspoon vanilla extract
3 large ripe bananas, pureed to yield 1 cup
4 ounces (2/3 cup) semisweet or bittersweet chocolate chips
Preheat oven to 350° F.
Beat egg whites to soft peaks and gradually add the sugar and continue beating the egg whites until they are very stiff.
In a mixing bowl, add the flour. Make a well and add the egg yolks, oil, and the vanilla. Beat with a portable mixer on high until mixture is very smooth.
Add bananas to the egg mixture and mix gently to incorporate, but do not beat. Fold in the chocolate chips.
Using a rubber spatula, gently fold in the egg whites into the banana mixture by placing the spatula at the far side of the bowl, following the bowl’s far side to the bottom, scraping along the bottom and up the side of the bowl closest to you. Lift the spatula and rotate the bowl slightly, repeating. Don’t be tempted to mix the ingredients at this point or you will deflate the egg whites. Continue until the mixture is pretty homogenous.
Transfer to an ungreased 10″ tube pan, preferably one with tips (feet) on the top and bake for 50 – 60 minutes or until a cake tester comes out clean and dry.
Remove from oven and invert pan on a wire rack to cool.
When cool, run a sharp kitchen knife along the edges of the tube pan, including the tube, and remove the cake.
Serve with a chocolate glaze and sliced strawberries or bananas if desired.
*Add 1 teaspoon xanthan gum and ¼ teaspoon salt to flour mix if not included in the blend.
Chocolate Chip Banana Cake
Passover Version
Serves 12
5 large eggs, separated
¾ cup sugar
¼ teaspoon salt
3 large ripe bananas, pureed to yield 1 cup
1/4 cup vegetable oil
1 teaspoon vanilla extract
1 cup potato starch
1/3 cup almond flour
4 ounces (2/3 cup) semisweet or bittersweet chocolate chips
Preheat oven to 350° F.
Beat egg whites to soft peaks and gradually add the sugar and continue beating the egg whites until they are very stiff. Set aside.
In a mixing bowl, combine the yolks, the salt, the banana puree, oil, and the vanilla. Add the potato starch and almond flour. Beat on high until mixture is very smooth.
Fold in the chocolate chips. Using a rubber spatula, gently fold the egg whites into the banana mixture.
Transfer to an ungreased 10″ tube pan, preferably one with tips (feet) on the top and bake for 50 – 60 minutes or until a cake tester comes out clean and dry. Remove from oven and invert pan on a wire rack to cool.
When cool, run a sharp kitchen knife along the edges of the tube pan, including the tube, and remove the cake.
TIP: Bananas not ripe? Prick the peels and microwave 1 to 2 minutes or until very warm and fragrant. Cool and puree.
Categories: Recipes | Tags: easy gluten free recipes, easy quick gluten-free dessert, gluten free Passover desserts | 2 Comments »
Crêpes were the first recipe I made over after I was diagnosed with celiac disease more than 35 years ago.
A few months earlier, I had been given Julia Child’s first cookbook, “Mastering The Art of French Cooking,” and I was cooking my way through Julia’s wonderful recipes. Her cookbooks opened a door and, whisk in hand, I went through. I cooked and baked and held parties just to have tasters who would help me devour my experiments. Her book was my beacon, my inspiration.
Then a doctor told me to avoid gluten and I was overwhelmed. I could not simply put those books back on the shelf and close my mind to the delicious foods I had discovered. So I went to culinary school and began experimenting again, but this time, I made my recipes with gluten-free flour. As long as I maintained the ratio in a recipe, the balance of wet to dry and fat and sugar, and replaced regular flour with the same amount of gluten-free flour, I had success every time.
I picked crêpes first because the formula called for a few simple ingredients – eggs, milk, and flour. What could be easier? And the batter sits overnight so the mixture is tenderized and softens. It turns out, the ingredients have an affinity for rice flour. The crêpes held together beautifully. The results were delicious. I flamed them with brandy to make Crêpes Suzette. I filled them with ricotta cheese, lemon and currants. No one had any idea they were gluten-free.
With my taste buds engaged and my curiosity in overdrive, I was ready to try more recipes. Today, I am confident that any recipe can be made over with gluten-free ingredients. My cookbook, “Gluten-Free Makeovers,” is filled with many of these successes.
Last week would have been Julia Child’s 100th birthday and the 50th year since “Mastering The Art of French Cooking,” was released. Celebrations large and small were held all over the world. I made crêpes in honor of Julia’s birthday, reserving an extra shot of brandy for a toast. Happy Birthday, Julia and Bon Appetit!
This recipe is a classic French formula. The trick is to make these very thin so they are pliable and easy to roll. Since this is peach season, I made up a quick peach Melba-style filling. Unfilled crêpes freeze well.
Crêpes with Easy Peach Melba-Style Filling
Makes Fifteen to Twenty 6-inch Crêpes
The Crêpe recipe is reprinted from my cookbook, Gluten-Free Makeovers (Da Capo Press) where you’ll find more delicious fillings for them.
2 large eggs
¾ cup rice flour
¼ cup tapioca starch/flour
½ teaspoon salt
¼ teaspoon xanthan gum
1 tablespoon sugar (for dessert crepes)
1¼ cups milk, soy milk, or rice milk
1.Whisk together the eggs in a large bowl. In a separate bowl, combine rice flour, tapioca starch, salt, xanthan gum, and sugar, if using. Whisk into the eggs just until moistened. The mixture will be very thick and gloppy.
2. Add the milk, a little at a time, stirring vigorously until the mixture is smooth and the consistency of heavy cream. Cover and chill for up to 24 hours.
3. Lightly oil one or two 6-inch crêpe pans or heavy frying pans and set over medium heat. Pour about 2 tablespoons of the batter into each pan and swirl until the pan is coated. Pour any excess batter back into the bowl. Cook the crêpe until the edges look very dry, about 1 minute. With a sharp knife, loosen the edges of the crêpe. Using fingers, grab the edges and flip the crêpe. Cook another 30 seconds and remove to a platter. Continue until the remaining batter is used, lightly oiling the pans with a paper towel as necessary.
Peach Melba-Style Filling
1 cup seedless raspberry jam
2 tablespoon brandy
6 medium vine-ripened peaches, peeled and coarsely chopped
confectioners’ sugar
1 peach, skin left on, for garnish
Combine jam with brandy. Spread 1 tablespoon of the mixture over the surface of a crêpe. Add a few pieces of cut up peaches. Roll the crêpe. Repeat until all the crêpes are used. Dust with confectioners’ sugar and serve.
Categories: Recipes | Tags: easy quick gluten-free dessert, gluten-free makeover, gluten-free recipes, Gluten-Free. Desserts, Julia Child | 3 Comments »
Follow Us Online
More Cookbook Stuff
Gluten-Free Makeovers - - Nearly 200 recipe makeovers for everyone to enjoy. Buy it at glutenfreeandmore.com, Amazon.com and barnesandnoble.com.
About This Blog
 Baking guru, Beth Hillson, transforms favorite foods into recipes that are safe for your gluten-free diet.


