Recipe By Beth Hillson
No-Knead Bread seems like an oxymoron to me. Aren’t we all looking for a texture that allows us to touch and knead our gluten free dough? Although you actually can knead the dough in this recipe, it’s not necessary.
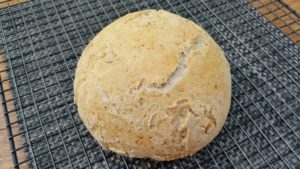
This bread is a makeover from the wildly popular no-knead wheat loaf that’s based on a recipe published in the New York Times courtesy of Jim Lahey of Sullivan Street Bakery fame. I know a number of bread bakers who make this regularly. It’s beautiful, tastes terrific, requires no special ingredients and, best of all, it takes virtually no effort to produce a perfect loaf.
When no-knead bread became the rage a couple of years ago for people who bake with wheat flour, it caught my attention. Its popularity was based on an easy prep: Mix it up in a bowl, let it rest on the counter up to 18 hours and stick it in the oven. Voila! Homemade bread.
I used my makeover magic to create this great-tasting, gorgeous loaf, the gluten-free version of Jim Lahey’s recipe. I used flax meal so the structure benefitted from eggs but could rest on the counter overnight. In place of wheat flour, I used a blend of gluten-free flours, starches and xanthan gum.
The amount of water was the tricky part. Too much water made the dough clay-like in texture and produced a hard rather than crusty exterior. Too little resulted in a dry, crumby loaf.
The original recipe called for a tiny bit of yeast. That might work with wheat dough but didn’t produce enough lift for dense, gluten-free dough. I increased the amount of yeast to create a steady fermentation process and a subtle sourdough taste. My loaf did not benefit from a lengthy resting period. The original recipe suggests 18 hours. This dough seems best if you let is rest 8 to 12 hours or overnight.
If you have a Dutch oven, I recommend using it. This produces just enough steam to create a chewy crust. Otherwise, set the boule on a baking stone or baking sheet to bake.
I’ve doubled the recipe and pulled off dough for rolls and breadsticks, too. It’s pretty cool dough and very easy to make.
Note: A version of this recipe appears in the Oct/Nov 2016 issue of Gluten Free & More Magazine.
My Makeover of No-Knead Bread
2 tablespoons flax meal
6 tablespoons hot water
1 ½ cups sorghum flour
¾ cup potato starch
½ cup sweet rice flour
¼ cup tapioca starch flour
2 ½ teaspoons xanthan gum
1 teaspoon salt
2 teaspoons yeast
1 cup warm water, divided, more as needed
2 tablespoons honey
In a medium bowl, combine flax meal with hot water and let sit until thick, about 5 minutes. Meanwhile, mix together sorghum flour, potato starch, sweet rice flour, tapioca starch flour, xanthan gum and salt. Set aside.
Stir yeast, ½ cup warm water and honey into flax gel. Let sit for 15 minutes or until mixture becomes foamy.
Stir mixture into dry ingredients. Add remaining ½ cup warm water, 2 tablespoons at a time, until mixture is smooth and silky to touch but not sticky. It may take the full ½ cup of water. If mixture has dry spots, add 1 tablespoon additional warm water. Dough will be shaggy (not smooth) at this point.
Set in a bowl. Cover with plastic wrap and let the dough sit in a warm spot on the counter for 8 hours or overnight. It should rise, but won’t double in size. As the dough sits, it will give off moisture that will soften the texture.
Coat a sheet of parchment paper with oil. Set the dough on parchment and roll it to coat in the oil. Smooth into a ball. Set it in a 4-quart Dutch oven, cover with the lid and let it rise 1 hour.
Preheat the oven to 450 degrees. After 1 hour, remove the lid and score the top with a sharp knife. Brush with oil or egg wash, if desired. (This will cause the crust to brown.)
Cover and bake for 30 minutes. Remove the lid and bake another 20 to 30 minutes.
Cool completely before cutting.
Categories: Recipes | Tags: gluten free bread, gluten free bread makeover, gluten free quick rise bread, gluten free quick yeast bread | 5 Comments »


 Baking guru,
Jen says:
November 18, 2016 at 12:05 pm /
Thank you! Thank you! THANK YOU for making this recipe! I’ve been searching for MONTHS for a simple eggless gluten-free no knead boule bread recipe! 😀
I’ve came across so many misleading no-knead boule recipes that actually DID include non-gluten flours &/or eggs in them. It’s been so frustrating, but i’m glad i’ve FINALLY found yours!
I’m going to substitute maple syrup for honey since i’m vegan though.
Again, thank you so much! 🙂
Beth Hillson says:
December 7, 2016 at 9:49 pm /
You are very welcome!
Cheryl D. says:
January 26, 2017 at 5:13 pm /
HI Beth! About a week ago I saw Gluten Free and More’s version of this recipe on their website, and immediately wanted to make it. But, I couldn’t figure out exactly how to measure the flours in the recipe (because I’m used to weighing flours for GF baking). But, I believe in doing what the creator of a recipe recommends. So, I went looking for you 🙂 and found THIS page with the amended recipe. I see that you recommend spooning the flour out of the bag and straight into the measuring cup.
So, two questions: 1. Because the various GF flours I buy often come packed way more densely (like a brick) than others (that can be light and fluffy – even of the same type, depending on brand), just spooning them straight out of the bag and into a cup to measure would still yield different results when compared to more loosely-packed flours. So, do we fluff the various flours with, say, a spoon, fork, or a whisk and THEN spoon it into the measuring cups?
2. Also, the recipe on THIS page appears to be 1/2 the size of the one on the Gluten Free and More site. Yesterday, I had just bought a 4 quart Dutch Oven to make the larger recipe, but now I’d also like to make the really beautiful smaller one (since I’m the only one in the house who has to be GF). Given that difference, will this smaller loaf still yield a nice and pretty puffy-looking round ball if baked in the same 4 quart Dutch Oven? I’m wondering if it will be flatter since it is smaller. 🙂 Thanks Beth; I am thrilled I found your website and I can’t wait to taste this yummy-looking loaf!
Beth Hillson says:
February 28, 2017 at 2:02 pm /
Hi Cheryl, It looks like I got hacked so apologies for not replying more quickly. You are absolutely correct to fluff up the flour before measuring it. I do the same. As for the size of the bread, I recommend using the one from this web site. Because the bread was used as a cover shot, I had to double it for the magazine. I think the one here is more manageable and bakes better than the other. You could also use the dough to make the rolls and breadsticks from the magazine article. Hope that helps. So glad you found me. Best, Beth
Cheryl D. says:
March 4, 2017 at 6:10 pm /
Awww; THANKS, Beth!! I am glad you finally straightened out the problem with the hacking-thing! It IS an advantage for me to use the smaller loaf, as I am the only Celiac in the family. I am SO happy to try the smaller loaf; do I still cook it in the 4 quart dutch oven I bought specifically for baking the larger loaf? I would love it if the loaf bakes up nice and round and high; so, should I use an even smaller dutch oven? And I’m glad I found you, too. 🙂