
Category Archives: Recipes
A Recipe From Beth
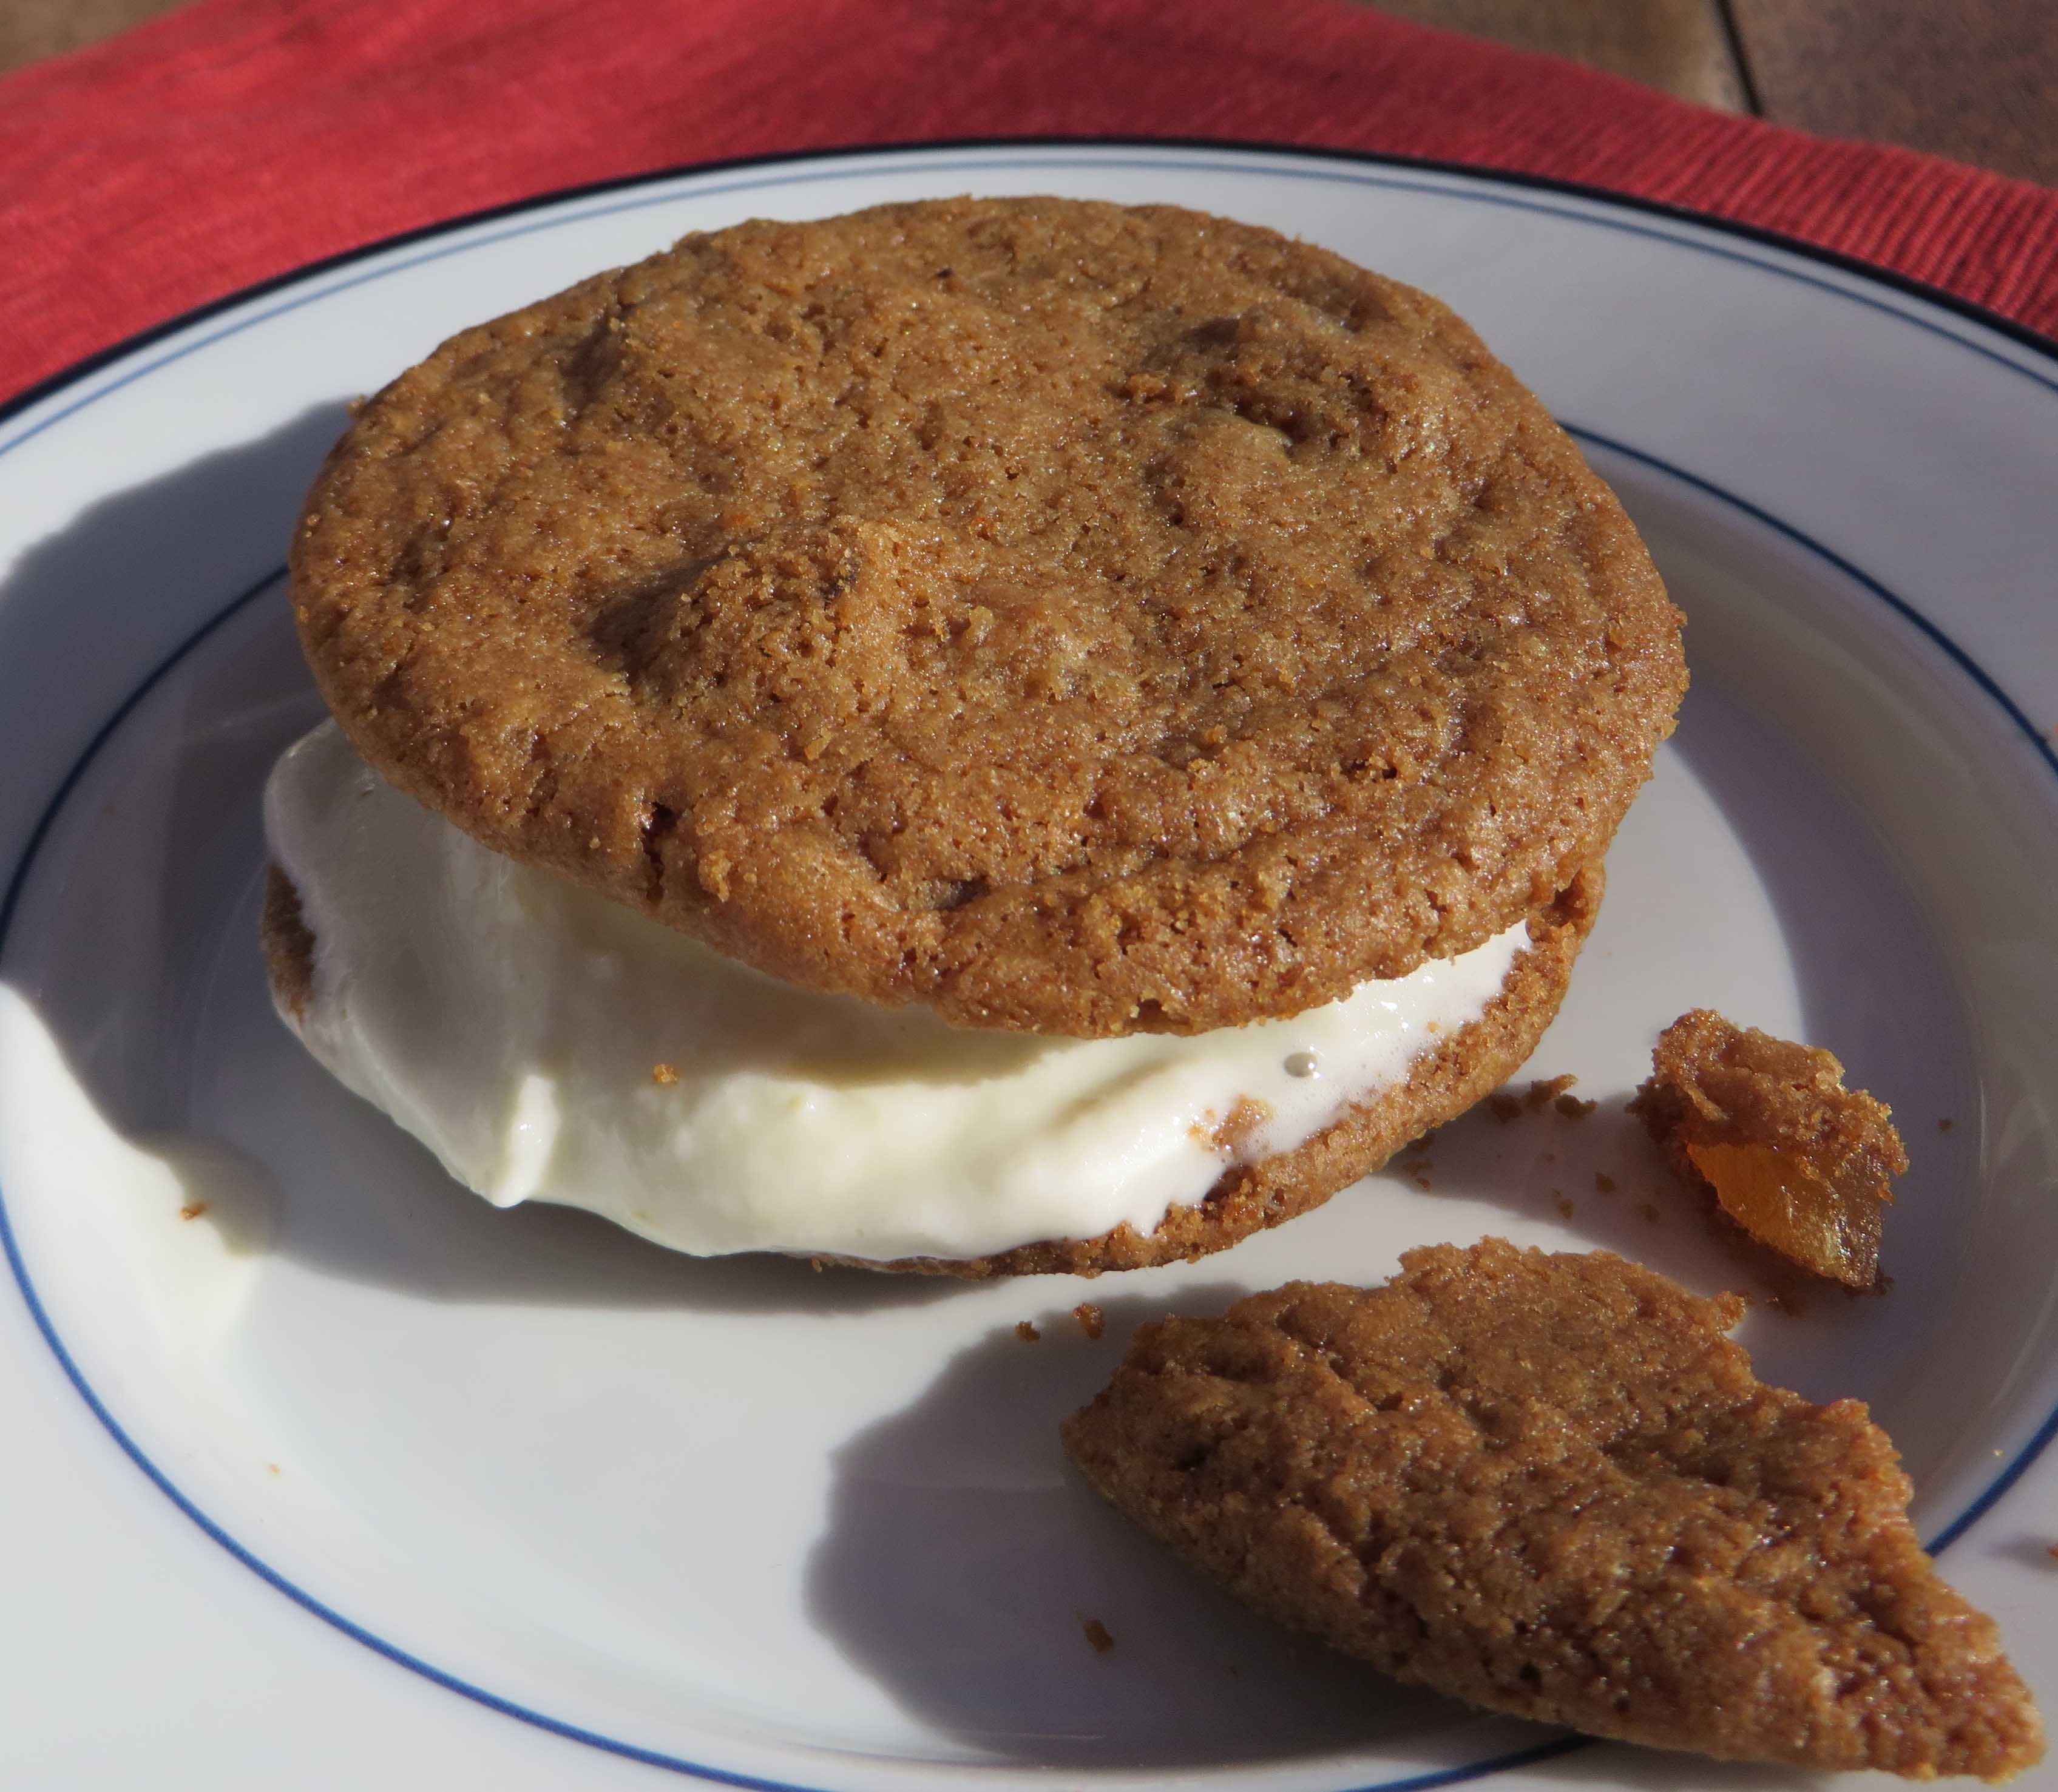
Tate’s Bake Shop GF Ginger Cookie Ice Cream Sandwiches
One Serving
I’m okay taking shortcuts when the results are delicious and impressive. And during the holiday season, I’m all about doing things the easy way. This fun dessert is exactly that — bursting with flavor and embarrassingly simple. I start with two top notch ingredients — yummy tasting Ginger Cookies from Tate’s Bake Shop and exquisitely rich ginger ice cream from Bart’s Homemade Ice Cream. My guests assemble their own ice cream sandwiches. I sit back and collect the ooh’s and ah’s.
First, let me tell you a little bit about the amazingly talented baker behind these cookies. If you visit Southampton, NY with its charming beach community and New York chicness, you’ll come upon a little bake shop called Tate’s. It’s legendary around the Hamptons. Creator, Kathleen King, has been baking here forever. Long before she decided to turn her amazing cookies into gluten free gems, I was making over recipes from her first cookbook so I could enjoy the gluten free versions.
Now Tate’s Bake Shop makes a gluten free line of cookies (in a dedicated facility) that will knock your socks off. I was beyond excited to receive a gift basket of their goodies. The butter, the crunch. Wow. My friend, Gail, had just served Tate’s Ginger Cookie Ice Cream Sandwiches with ginger ice cream at a dinner party. The cookies are peppered with bites of crystallized ginger. I was over the moon. I had to recreate that “recipe” for you here.
2 Tate’s Ginger Zinger Cookies
1 scoop (about ¼ cup) Bart’s Homemade Ginger Ice Cream (it says GF on the label) or another good quality ginger ice cream
Warm Hot Fudge Sauce, if desired
Soften the ice cream a bit then spread it over the flat side of one cookie. Top with the second cookie (flat side pressed onto the ice cream. Dip in warm hot fudge sauce if you wish. Eat every morsel! Ask for more!
A Giveaway 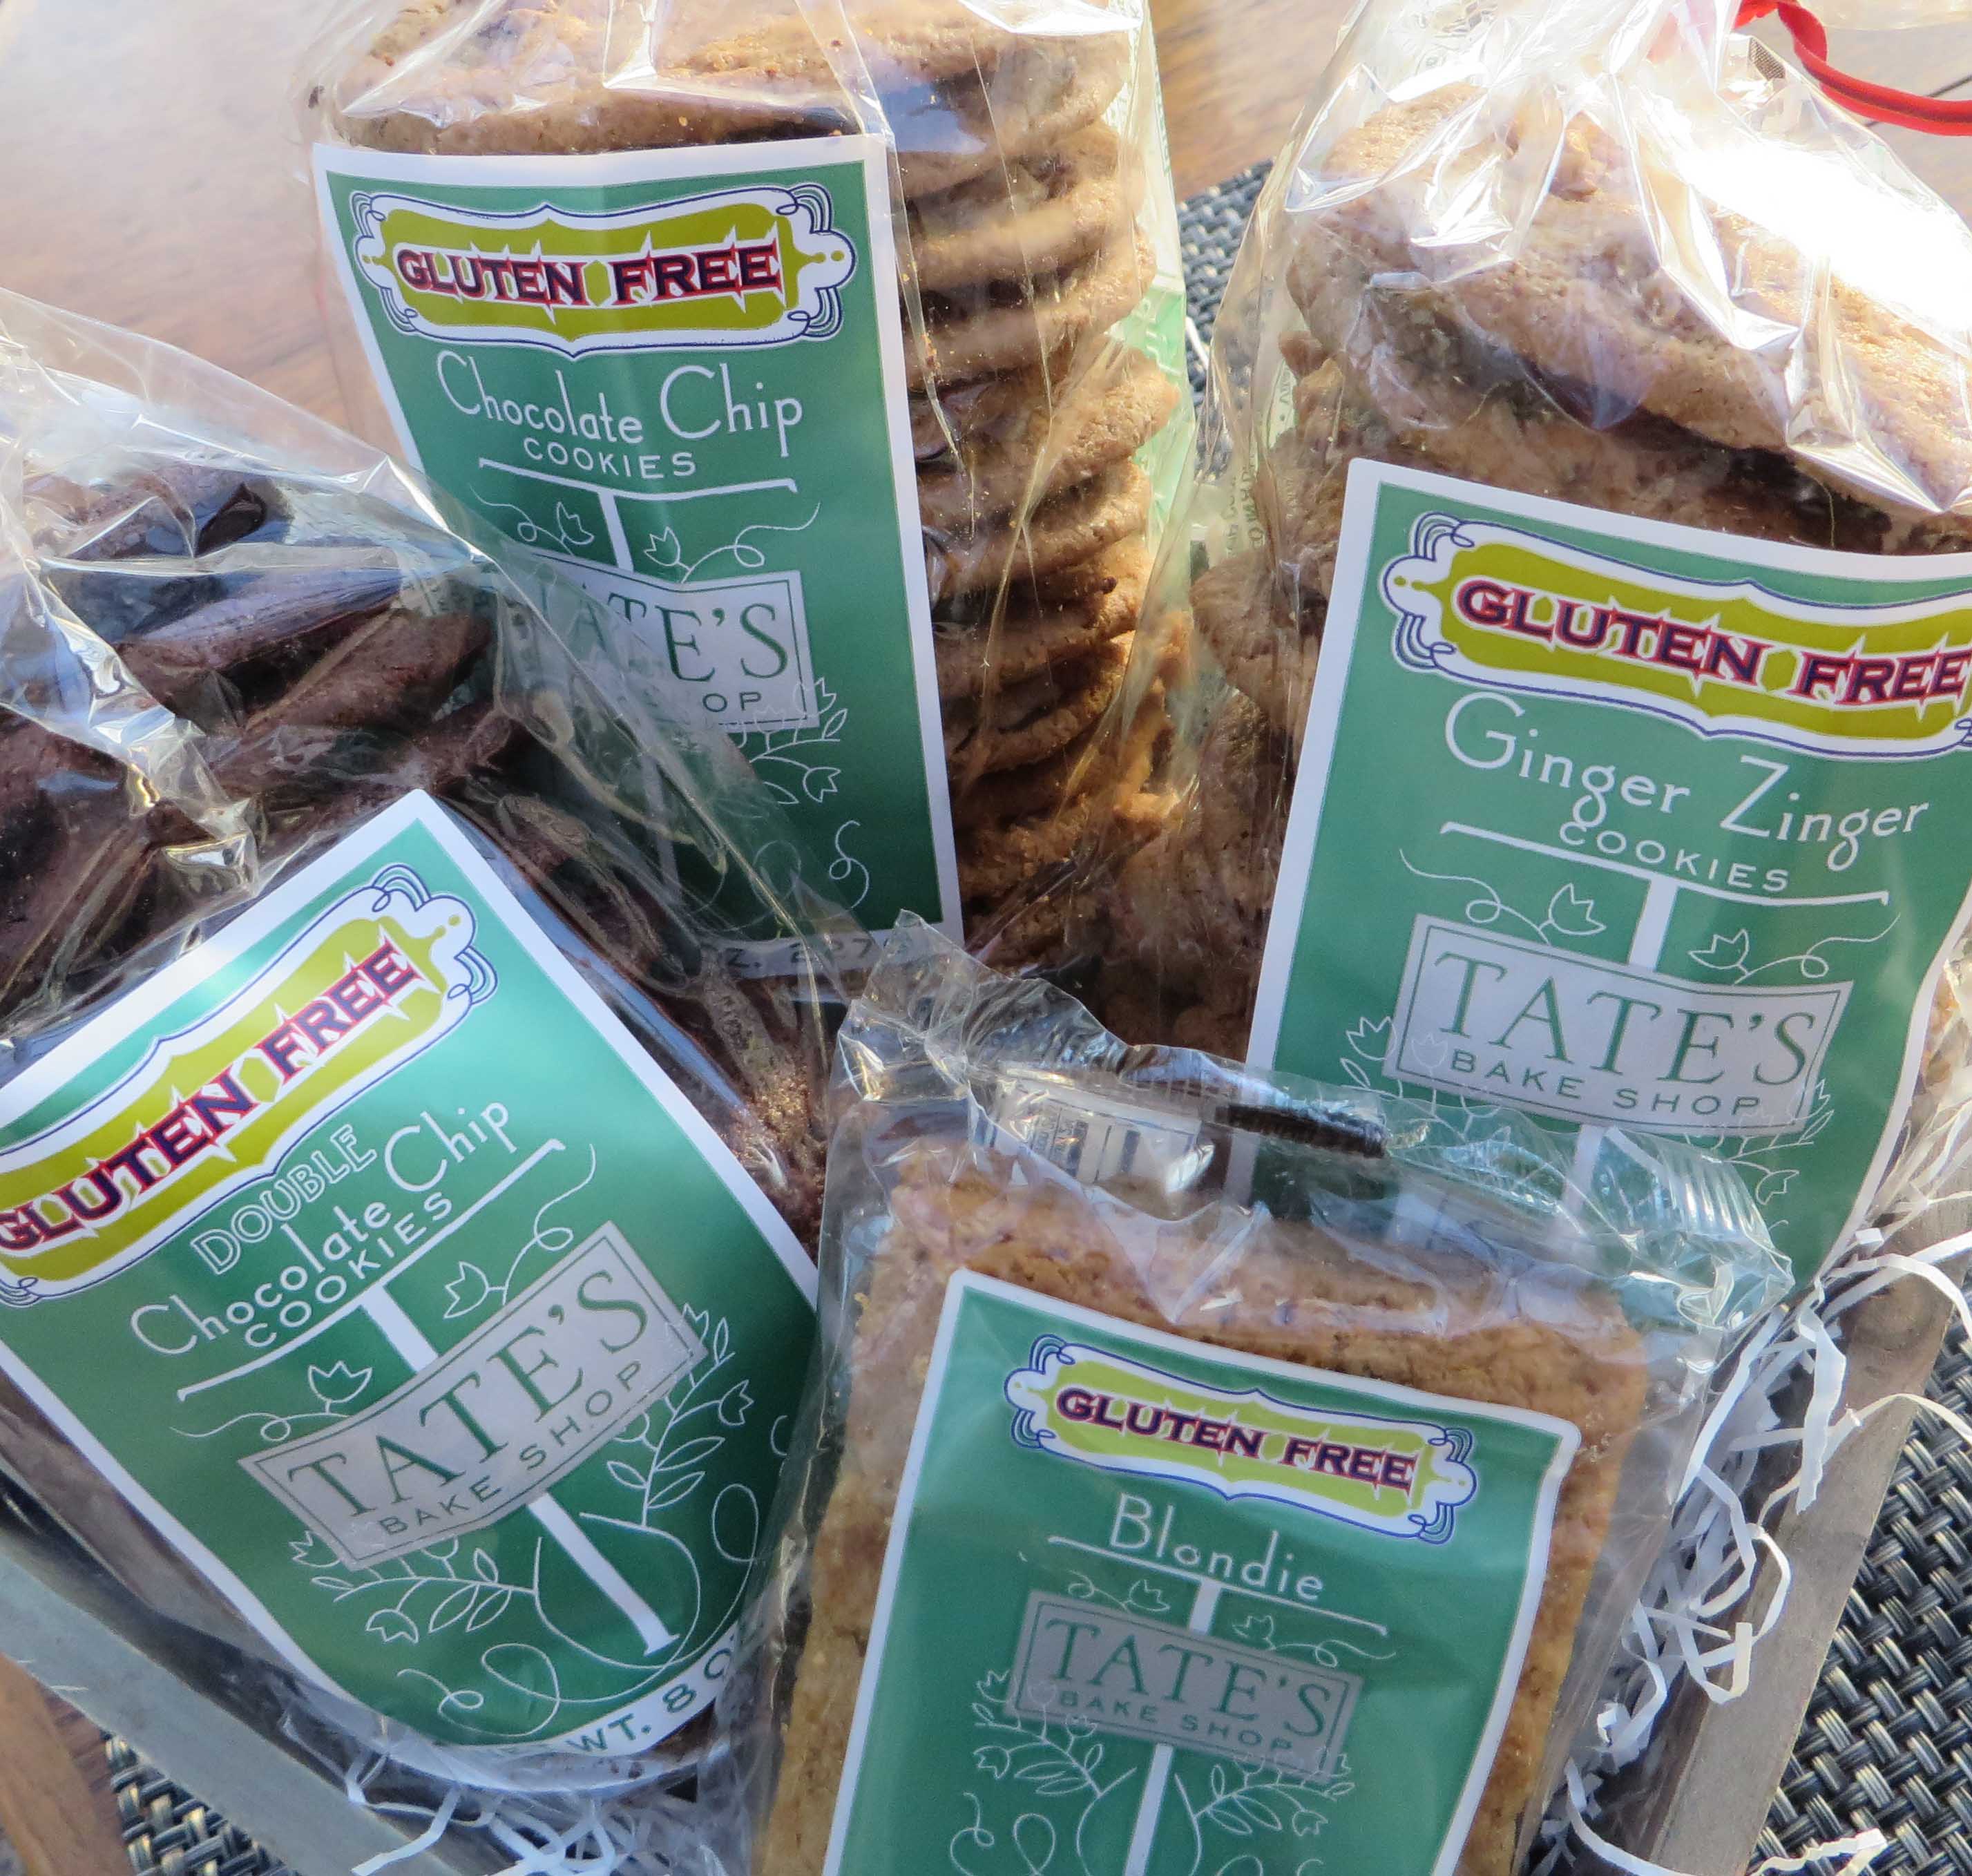
Tate’s has offered to send a gift basket of gluten free goodies to one lucky person reading my blog. Just send me an email at beth@glutenfreemakeovers.com to be entered in this giveaway. Hurry. You’ll have to reply by December 31, 2014.

Categories: Recipes | Tags: easy gluten free recipes, gluten free cookies, Gluten-Free. Desserts | No Comments »
A Recipe from Beth
Here’s a chance to play with your food and take some of the stress out of the hectic Thanksgiving holiday, too. Even young children can make these treats. Use them as favors and set one by each plate or fill a tray with these little birds and pass them out at dessert. Either way, these turkey favors are sure to become part of your Thanksgiving tradition from now on. 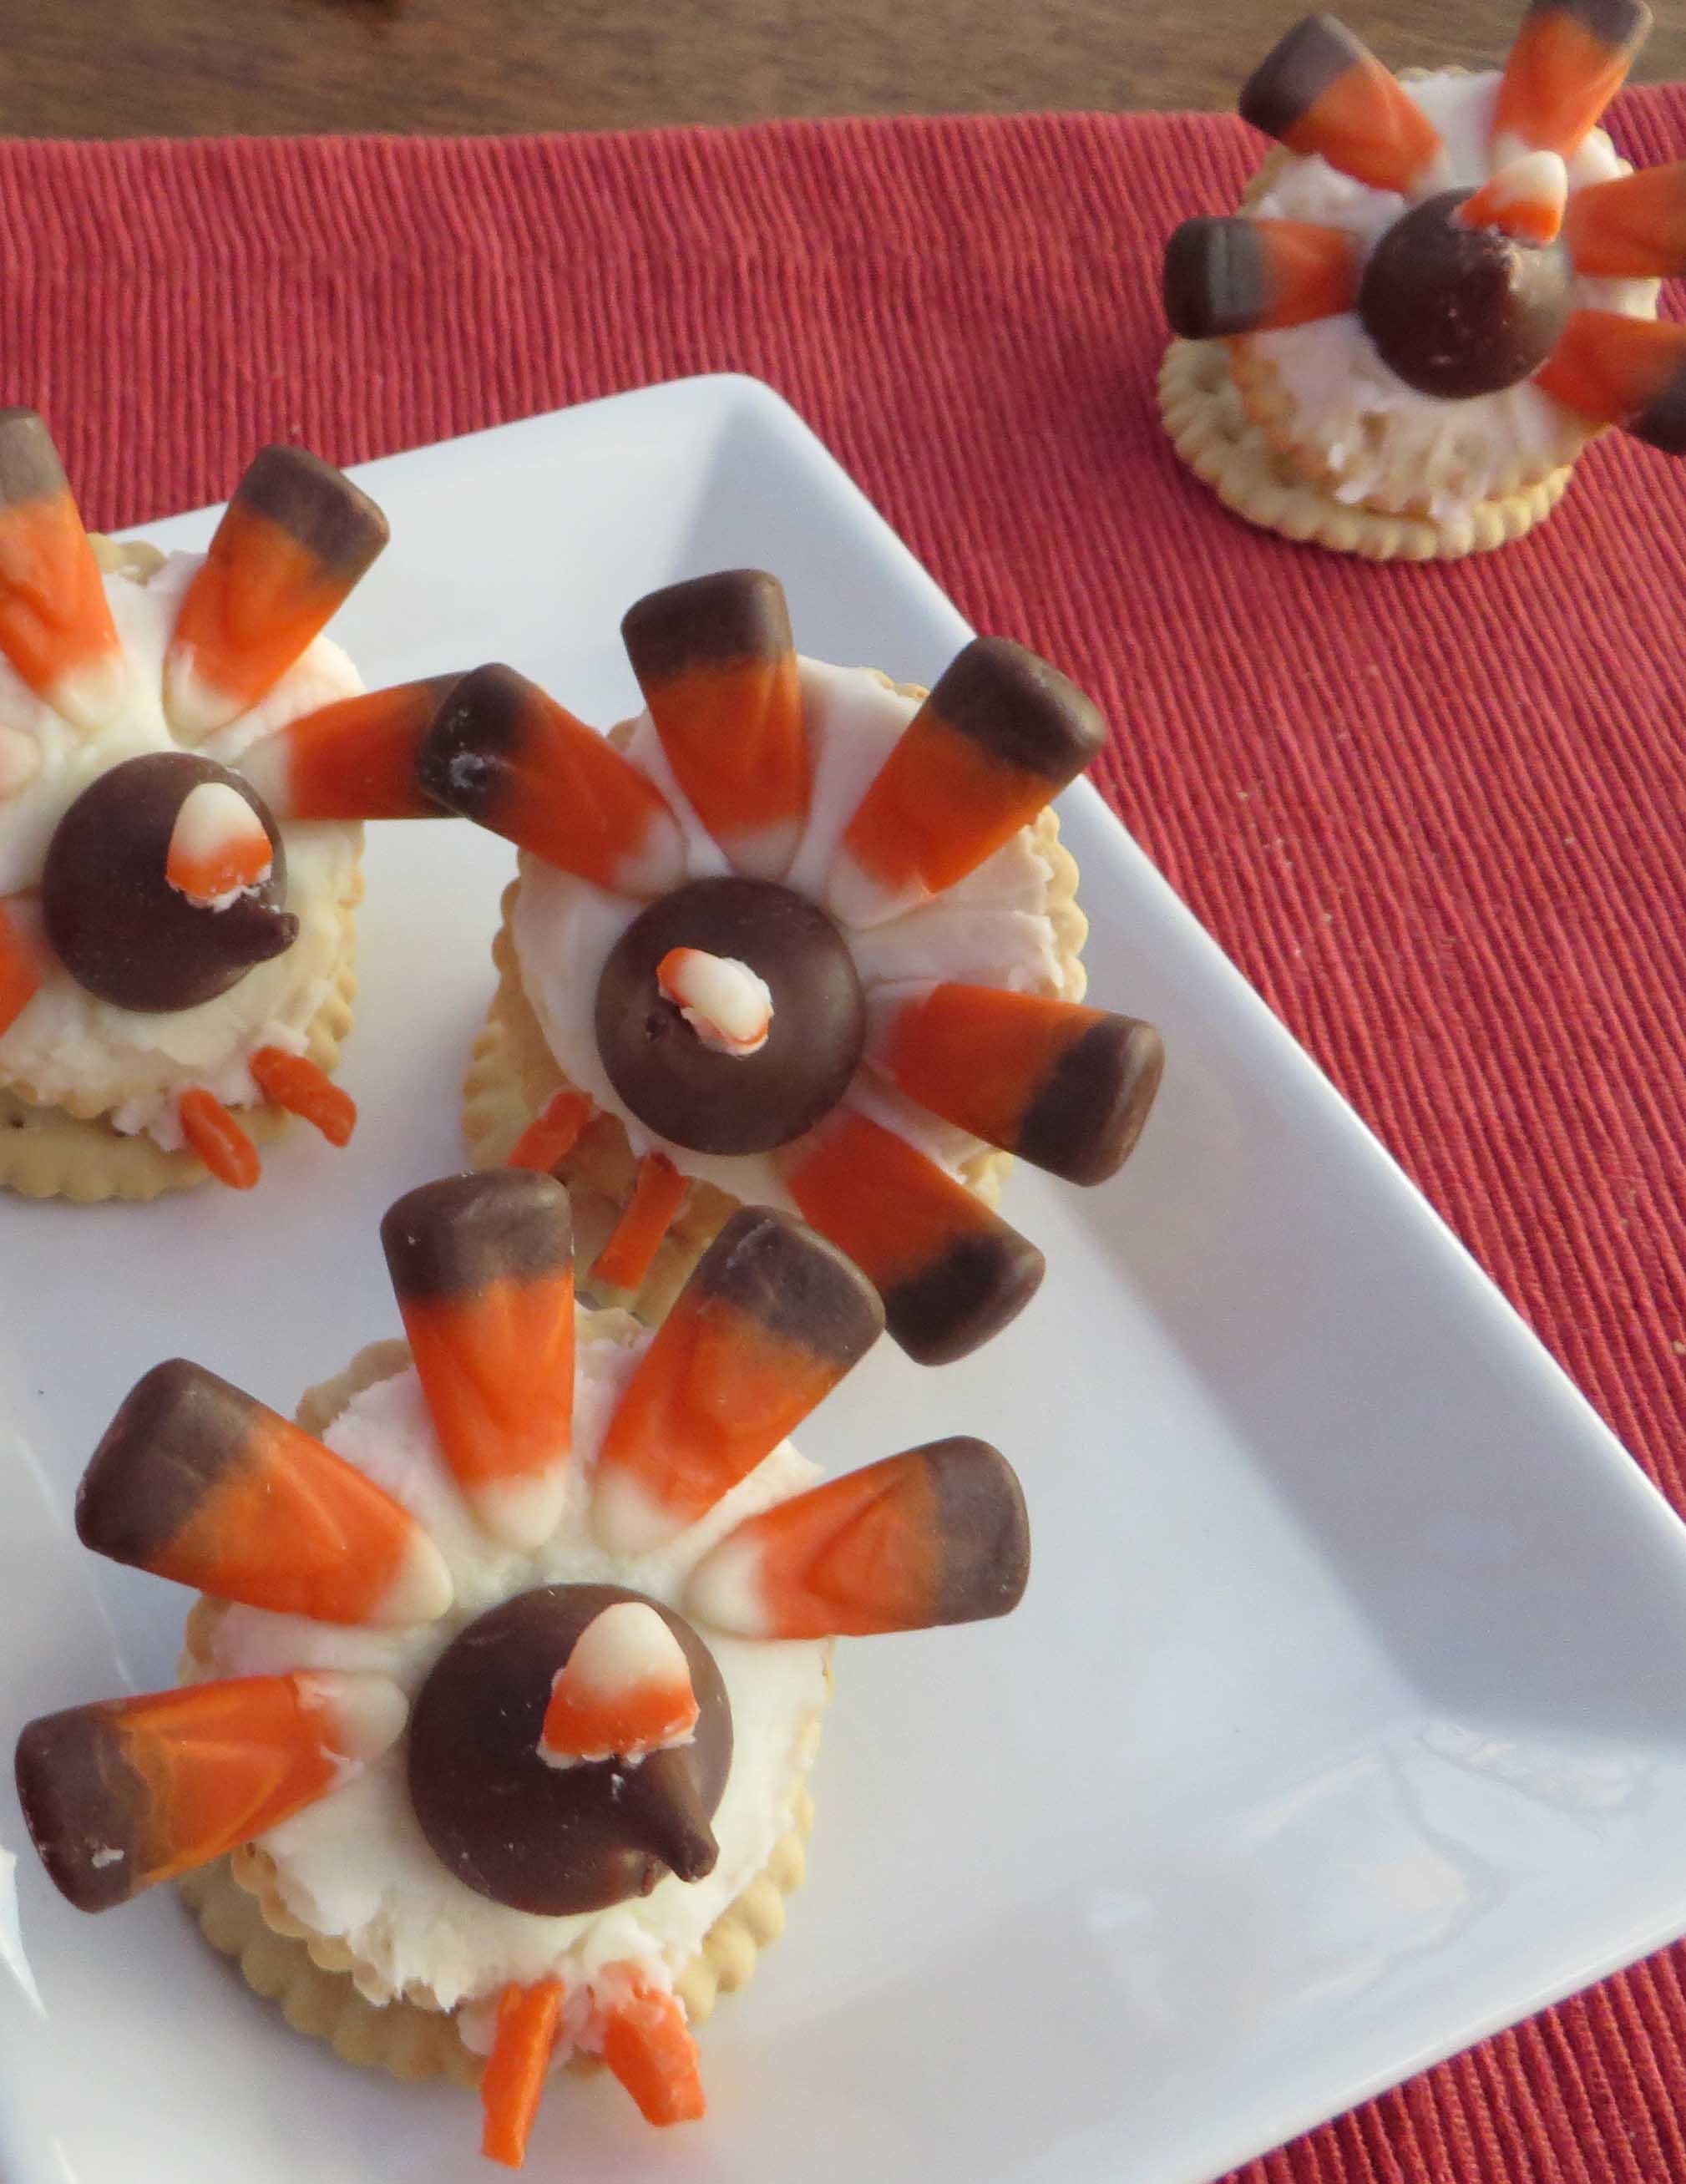
I used Glutino Original Crackers to make these and the recipe first appeared on Glutino’s blog. They are so darn cute, I had to share them with you.
You’ll Need:
1 box Glutino Original Flavor Crackers
1 bag Miniature Reese’s Peanut Butter Cups, 1 per turkey
1 bag Hershey’s Milk Chocolate Kisses, 1 per turkey
1 bag Indian Candy Corn, You’ll need 5 for tail feathers per turkey plus 1 for each beak and feet*
Frosting:
6 tablespoons softened unsalted butter
2 cups confectioners’ sugar
2 ½ tablespoons milk
To Make the Frosting: Beat the butter until fluffy. Add the sugar and beat until crumbly. Add the milk and beat until smooth. Add a little more milk, if necessary, to create a smooth frosting. However, remember, this is the spackle that holds everything together. It needs to be thick.
To Assemble:
Follow these steps to make assembly easier and prevent crackers from breaking.
Lay out the crackers on wax paper-lined cookie sheets.
Spread some frosting over the bottom of Reese’s Peanut Butter Cups. Set them slightly back from the center of a cracker and away from you. Put a small blob of frosting on the front of the peanut butter cup (facing you).
Spread a thick layer of frosting over the front of a second cracker and on the bottom edge of the cracker. This should be a fairly thick layer so the candy corn and kiss can adhere.
Press the frosted cracker against the blob of frosting on the peanut butter cup at a slight angle and press the bottom edge of frosting onto the first cracker. Hold it there for a minute to steady the cracker.
Now comes the fun part. Put a generous dollop of frosting on the bottom of a Hershey’s Kiss and set it in the center of the frosted cracker. This will be the beak. Press five candy corn in an arc around the cracker with the points toward the kiss. Start by placing one at the top of the cracker and two on each side so your turkey’s feathers will be even.
Note: It’s important to plant the kiss on the cracker first to stabilize it.
For the beak, cut the white and a little of the orange from a candy corn, smear a little frosting on the back, and smoosh it down above the pointy part of the kiss.
Cut two slices from the remaining orange part of this candy corn. Smear a little frosting on the narrow side of each and set them at the base of the cracker for feet. Voila. Your turkey favors are ready.
Put these in the fridge to harden or just leave them at room temperature, especially if your kitchen is cool. Don’t wrap them right away or the feathers may come loose.
Make these ahead if you are planning to use them for favors or set out all the ingredients and let the kids create decorations for the table on Thanksgiving Day.
* Indian Candy Corn is best because it is brown, orange and white (like turkey feathers). However, you can also use Candy Corn if you have it leftover from Halloween (It’s brighter orange, yellow, and white.) Brach’s, CVS and others state that their candy corn is free of gluten and the 8 top allergens. Brach’s does have a disclaimer that their products are made in a facility that also processes wheat. But CVS seems to go the extra mile to say their candy corn is gluten free. If you can’t find gluten free candy corn, you can use g-f pretzel sticks instead. Still cute and very safe
Categories: Recipes | Tags: easy gluten free recipes, gluten free Thanksgiving | 5 Comments »
From Beth Hillson
Makes 24 balls
Preparation time: 10 minutes
Here’s the ultimate quick, delicious dessert from Carol Fenster’s new cookbook, 100 BEST QUICK GLUTEN-FREE RECIPES. My friend, Carol, is a master of gluten-free cooking and baking. She has produced eleven cookbooks and each one is better than the last. But this one truly takes the proverbial gluten-free cake! Every recipe can be made in 30 minutes or less. With the holiday season around the corner, you’ll welcome these simple and yummy recipes for meals, entertaining and all your holiday treats. Here’s one of my favorites.
Serve these bite-size treats during the holidays or at dinner parties in little foil or paper candy liners. Their small size and rich, satisfying flavor makes them ideal for when you want just a little something sweet, not an entire dessert. A food processor makes the prep super-fast. You can replace the white chocolate with dark chocolate, if you wish.
1 cup whole almonds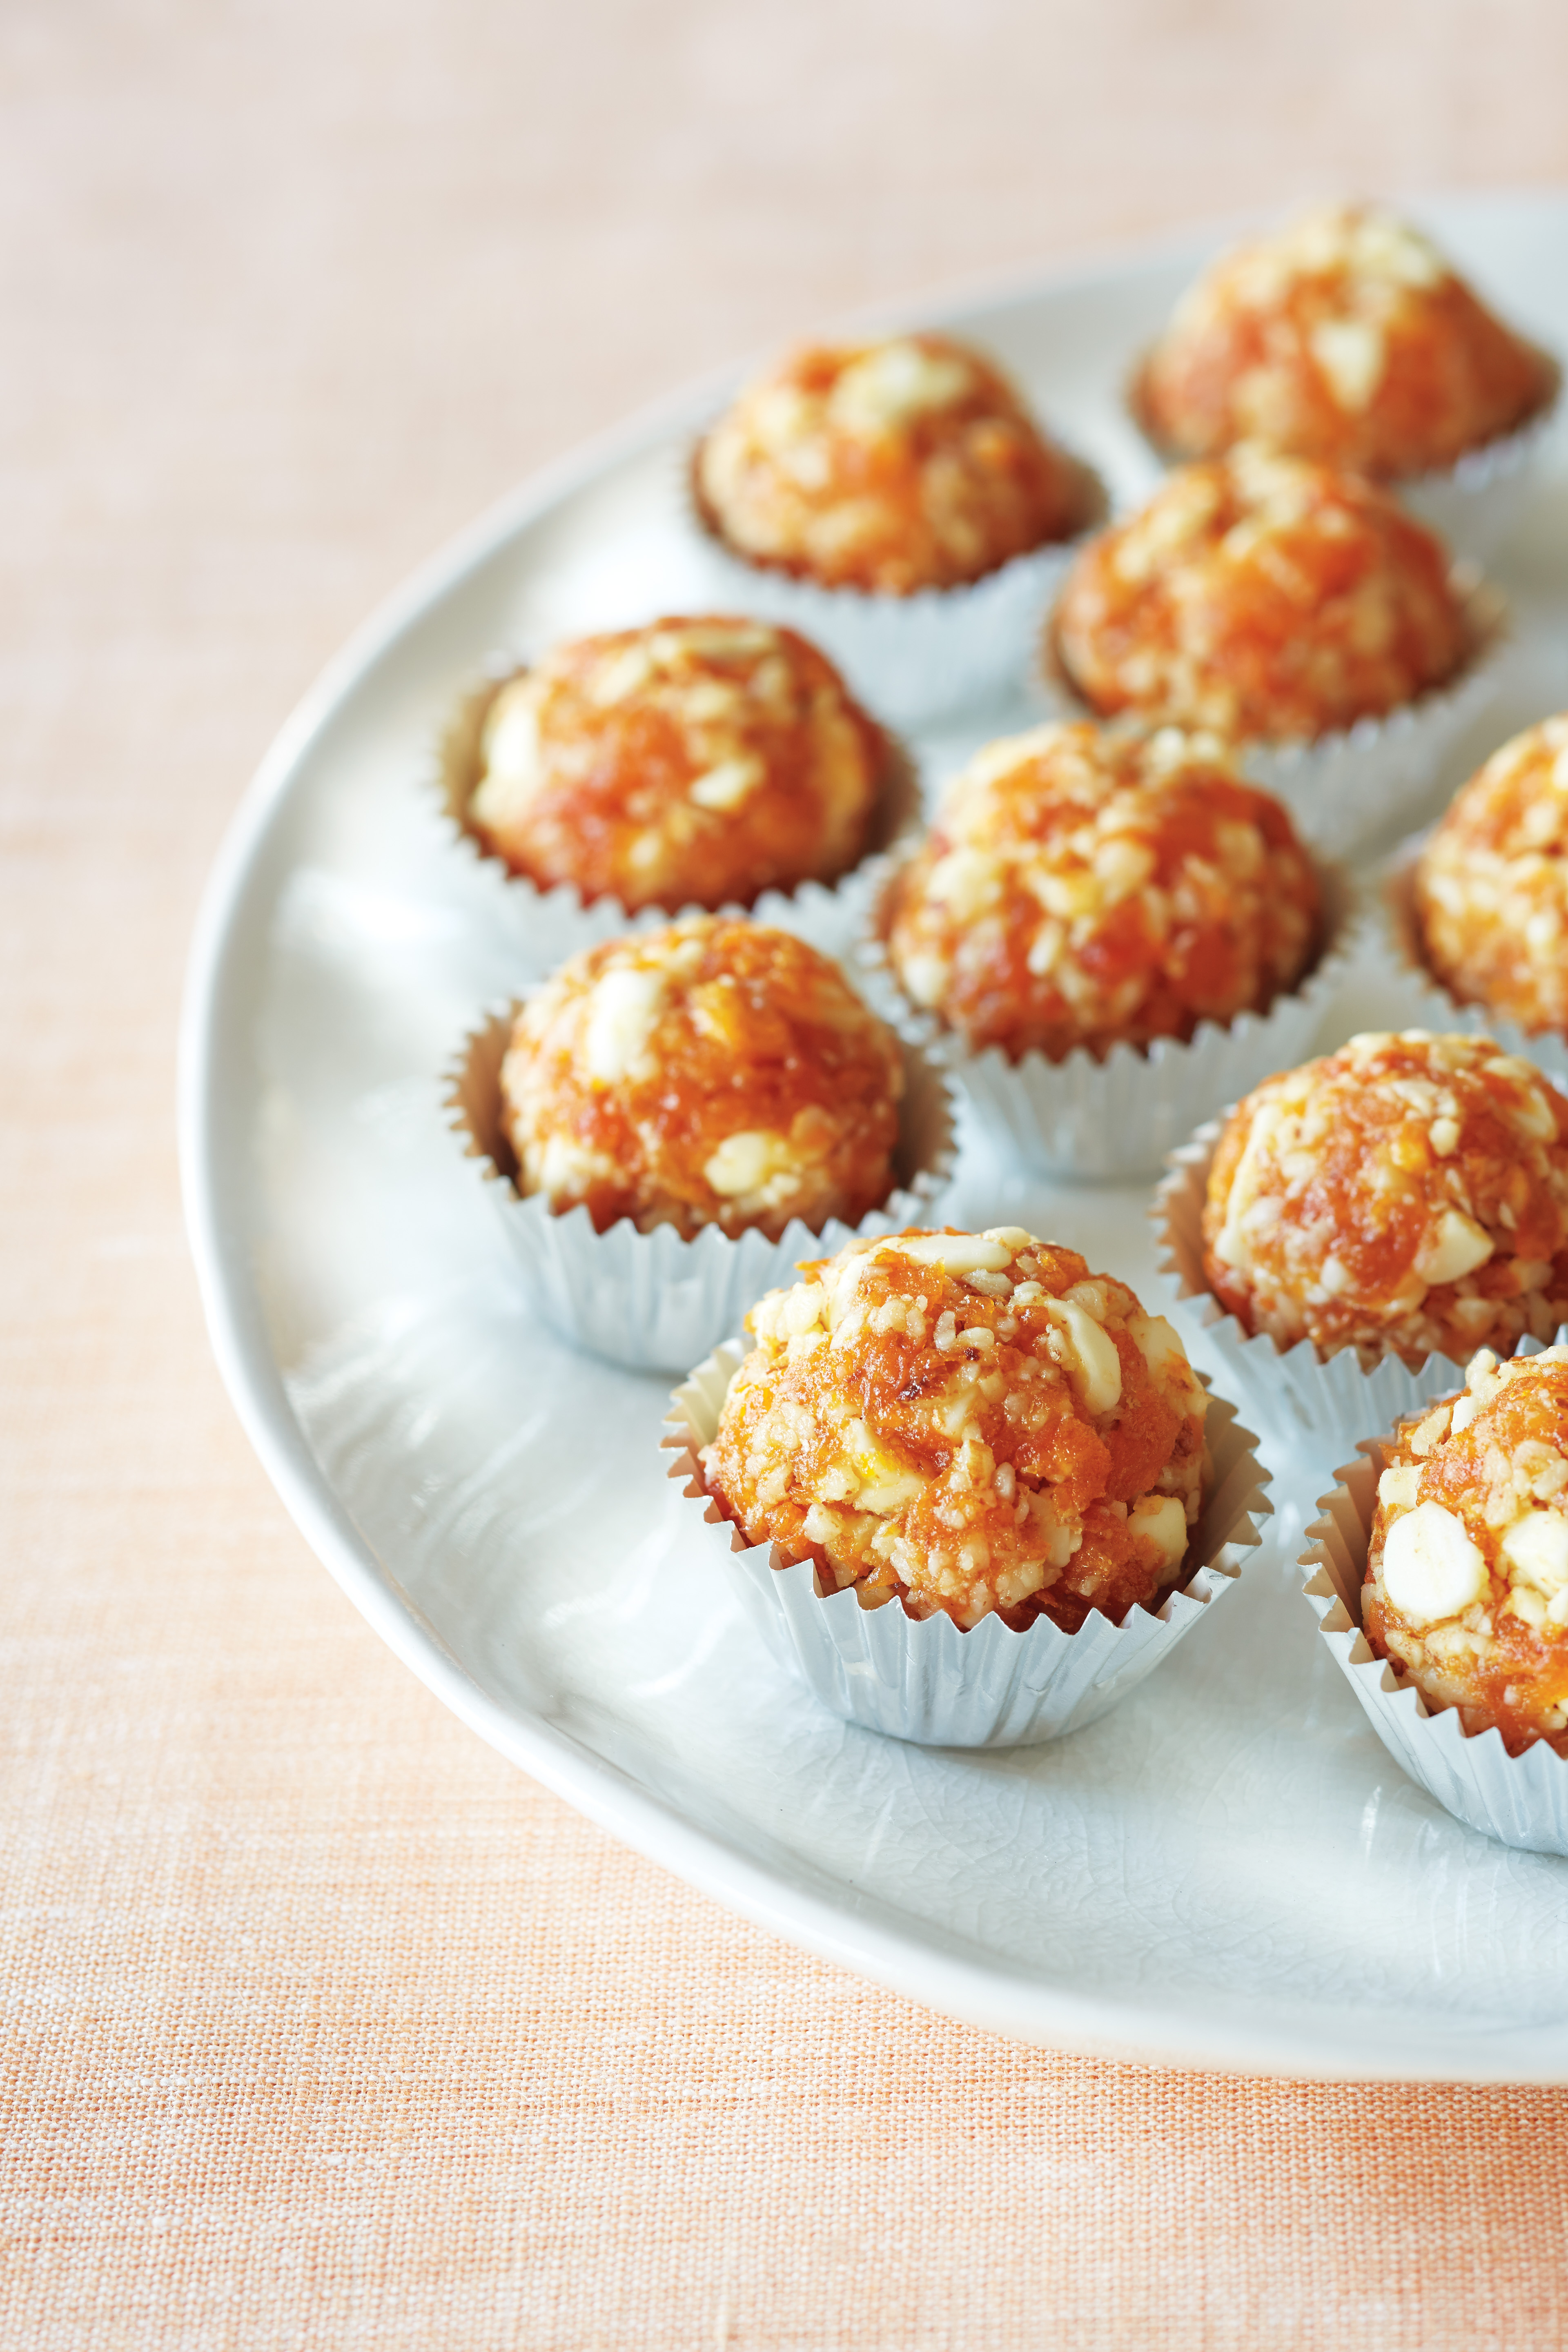
2/3 cup powdered sugar
2 cups dried apricots (about 12 ounces)
2 tablespoons light or dark rum or orange juice
2 teaspoons grated orange zest
1 teaspoon pure vanilla extract
3 ½ ounces white chocolate chips (or a 3.5- ounce bar of white chocolate, chopped or broken into ¼ -inch chunks)
In a food processor, process the almonds and powdered sugar until the almonds are very finely ground. Add the apricots and pulse until the apricots are very finely chopped.
Add the rum, orange zest, vanilla, and white chocolate chips and pulse until the mixture is just blended. With lightly oiled hands, roll and compress the dough into 24 balls, each 1 -inch in diameter. Refrigerate for at least 1 hour to firm up. Serve in foil or paper candy liners.
STORAGE: Store leftovers, tightly covered, for up to 2 days in the refrigerator or for up to 1 month in the freezer for up to 1 month.
Per ball: 130 calories; 3g protein; 6g total fat; 2g fiber; 17g carbohydrates; 0mg cholesterol; 8mg sodium
Excerpted from 100 BEST QUICK GLUTEN-FREE RECIPES © 2014 by Carol Fenster. Reproduced by permission of Houghton Mifflin Harcourt. All rights reserved.
Categories: Recipes | Tags: gluten free cookbooks, gluten free quick desserts, gluten free quick recipes | No Comments »
I love to bake, but I can’t remember when I’ve had this much fun in the kitchen. And it’s all because I was on a quest to do a Twinkie makeover. I created this yummy gluten-free version so we could all celebrate the return of the crème-filled snack cakes.
But it’s a gluten-filled lifetime ago since I ate a Twinkie. So I scanned the internet for inspiration – – the size, the texture, the filling. It looked like there were two ways to go – – either a sponge cake or a cake mix. I opted for the sponge cake version, remembering that gluten-free cakes can be delicate and crumbly. I needed these babies to hold up when I injected them with a creamy frosting center.
Now I needed a clue on forming the cakes. Knowing gluten-free batter spreads unless corralled, I suspected I would need a special pan. Aha. The answer was a Cream Canoe Pan. Mine came with a cupcake injector/decorating kit.
The checklist of tools complete, I looked into the crème filling. To my surprise, the traditional one was flour based and, although I could substitute gluten-free flour, it did not sound all that appetizing. I created a yummy filling using Marshmallow Crème another icon of my childhood and, in this case, a good fit.
Finally, I turned to the ingredients. In place of regular flour, I used a gluten free All Purpose Flour Mix, in this case, the one from Gluten-Free Pantry (Glutino) and my go-to flour blend when I don’t want to start from scratch.
The sponge cakes turned out to be a brilliant choice. They were amazingly sturdy yet delicate and up to the task of holding the filling without falling apart. Voila, Winkees. As you can see, these look (and taste) like the real deal. Several gluten-eating tasters couldn’t tell they were gluten free.
While Winkees don’t have a 45-day shelf-life, the cakes keep on the counter for several days. The frosting keeps for several weeks. If you don’t have a canoe pan, you could make these as cupcakes and fill them with the fluffy filling. But, do yourself a favor and buy the pan. In fact, buy two. Winkees are addictive.
Makes 20 Snack Cakes 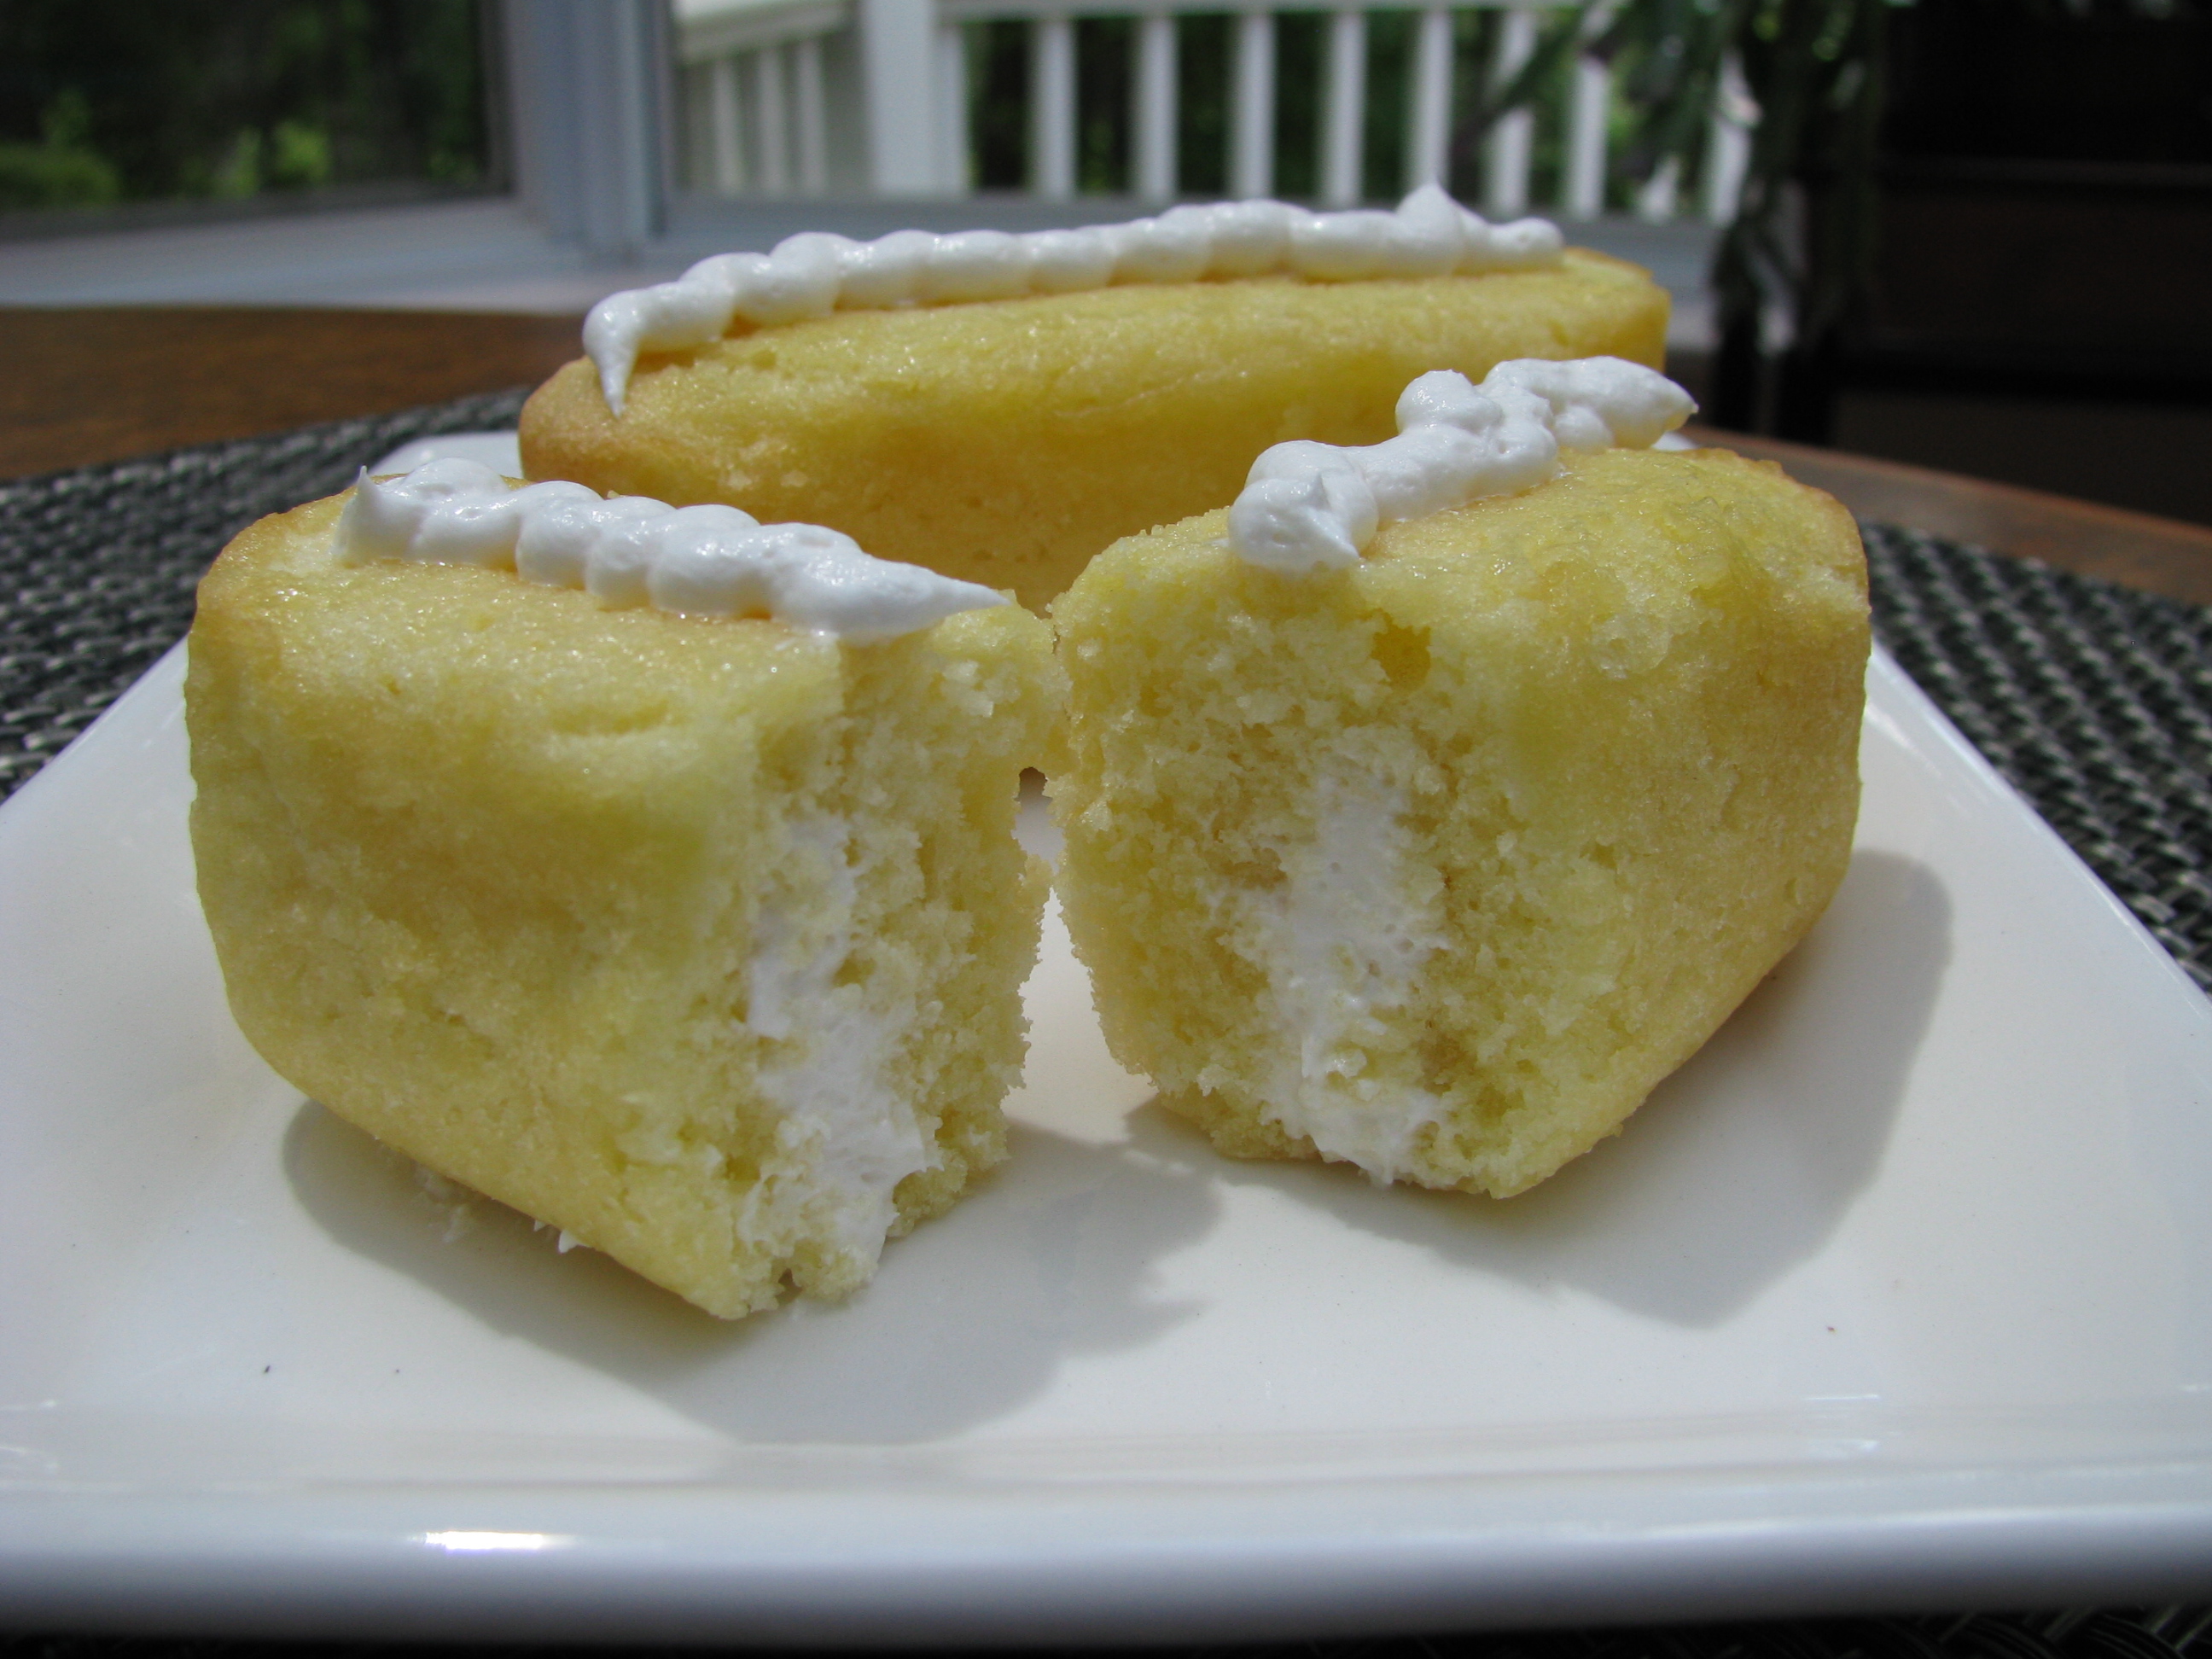
The Cakes
7 large eggs
½ teaspoon cream of tartar
2 cups Gluten-Free All-Purpose Flour Mix or blend below
1 ½ cups granulated sugar
1 tablespoon baking powder
½ cup vegetable oil
¾ cup cold water
1 ½ teaspoon vanilla
The Filling
2 teaspoons hot water
1/4 teaspoon salt
1 (16-ounce) jar of marshmallow crème
¾ cup vegetable shortening
1 1/3 cup powdered sugar
1 ½ teaspoon vanilla
To make the cakes: Preheat the oven to 350°F. Spray the canoe pan channels lightly with vegetable spray. Set aside.
Separate the eggs, placing the whites in one large mixing bowl and the yolks in another. Add cream of tartar to the whites and beat until they form stiff peaks. Set aside.
Place the flour mixture, sugar, baking powder, oil, water and vanilla in the bowl with the yolks and beat until smooth.
Working in thirds, fold the beaten egg whites into the batter. Don’t be tempted to stir or beat this mixture or the egg whites will lose their loft.
Fill each section of the snack cake pan 3/4 full. An over-filled 1/3 cup measure works well for filling these pans. Bake for 18-20 minutes, or until golden brown.
Remove the pan from the oven and let cool for 5 minutes. Using a flexible spatula, gentle turn cakes onto a wire rack to cool flat side (top side) down. Cool completely.
Wipe out the pan and spray with more vegetable spray. Add more batter. Repeat until you’ve used all the batter.
Let these cool while you make the filling.
To make the filling: Combine the salt with the hot water in a small bowl and stir until salt is dissolved. Let mixture cool. In a large bowl, combine the marshmallow crème, vegetable shortening, powdered sugar, and vanilla and beat until fluffy. Add the water and beat to combine.
Line two cookie sheets with waxed paper. Set the cakes, flat side down, on the cookie sheets. Use a thick skewer to make three holes in the bottom of each cake, moving the stick around inside of each cake to create space for the filling. Don’t poke through to the top however. Fill a cake decorator or pastry bag with filling and inject each cake with filling through all three holes. Don’t worry if you overfill these and the sides begin to break. They won’t fall apart. Add a row of squiggles on top for decoration.
All-Purpose Blend
This makes more than you’ll need for the recipe above. Store the remainder in a zip-loc bag.
2 ¾ cups rice flour
1 ¼ cups corn or potato starch
1/3 cup tapioca flour
3 teaspoons xanthan gum
1 teaspoon salt
Categories: Recipes | | 2 Comments »
My friends at Attune Foods asked several bloggers to create recipes that would delight Mom’s, especially those who are gluten-free. I am honored that my recipe for Turkey Strata Muffins is among them. For the entire booklet, follow this link to Attune Foods.
Here’s my recipe to whet your appetite.
Turkey Crunch Strata Cups with Orange Slices and Balsamic Glaze
Serves 6
These delicious, muffin-size strata are packed with flavor and a little crunch. They make a hearty, attractive breakfast for Mom and leftovers can be frozen or refrigerated for an ideal weekday breakfast on the go. Maple syrup lends some sweet notes that work nicely with the turkey and cheese. However, if you don’t want that touch of sweetness, it can be omitted.
2 tablespoons olive oil 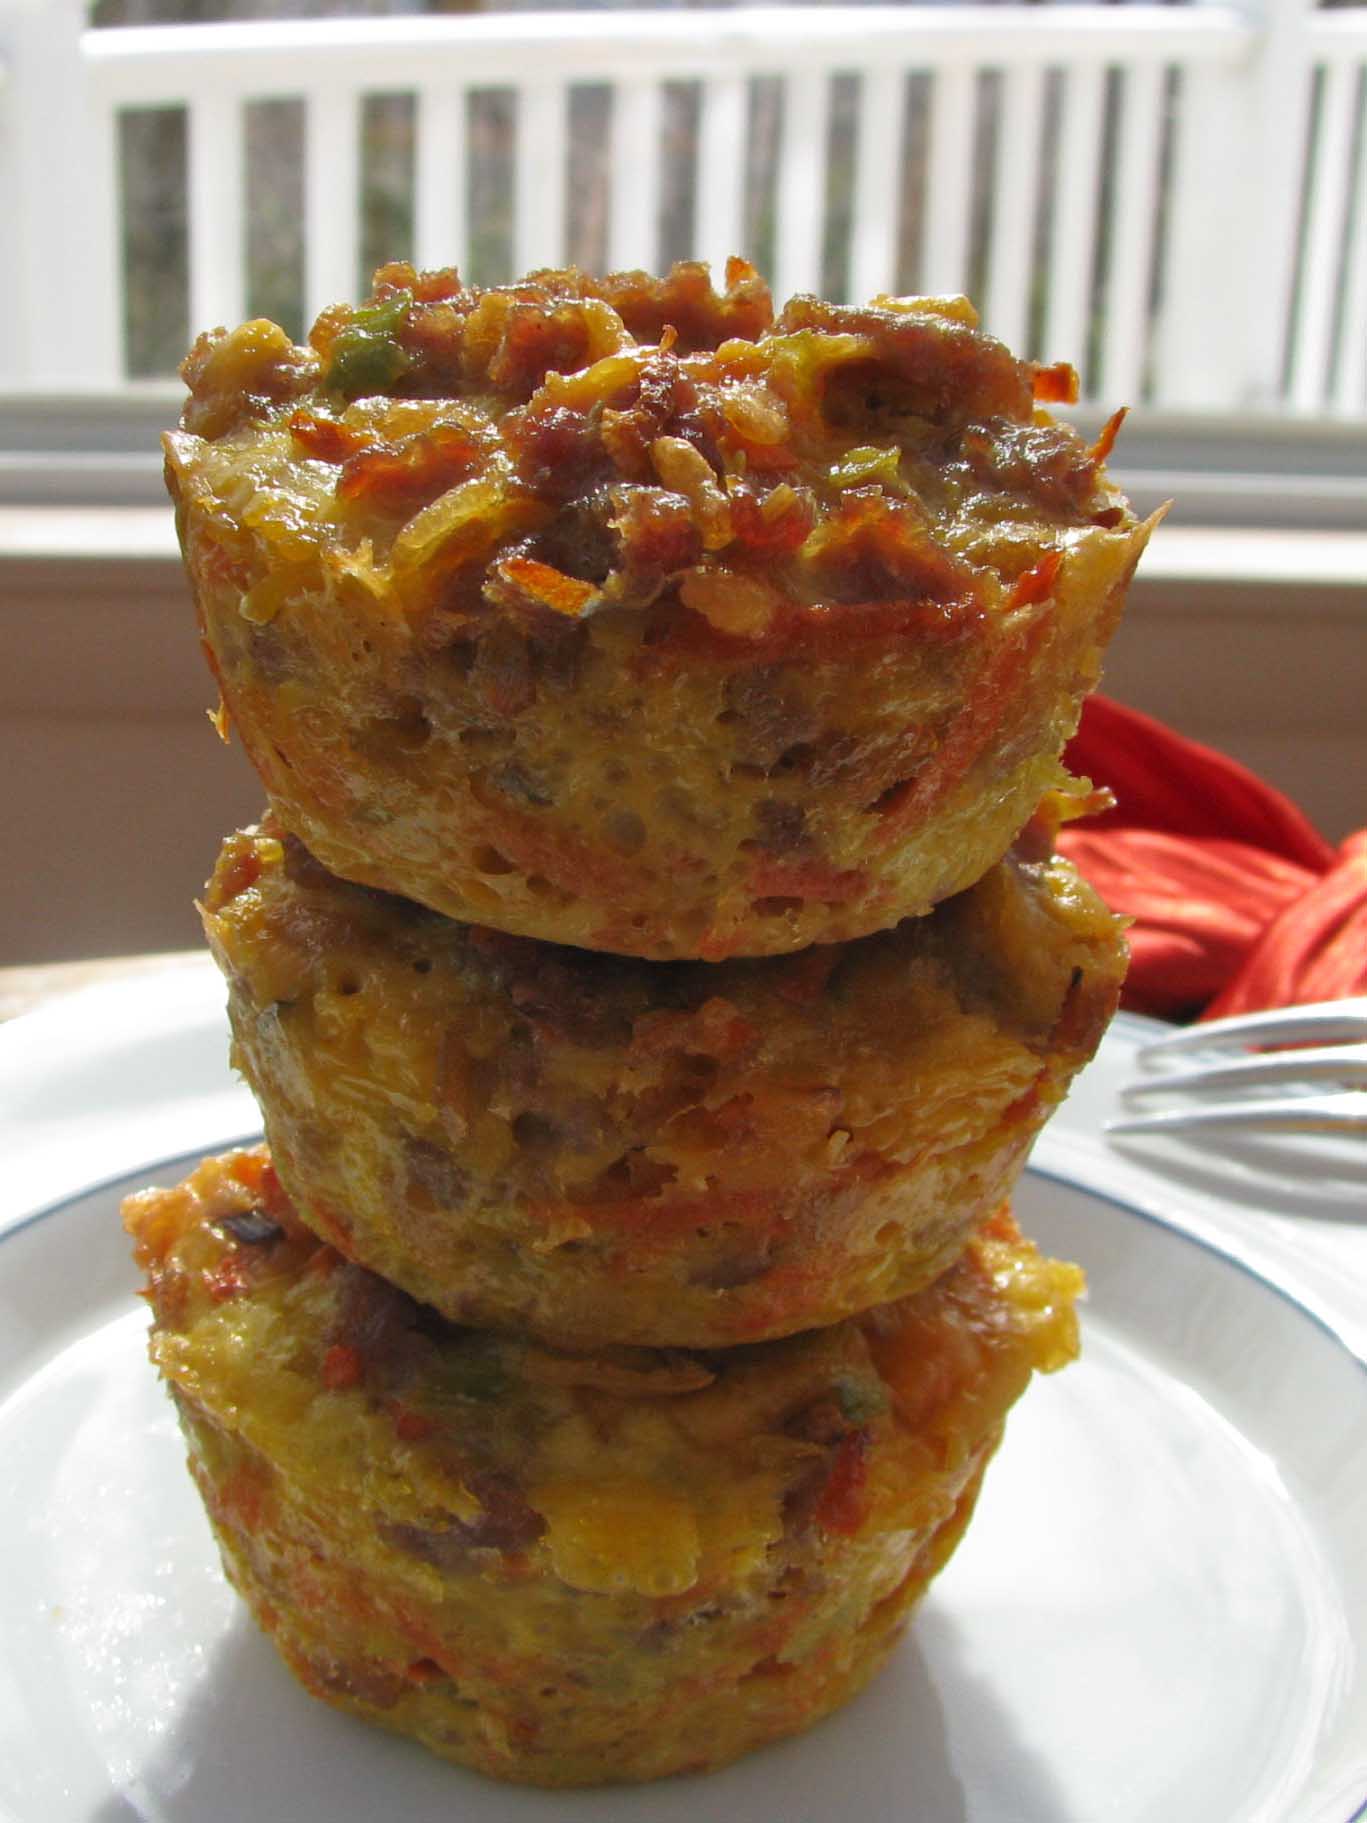
1 medium leek, white part only, cleaned and chopped
3 uncooked turkey sausage (about 1 pound)
1 cup shredded carrots
1 cup Erewhon Brown Rice Cereal
1 ½ cups shredded cheddar cheese
5 large eggs, beaten
2 to 3 tablespoons pure maple syrup
Orange segments or slices (peel removed) for garnish
Maple Balsamic Glaze for drizzle (recipe follows)
Lightly oil 12 muffin cups. Preheat oven to 350 degrees.
Heat olive oil in a large skillet. Add leek and sauté 2 minutes or until fragrant.
Remove casing from sausage. Add sausage to leeks and sauté, crumbling the sausage with the back of a spoon as it cooks. Sauté until sausage is cooked and no pink is visible. Remove from heat and cool. Break apart any lingering chunks of sausage (or chop with a knife) and transfer mixture to a large bowl.
Add carrot, cereal and cheese and mix well. Taste and add salt and pepper if desired. (Usually, the sausage has plenty of flavor without additional seasonings.)
Combine eggs and maple syrup. Add to sausage mixture and mix well.
Scoop into muffin cups and press gently. The filling will be above the tops of the cups, but it shrinks during baking.
Bake 23 to 25 minutes. Remove from oven. Let sit 5 minutes to set and turn onto a cooling rack. Cool to room temperature or serve warm.
To serve, set two strata muffins on a plate and garnish with 3 to 4 orange slices and a drizzle of Maple Balsamic Glaze.
Strata can be refrigerated for up to 3 days and reheated or frozen for future use. This makes a nice grab and go breakfast for Mom’s busy work week, too.
Maple Balsamic Glaze
3 tablespoons real maple syrup
2 teaspoons dark balsamic vinegar
Combine and warm briefly in the microwave. Drizzle over orange slices and strata cups before serving.
About Leeks: Leeks grow in mounds of dirt. The best way to clean them is to remove and discard the green top of the stalk. Rinse any visible dirt from inside the layers of the leek and chop finely. If leeks still seem sandy, transfer the chopped leek to a bowl and add cool water. Any leftover dirt will sink to the bottom while the chopped leek will rise to the top. Scoop out with your hand and transfer to a strainer. Discard any leeks that remain in the bottom of the bowl.
Do ahead: Sauté leeks and sausage and refrigerate overnight. Add remaining ingredients in the morning and prepare as above. Or make the strata cups the night before. Just before serving, reheat gently in a 350 degree oven for 5 to 7 minutes.
Categories: Recipes | Tags: gluten-free breakfast, gluten-free Mother's Day, gluten-free recipes | No Comments »
I am grateful for good, gluten-free pizza and this one tops my list. It’s chewy, thanks to the addition of millet flour, and flavorful, thanks to the use of high protein flours. You can use any blend that contains one or more of these flours. (Chickpea, teff, and sorghum are all good.) Of course, you have to make this yourself, but it’s not difficult and these pizzas (par-baked or fully baked) can be frozen.
Using a pizza stone enhances the texture and fills the crust with a slightly smoky flavor. It’s yumminess to the 10th power. But, if you don’t have a stone, don’t fret. Use a heavy baking sheet or pizza pan and set it on the lowest rack in the oven.
The recipe is versatile, too. Use the dough to make pizza, pizza pockets, and focaccia. No need to let the dough rise. It will puff up nicely in the oven. However, if you like a thicker crust, let it rise for 10 minutes before adding toppings and bake an addition 3 to 4 minutes. I’ve suggested some of my favorite toppings. However, feel free to use whatever suits your fancy.
The Dough
Makes 2, 12-inch pizzas
2 ½ cups high protein blend of choice or my recipe, below
½ cup millet flour
1 tablespoon xanthan gum
1 teaspoon salt
2 teaspoons chopped dry or 1 tablespoon chopped fresh rosemary
5 teaspoons instant active dry yeast
1 1/3 cups warm water
2 tablespoons olive oil
1 tablespoon honey
1 teaspoon cider vinegar
Place the pizza stone on the lowest rack of the oven and preheat the oven to 450 degrees. (Do this 30 to 60 minutes ahead so the stone is very hot.) If you are not using a stone, it is not necessary to preheat the oven for an extended amount of time.
In the bowl of a heavy duty mixer fitted with the paddle attachment, combine the
high protein blend, millet flour, xanthan gum, salt, and rosemary. Blend well. Add the yeast and blend. Combine water, oil, honey, and vinegar. Beat at medium high speed for 3 to 5 minutes or until the dough thickens. Follow preparation instructions below.
Gourmet Toppings For One Pizza
Makes 1, 12-inch pizza
1 to 2 teaspoons good quality olive oil
2 tablespoons good quality pizza sauce (such as Muir Glen)
4 medium tomatoes (red, yellow and orange) thickly sliced
A handful of small, pitted cured black olives such as Nicoise
¼ cup cubed Manchego or other cheese (optional)
Freshly grated Parmesan cheese
Fresh rosemary for garnish
Preparation
Scoop half the dough onto a lightly oiled sheet of parchment paper. Cover with a sheet of lightly oiled plastic wrap. Use finger tips and palm to lightly press the dough into a 12-inch circle. Use finger tips to create a rim of dough around the edge that will become a pretty crust. Drizzle olive oil of the surface and top with a light coating of pizza sauce. Scatter tomato slices, olives and cheese over the sauce. Sprinkle with freshly grated Parmesan.
Slide onto pizza paddle and transfer to the preheated stone, sliding the parchment off the paddle and onto the stone or slide parchment onto a baking sheet and set in the lowest rack of the preheated oven. Bake 20 to 24 minutes depending on the thickness. The bottom of the pizza will be brown. Slide the pizza paddle under the parchment and slide the pizza out of the oven. Don’t worry if the paper tears a little. Sprinkle with fresh rosemary and serve.
Note: Double ingredients and repeat with remaining dough or prepare the crust and par-bake for 12 minutes (without toppings). Store the crust in the freezer for a later use. Thaw before adding toppings.
High Protein Blend (from Gluten-Free Makeovers)
Blend well and scoop out 2 ½ cups for the pizza recipe above. Reserve the rest for later use.
1¼ cups white or brown rice flour
1¼ cups sweet white sorghum flour
½ cup amaranth flour
¾ cup cornstarch or tapioca starch
Categories: Recipes | Tags: gluten free, gluten free pizza, gluten free pizza from scratch, gluten free pizza recipe, gluten free recipe | 2 Comments »
As with so many great recipes, this one passed through several channels, but rather than the old-fashioned grandmother to mother to daughter or son kind of hand-me-down, this one went through an internet-compressed timeline. One day, I read an account from Mark Bittman in the New York Times Magazine about his friend Jean-Georges Vongerichten’s squash on toast. It was not a recipe, per se, but an account, like someone passing along the gist of a recipe, the flavor, the texture, but never the amounts.
The mention of winter squash and caramelized onions caught my attention. What great flavors and there was nothing unhealthy or fattening, at least in the description. So I created a recipe from what I thought Jean-Georges might have told Mark and that Mark was recounting to his readers. I made the recipe for a Thanksgiving appetizer and served it with gluten-free French bread. Needless to say, it was a huge hit. Even my son wanted the recipe.
So, I figured I would copy the account from the New York Times online and fill in the details with my notes. But what came up was the original recipe from Jean-Georges Vongerichten. In some places, it was quite different than what I had created. It called for cheese, chili flakes, and mint. By then, I was hooked on my version. Here it is, a perfect dip or spread or appetizer that I’ll be serving at all our winter gatherings, especially for the Super Bowl.
Butternut Squash Spread 
1 medium butternut squash, peeled and cubed
4 tablespoons extra-virgin olive oil, divided
2 teaspoons kosher salt, divided
2 large yellow onions, peeled and thinly sliced
1/4 cup apple cider vinegar
2 tablespoons maple syrup
Gluten-free baguette, thinly sliced and lightly toasted
Extra salt, to taste
Heat the oven to 400. Toss the squash cubes with 2 tablespoons olive oil and 1 teaspoon of salt and spread the mixture over a parchment-lined baking sheet. Bake, stirring every few minutes, until tender and slightly colored, about 20 to 25 minutes. Edges should be golden brown and squash should be very tender. Remove from the oven.
Meanwhile, heat remaining 2 tablespoons olive oil over medium-high heat, add the onions and remaining teaspoon salt and cook, stirring frequently, until the onions are well softened and darkening, at least 15 minutes. Add the vinegar and syrup, stir and reduce until broken down, an additional 15 minutes or so. The mixture should be jammy.
Combine squash and onions in a bowl and smash with a fork until combined. Adjust seasoning. Serve with gluten-free toast or crackers.
Note: The original recipe says to spread this mixture on toasted bread, top with ricotta, goat cheese or mascarpone cheese, coarse salt and mint. I did not do this, but now that I’m passing this on, you can try your own version of this wonderful recipe!
Categories: Recipes | Tags: gluten free, gluten free and super bowl, gluten-free appetizers, gluten-free recipes | 1 Comment »
My friend Pat sent me her recipe for Fruit Rocks. It called for all-purpose flour. That was the easy part. It also called for a supermarket’s worth of candied fruit, chopped pecans and dates. The amount seemed like a lot for the quantity of flour.
To my delight, I met Pat and her husband at a cooking class I did in Atlanta in March. She brought me some of her fruit rock cookies made gluten free. They were yummy, but very dense. Chockfull of fruit and nuts, they reminded me of fruitcake. But they were crumbly, too. My baker’s instinct told me, indeed, there was too much fruit.
Upon researching this old fashion cookie, I discovered a number of variations. Some were listed as Russian Rock Cookies. Others were called Christmas Rock Cookies. One called for cocoa, another for lemon juice, a third for raisins.
I kept many parts of Pat’s recipe – – the candied cherries, chopped dates, and pecans. I added cocoa but did not add raisins. Then I created a flour blend – – an enhanced version of my cake and pastry flour from Gluten-Free Makeovers and increased the fat a bit, but not as much as one of the other recipes would have added. It seemed like the cookies should be delicate, but sturdy enough to keep the chopped fruit suspended.
The results were delicious. These are like “loaded” miniature fruitcakes only better. The flavor and texture will keep you coming back for more.
One batch makes enough for all your holiday gifts.
Fruit Rock Cookies (makes about 96 cookies)
1 cup white rice flour
1 cup sorghum flour
1 cup cornstarch (or tapioca starch)
2 teaspoons xanthan gum
1 teaspoon salt
2 tablespoon cocoa powder
3/4 teaspoon baking soda
3 teaspoons ground cinnamon
1 teaspoon allspice
¾ pound (12 ounces) chopped pecans
1, 4-ounce container red candied cherries, chopped
1, 4-ounce container green candied cherries, chopped
½ pound candied peel and fruit mix
½ pound chopped dates
1-1/2 cups granulated sugar
6 tablespoons unsalted butter or dairy-free alternative, at room temperature
6 tablespoons Earth Balance organic shortening, at room temperature
3 large eggs
2 tablespoons lemon juice
1 teaspoon vanilla extract
½ cup water
Preheat oven to 350 degrees. Line 4 baking sheets with parchment paper. Set aside.
Blend flours, cornstarch, xanthan gum, salt, cocoa powder, baking soda, and spices. Whisk until cocoa is evenly dispersed. Remove ½ cup of flour mixture.
Combine chopped pecans, cherries, peel and fruit mix, and dates. Toss with reserved ½ cup of flour blend. Set aside.
Cream sugar with butter and shortening until light and fluffy. Add eggs and beat until fluffy. Add the remaining flour mixture to butter mixture. Stir in lemon juice and vanilla extract. Add water and stir until mixture is smooth.
Fold fruit mixture into batter, mixing thoroughly. Drop by teaspoon onto prepared baking sheet, about one inch apart. Bake for 15 to 18 minutes. Do not over-brown.
Store cookies in jars for up to a week or freeze for later use.
Categories: Recipes | Tags: gluten free cookies, gluten free holiday cookies, gluten free recipe, gluten-free makeover | 12 Comments »
“I have a friend who is new to the gluten free diet. She wanted to do these Candy Cane Cookies for her family at Christmas. Needless to say, these traditional favorites are not the same when you make them gluten free. If you can help my friend, Charlotte, I would appreciate it. Thank you,” writes Marie from Maryland.
Marie sent me the original recipe from a Gold Medal Flour cookbook. Initially I thought the gluten-free version of the cookies would not be sturdy enough to maintain its shape without crumbling. Isn’t that always the challenge when making gluten-free baked goods? Then I remembered a recipe I made over last year for Spritz cookies. I remembered the challenge was finding a blend and a balance of ingredients that created structure but still tasted delicious and was not crumbly. The problem is that Cut Out cookies, Spritz cookies and Candy Cane cookies spread and lose their shape if you make them following a one-to-one substitution. I needed a special blend, a delicate balance.
So what I did it. I added a little more flour blend than the original recipe calls for (about 2 tablespoons more) just as I had for the Spritz cookies. And I added ¼ cup additional confectioners’ sugar. It not only adds more sweetness but also, the added cornstarch helps add structure.
The result was these light, rich, cookies that are both sturdy and delicate. They are fun to make so invite extras into the kitchen to help form the canes. Enjoy!
Candy Cane Cookies 
Makes 40 to 48 cookies
1 cup white rice flour
¾ cup sorghum flour
½ cup cornstarch
1/3 cup tapioca starch
1 ½ teaspoons xanthan gum
½ teaspoon salt
½ cup (1 sticks) unsalted butter, softened (or dairy-free substitute)
½ cup (1 stick) Earth Balance or other organic shortening
1 ¼ cups confectioners’ sugar
1 large egg
1½ teaspoons almond extract
1 teaspoon vanilla extract
½ teaspoon red food coloring*
½ cup crushed candy cane candy
½ cup granulated sugar
Preheat the oven to 375 degrees F. Line 3 to 4 cookie sheets with parchment paper and set aside. In a medium bowl, combine rice flour, sorghum flour, cornstarch, tapioca starch, xanthan gum, and salt. Whisk to combine. Sift and set aside.
In a medium bowl, cream the butter, shortening, confectioners’ sugar, and egg until fluffy. Add flavorings and beat briefly to combine. Add the flour mixture and beat briefly to combine. Divide dough in half. Blend food coloring into one half.
Roll a 4-inch strip (using 1 teaspoon of dough) from each color. Roll the strips back and forth to smooth the surface then place strips side by side and press together lightly. Twist like a rope by rolling together or twisting like a rope. Experiment to see which method works best for you. Just be careful not to blend the two strands or the candy cane cookies will look more marbled than twisted.
Place on prepared cookie sheets. Curve the top down to form the handle of the cane. Bake 9 minutes, until lightly browned. While still warm, sprinkle with candy-sugar mixture. Cool completely before storing.
*Natural food coloring is available through IndiaTree.com
TIP: Instead of crushed peppermint candy and granulated sugar, dust with red or green sanding sugar when the cookies come out of the oven.
Categories: Recipes | Tags: gluten free candy cane cookies, gluten free cookies, gluten free recipe, gluten-free makeover | 2 Comments »
Christine from New Zealand wrote to say, “I haven’t had a Crumpet for years and wondered if you had a recipe for gluten free crumpets?”
She piqued my interest as I had never had one. So I did a bit of research. Crumpets are made with a rather thin yeast batter and are cooked on a bake stone or griddle in crumpet or English muffin rings. The distinguishing feature of real crumpets is their pliable texture and the characteristic holes into which butter deliciously melts and oozes.
After reading a mainstream formula, I developed this recipe makeover. These crumpets are soft, light in texture and quite tasty. You will not be disappointed. Add your favorite jam or slather with butter. I like both. If you are not able to get one of the all-purpose flour blends I mentioned here, you can use any flour blend you have available.
Crumpets by Beth Hillson 
This recipe makes 8 to 10 crumpets.
1 ½ cups all-purpose gluten-free flour blend such as Gluten-Free Pantry All-Purpose Flour or King Arthur Multi-Purpose Flour
½ cup sorghum flour
2 ¼ teaspoons dry active yeast
1 teaspoon of sugar
½ teaspoon cream of tartar
¾ cup warm milk (about 110 degrees)
½ cup warm water (about 110 degrees)
1 ½ teaspoon baking powder
1 teaspoon baking soda
1 tablespoon melted butter
TIP: If using a blend that does not contain gum and salt, add 1 teaspoon xanthan gum and ½ teaspoon salt.
1) Combine flours, yeast, sugar, cream of tartar and blend. Add warm milk and water and beat for 3 minutes. Cover with plastic wrap and let stand in a warm place for about 20 minutes. The thick batter should double in size.
2) Add baking powder, baking soda and butter and beat for 1 minute or until well mixed. Cover and let stand 10 minutes.
3) Preheat a griddle to 350 degrees. Coat 8 to 10, 3 ½ inch English muffin rings well with vegetable spray. Set on griddle, bake stone or large skillet (see note below).
4) Place enough mixture into the center of each ring to come halfway to the top of the ring. Cook for 4-6 minutes over medium heat, until bubbles appear over the entire surface, and the dough appears ‘dry’.
5) Use tongs to remove the ring. Turn the crumpet over and cook an additional 2 to 4 minutes to brown the top. Remove from the pan and cool on a baking rack. Split and enjoy. Or, if thin enough, do not split before eating.
Notes: Alternatively, make thinner crumpets by filling only one-third of the way up the rings. These do not need to be cooked on the second side. If you don’t have a griddle, heat a heavy cast iron skillet and line it with as many rings as possible. You’ll need to make these in more than one batch.
Categories: Recipes | Tags: gluten free, gluten free bread, gluten free crumpets, gluten free recipe, gluten-free makeover | 2 Comments »
Follow Us Online
More Cookbook Stuff
Gluten-Free Makeovers - - Nearly 200 recipe makeovers for everyone to enjoy. Buy it at glutenfreeandmore.com, Amazon.com and barnesandnoble.com.
About This Blog
 Baking guru, Beth Hillson, transforms favorite foods into recipes that are safe for your gluten-free diet.


