

About Beth
Beth created one of the first gluten-free companies in the US, wrote books, and now shares 40 years of living well without gluten in her latest book, The Complete Guide to Living Well Gluten Free. She believes no one should go without because of gluten. Through her cookbooks, lifestyle book and essays, she shows us how. Travel, restaurant dining, parties, dating, raising kids – she’s been there and takes celiac disease and the gluten free diet along for the ride. Join her as she answers all your baking and lifestyle questions.My friends at Attune Foods asked several bloggers to create recipes that would delight Mom’s, especially those who are gluten-free. I am honored that my recipe for Turkey Strata Muffins is among them. For the entire booklet, follow this link to Attune Foods.
Here’s my recipe to whet your appetite.
Turkey Crunch Strata Cups with Orange Slices and Balsamic Glaze
Serves 6
These delicious, muffin-size strata are packed with flavor and a little crunch. They make a hearty, attractive breakfast for Mom and leftovers can be frozen or refrigerated for an ideal weekday breakfast on the go. Maple syrup lends some sweet notes that work nicely with the turkey and cheese. However, if you don’t want that touch of sweetness, it can be omitted.
2 tablespoons olive oil 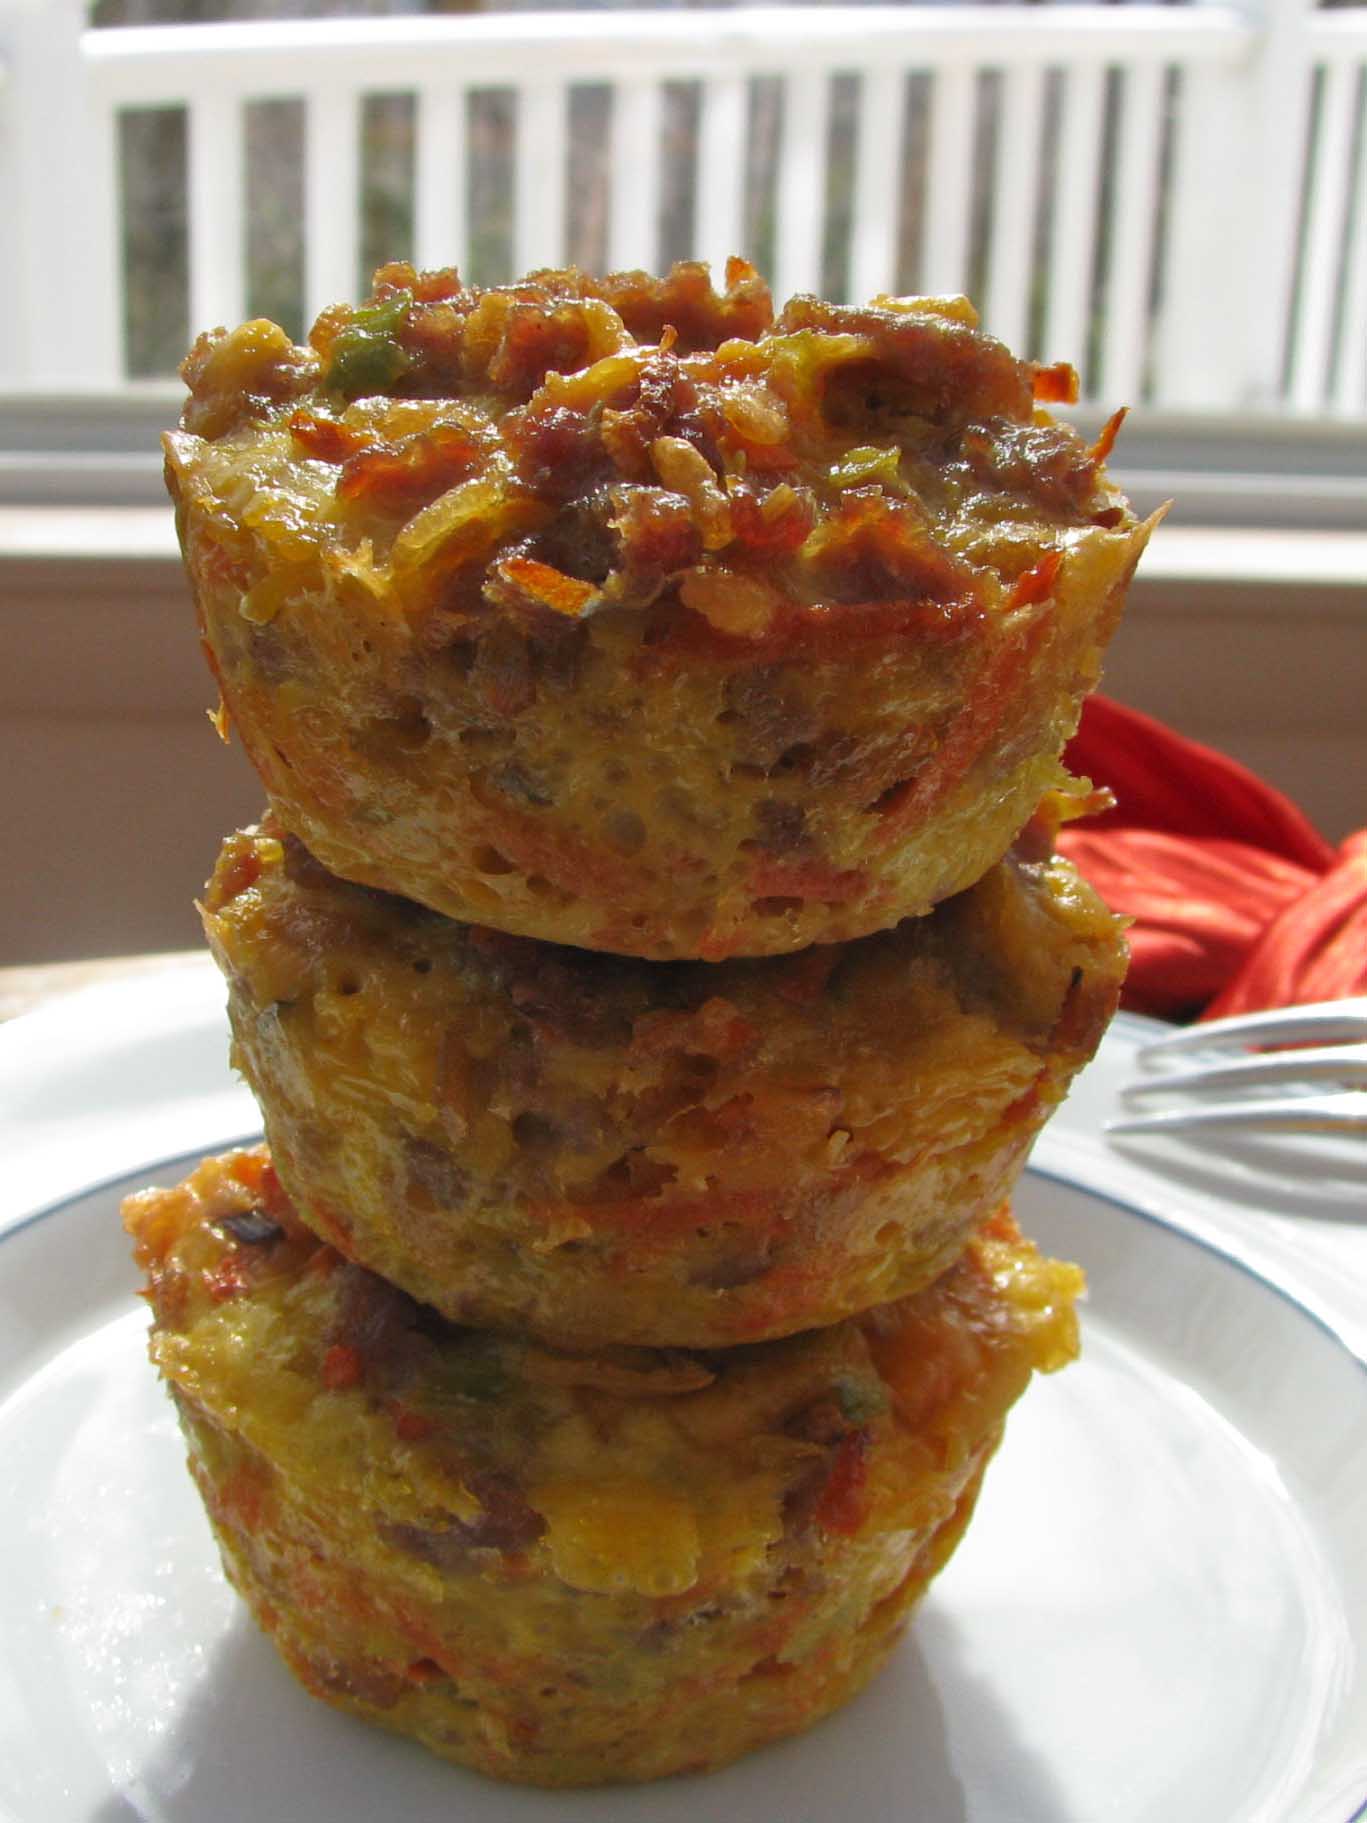
1 medium leek, white part only, cleaned and chopped
3 uncooked turkey sausage (about 1 pound)
1 cup shredded carrots
1 cup Erewhon Brown Rice Cereal
1 ½ cups shredded cheddar cheese
5 large eggs, beaten
2 to 3 tablespoons pure maple syrup
Orange segments or slices (peel removed) for garnish
Maple Balsamic Glaze for drizzle (recipe follows)
Lightly oil 12 muffin cups. Preheat oven to 350 degrees.
Heat olive oil in a large skillet. Add leek and sauté 2 minutes or until fragrant.
Remove casing from sausage. Add sausage to leeks and sauté, crumbling the sausage with the back of a spoon as it cooks. Sauté until sausage is cooked and no pink is visible. Remove from heat and cool. Break apart any lingering chunks of sausage (or chop with a knife) and transfer mixture to a large bowl.
Add carrot, cereal and cheese and mix well. Taste and add salt and pepper if desired. (Usually, the sausage has plenty of flavor without additional seasonings.)
Combine eggs and maple syrup. Add to sausage mixture and mix well.
Scoop into muffin cups and press gently. The filling will be above the tops of the cups, but it shrinks during baking.
Bake 23 to 25 minutes. Remove from oven. Let sit 5 minutes to set and turn onto a cooling rack. Cool to room temperature or serve warm.
To serve, set two strata muffins on a plate and garnish with 3 to 4 orange slices and a drizzle of Maple Balsamic Glaze.
Strata can be refrigerated for up to 3 days and reheated or frozen for future use. This makes a nice grab and go breakfast for Mom’s busy work week, too.
Maple Balsamic Glaze
3 tablespoons real maple syrup
2 teaspoons dark balsamic vinegar
Combine and warm briefly in the microwave. Drizzle over orange slices and strata cups before serving.
About Leeks: Leeks grow in mounds of dirt. The best way to clean them is to remove and discard the green top of the stalk. Rinse any visible dirt from inside the layers of the leek and chop finely. If leeks still seem sandy, transfer the chopped leek to a bowl and add cool water. Any leftover dirt will sink to the bottom while the chopped leek will rise to the top. Scoop out with your hand and transfer to a strainer. Discard any leeks that remain in the bottom of the bowl.
Do ahead: Sauté leeks and sausage and refrigerate overnight. Add remaining ingredients in the morning and prepare as above. Or make the strata cups the night before. Just before serving, reheat gently in a 350 degree oven for 5 to 7 minutes.

Categories: Recipes | Tags: gluten-free breakfast, gluten-free Mother's Day, gluten-free recipes | No Comments »
For my birthday, I couldn’t decide between chocolate and vanilla. I solved the problem by making a marble cake. That way I didn’t have to choose! Orange juice and orange zest added a special brightness to this treat. Instead of a layer cake with lots of frosting and lots of extra calories, I made a Bundt cake and topped it with thin layer of orange glaze. The results were yummy.
Now, here’s the best part. I made this from chocolate and a vanilla gluten-free cake mixes. Quick, delicious and such a nice gift!
Orange Marble Birthday Cake 
Serves 10 to 12
1 box (15 ounces) Gluten-Free Yellow or White Cake Mix*
1 box (15 ounces) Gluten-Free Chocolate Cake Mix*
2 sticks unsalted butter or dairy-free alternative, softened, divided
4 large eggs, divided
3 teaspoons vanilla extract, divided
2 cups buttermilk, divided (a tad less than 2 cups, really)
Juice and zest of one orange
Preheat oven to 350 degrees. Lightly oil a 10-cup Bundt cake pan.
Make the Yellow Cake. Cream 1 stick of butter until light and fluffy. Add yellow cake mix and beat until crumbly. Add 2 large eggs and beat until smooth. Beat in 1 ½ teaspoons vanilla and 1 cup buttermilk. Beat until smooth. Set aside.
Make the Chocolate Cake. Cream 1 stick of butter until light and fluffy. Add chocolate cake mix and beat until crumbly. Add 2 large eggs and beat until smooth. Pour orange juice into a 1 cup measure. Add enough buttermilk to measure 1 cup. Add 1 ½ teaspoons vanilla and 1 cup buttermilk mixture to the cake mix. Fold in zest. Beat until smooth. Set aside.
To Assemble. Start with dollops of yellow cake batter, then chocolate cake batter and keep alternating until both batters are used up. Use a sharp knife, swirl the batter to create a marble effect. Set on middle rack in preheated oven. Bake 50-60 minutes or until toothpick comes out clean. Rest 10 minutes on rack then invert, remove pan, and cool completely.
Orange Glaze
3 tablespoons orange juice
¾ to 1 cup confectioners’ sugar
Grated peel of half an orange
Combine juice and sugar and blend until smooth. Add grated peel and mix to combine. Drizzle over the top of the cake before serving.
*Hodgson Mill, Betty Crocker, and Gluten-Free Pantry cake mixes are all good choices as they all weigh 15 ounces. Many other gluten-free cake mixes will work, too. Just weigh out 15 ounces of each mix before using.
Categories: Uncategorized | Tags: easy gluten free recipes, gluten free baking, gluten free birthday cake, gluten free diet | 7 Comments »
I am grateful for good, gluten-free pizza and this one tops my list. It’s chewy, thanks to the addition of millet flour, and flavorful, thanks to the use of high protein flours. You can use any blend that contains one or more of these flours. (Chickpea, teff, and sorghum are all good.) Of course, you have to make this yourself, but it’s not difficult and these pizzas (par-baked or fully baked) can be frozen.
Using a pizza stone enhances the texture and fills the crust with a slightly smoky flavor. It’s yumminess to the 10th power. But, if you don’t have a stone, don’t fret. Use a heavy baking sheet or pizza pan and set it on the lowest rack in the oven.
The recipe is versatile, too. Use the dough to make pizza, pizza pockets, and focaccia. No need to let the dough rise. It will puff up nicely in the oven. However, if you like a thicker crust, let it rise for 10 minutes before adding toppings and bake an addition 3 to 4 minutes. I’ve suggested some of my favorite toppings. However, feel free to use whatever suits your fancy.
The Dough
Makes 2, 12-inch pizzas
2 ½ cups high protein blend of choice or my recipe, below
½ cup millet flour
1 tablespoon xanthan gum
1 teaspoon salt
2 teaspoons chopped dry or 1 tablespoon chopped fresh rosemary
5 teaspoons instant active dry yeast
1 1/3 cups warm water
2 tablespoons olive oil
1 tablespoon honey
1 teaspoon cider vinegar
Place the pizza stone on the lowest rack of the oven and preheat the oven to 450 degrees. (Do this 30 to 60 minutes ahead so the stone is very hot.) If you are not using a stone, it is not necessary to preheat the oven for an extended amount of time.
In the bowl of a heavy duty mixer fitted with the paddle attachment, combine the
high protein blend, millet flour, xanthan gum, salt, and rosemary. Blend well. Add the yeast and blend. Combine water, oil, honey, and vinegar. Beat at medium high speed for 3 to 5 minutes or until the dough thickens. Follow preparation instructions below.
Gourmet Toppings For One Pizza
Makes 1, 12-inch pizza
1 to 2 teaspoons good quality olive oil
2 tablespoons good quality pizza sauce (such as Muir Glen)
4 medium tomatoes (red, yellow and orange) thickly sliced
A handful of small, pitted cured black olives such as Nicoise
¼ cup cubed Manchego or other cheese (optional)
Freshly grated Parmesan cheese
Fresh rosemary for garnish
Preparation
Scoop half the dough onto a lightly oiled sheet of parchment paper. Cover with a sheet of lightly oiled plastic wrap. Use finger tips and palm to lightly press the dough into a 12-inch circle. Use finger tips to create a rim of dough around the edge that will become a pretty crust. Drizzle olive oil of the surface and top with a light coating of pizza sauce. Scatter tomato slices, olives and cheese over the sauce. Sprinkle with freshly grated Parmesan.
Slide onto pizza paddle and transfer to the preheated stone, sliding the parchment off the paddle and onto the stone or slide parchment onto a baking sheet and set in the lowest rack of the preheated oven. Bake 20 to 24 minutes depending on the thickness. The bottom of the pizza will be brown. Slide the pizza paddle under the parchment and slide the pizza out of the oven. Don’t worry if the paper tears a little. Sprinkle with fresh rosemary and serve.
Note: Double ingredients and repeat with remaining dough or prepare the crust and par-bake for 12 minutes (without toppings). Store the crust in the freezer for a later use. Thaw before adding toppings.
High Protein Blend (from Gluten-Free Makeovers)
Blend well and scoop out 2 ½ cups for the pizza recipe above. Reserve the rest for later use.
1¼ cups white or brown rice flour
1¼ cups sweet white sorghum flour
½ cup amaranth flour
¾ cup cornstarch or tapioca starch
Categories: Recipes | Tags: gluten free, gluten free pizza, gluten free pizza from scratch, gluten free pizza recipe, gluten free recipe | 2 Comments »
As with so many great recipes, this one passed through several channels, but rather than the old-fashioned grandmother to mother to daughter or son kind of hand-me-down, this one went through an internet-compressed timeline. One day, I read an account from Mark Bittman in the New York Times Magazine about his friend Jean-Georges Vongerichten’s squash on toast. It was not a recipe, per se, but an account, like someone passing along the gist of a recipe, the flavor, the texture, but never the amounts.
The mention of winter squash and caramelized onions caught my attention. What great flavors and there was nothing unhealthy or fattening, at least in the description. So I created a recipe from what I thought Jean-Georges might have told Mark and that Mark was recounting to his readers. I made the recipe for a Thanksgiving appetizer and served it with gluten-free French bread. Needless to say, it was a huge hit. Even my son wanted the recipe.
So, I figured I would copy the account from the New York Times online and fill in the details with my notes. But what came up was the original recipe from Jean-Georges Vongerichten. In some places, it was quite different than what I had created. It called for cheese, chili flakes, and mint. By then, I was hooked on my version. Here it is, a perfect dip or spread or appetizer that I’ll be serving at all our winter gatherings, especially for the Super Bowl.
Butternut Squash Spread 
1 medium butternut squash, peeled and cubed
4 tablespoons extra-virgin olive oil, divided
2 teaspoons kosher salt, divided
2 large yellow onions, peeled and thinly sliced
1/4 cup apple cider vinegar
2 tablespoons maple syrup
Gluten-free baguette, thinly sliced and lightly toasted
Extra salt, to taste
Heat the oven to 400. Toss the squash cubes with 2 tablespoons olive oil and 1 teaspoon of salt and spread the mixture over a parchment-lined baking sheet. Bake, stirring every few minutes, until tender and slightly colored, about 20 to 25 minutes. Edges should be golden brown and squash should be very tender. Remove from the oven.
Meanwhile, heat remaining 2 tablespoons olive oil over medium-high heat, add the onions and remaining teaspoon salt and cook, stirring frequently, until the onions are well softened and darkening, at least 15 minutes. Add the vinegar and syrup, stir and reduce until broken down, an additional 15 minutes or so. The mixture should be jammy.
Combine squash and onions in a bowl and smash with a fork until combined. Adjust seasoning. Serve with gluten-free toast or crackers.
Note: The original recipe says to spread this mixture on toasted bread, top with ricotta, goat cheese or mascarpone cheese, coarse salt and mint. I did not do this, but now that I’m passing this on, you can try your own version of this wonderful recipe!
Categories: Recipes | Tags: gluten free, gluten free and super bowl, gluten-free appetizers, gluten-free recipes | 1 Comment »
My friend Pat sent me her recipe for Fruit Rocks. It called for all-purpose flour. That was the easy part. It also called for a supermarket’s worth of candied fruit, chopped pecans and dates. The amount seemed like a lot for the quantity of flour.
To my delight, I met Pat and her husband at a cooking class I did in Atlanta in March. She brought me some of her fruit rock cookies made gluten free. They were yummy, but very dense. Chockfull of fruit and nuts, they reminded me of fruitcake. But they were crumbly, too. My baker’s instinct told me, indeed, there was too much fruit.
Upon researching this old fashion cookie, I discovered a number of variations. Some were listed as Russian Rock Cookies. Others were called Christmas Rock Cookies. One called for cocoa, another for lemon juice, a third for raisins.
I kept many parts of Pat’s recipe – – the candied cherries, chopped dates, and pecans. I added cocoa but did not add raisins. Then I created a flour blend – – an enhanced version of my cake and pastry flour from Gluten-Free Makeovers and increased the fat a bit, but not as much as one of the other recipes would have added. It seemed like the cookies should be delicate, but sturdy enough to keep the chopped fruit suspended.
The results were delicious. These are like “loaded” miniature fruitcakes only better. The flavor and texture will keep you coming back for more.
One batch makes enough for all your holiday gifts.
Fruit Rock Cookies (makes about 96 cookies)
1 cup white rice flour
1 cup sorghum flour
1 cup cornstarch (or tapioca starch)
2 teaspoons xanthan gum
1 teaspoon salt
2 tablespoon cocoa powder
3/4 teaspoon baking soda
3 teaspoons ground cinnamon
1 teaspoon allspice
¾ pound (12 ounces) chopped pecans
1, 4-ounce container red candied cherries, chopped
1, 4-ounce container green candied cherries, chopped
½ pound candied peel and fruit mix
½ pound chopped dates
1-1/2 cups granulated sugar
6 tablespoons unsalted butter or dairy-free alternative, at room temperature
6 tablespoons Earth Balance organic shortening, at room temperature
3 large eggs
2 tablespoons lemon juice
1 teaspoon vanilla extract
½ cup water
Preheat oven to 350 degrees. Line 4 baking sheets with parchment paper. Set aside.
Blend flours, cornstarch, xanthan gum, salt, cocoa powder, baking soda, and spices. Whisk until cocoa is evenly dispersed. Remove ½ cup of flour mixture.
Combine chopped pecans, cherries, peel and fruit mix, and dates. Toss with reserved ½ cup of flour blend. Set aside.
Cream sugar with butter and shortening until light and fluffy. Add eggs and beat until fluffy. Add the remaining flour mixture to butter mixture. Stir in lemon juice and vanilla extract. Add water and stir until mixture is smooth.
Fold fruit mixture into batter, mixing thoroughly. Drop by teaspoon onto prepared baking sheet, about one inch apart. Bake for 15 to 18 minutes. Do not over-brown.
Store cookies in jars for up to a week or freeze for later use.
Categories: Recipes | Tags: gluten free cookies, gluten free holiday cookies, gluten free recipe, gluten-free makeover | 12 Comments »
“I have a friend who is new to the gluten free diet. She wanted to do these Candy Cane Cookies for her family at Christmas. Needless to say, these traditional favorites are not the same when you make them gluten free. If you can help my friend, Charlotte, I would appreciate it. Thank you,” writes Marie from Maryland.
Marie sent me the original recipe from a Gold Medal Flour cookbook. Initially I thought the gluten-free version of the cookies would not be sturdy enough to maintain its shape without crumbling. Isn’t that always the challenge when making gluten-free baked goods? Then I remembered a recipe I made over last year for Spritz cookies. I remembered the challenge was finding a blend and a balance of ingredients that created structure but still tasted delicious and was not crumbly. The problem is that Cut Out cookies, Spritz cookies and Candy Cane cookies spread and lose their shape if you make them following a one-to-one substitution. I needed a special blend, a delicate balance.
So what I did it. I added a little more flour blend than the original recipe calls for (about 2 tablespoons more) just as I had for the Spritz cookies. And I added ¼ cup additional confectioners’ sugar. It not only adds more sweetness but also, the added cornstarch helps add structure.
The result was these light, rich, cookies that are both sturdy and delicate. They are fun to make so invite extras into the kitchen to help form the canes. Enjoy!
Candy Cane Cookies 
Makes 40 to 48 cookies
1 cup white rice flour
¾ cup sorghum flour
½ cup cornstarch
1/3 cup tapioca starch
1 ½ teaspoons xanthan gum
½ teaspoon salt
½ cup (1 sticks) unsalted butter, softened (or dairy-free substitute)
½ cup (1 stick) Earth Balance or other organic shortening
1 ¼ cups confectioners’ sugar
1 large egg
1½ teaspoons almond extract
1 teaspoon vanilla extract
½ teaspoon red food coloring*
½ cup crushed candy cane candy
½ cup granulated sugar
Preheat the oven to 375 degrees F. Line 3 to 4 cookie sheets with parchment paper and set aside. In a medium bowl, combine rice flour, sorghum flour, cornstarch, tapioca starch, xanthan gum, and salt. Whisk to combine. Sift and set aside.
In a medium bowl, cream the butter, shortening, confectioners’ sugar, and egg until fluffy. Add flavorings and beat briefly to combine. Add the flour mixture and beat briefly to combine. Divide dough in half. Blend food coloring into one half.
Roll a 4-inch strip (using 1 teaspoon of dough) from each color. Roll the strips back and forth to smooth the surface then place strips side by side and press together lightly. Twist like a rope by rolling together or twisting like a rope. Experiment to see which method works best for you. Just be careful not to blend the two strands or the candy cane cookies will look more marbled than twisted.
Place on prepared cookie sheets. Curve the top down to form the handle of the cane. Bake 9 minutes, until lightly browned. While still warm, sprinkle with candy-sugar mixture. Cool completely before storing.
*Natural food coloring is available through IndiaTree.com
TIP: Instead of crushed peppermint candy and granulated sugar, dust with red or green sanding sugar when the cookies come out of the oven.
Categories: Recipes | Tags: gluten free candy cane cookies, gluten free cookies, gluten free recipe, gluten-free makeover | 2 Comments »
Christine from New Zealand wrote to say, “I haven’t had a Crumpet for years and wondered if you had a recipe for gluten free crumpets?”
She piqued my interest as I had never had one. So I did a bit of research. Crumpets are made with a rather thin yeast batter and are cooked on a bake stone or griddle in crumpet or English muffin rings. The distinguishing feature of real crumpets is their pliable texture and the characteristic holes into which butter deliciously melts and oozes.
After reading a mainstream formula, I developed this recipe makeover. These crumpets are soft, light in texture and quite tasty. You will not be disappointed. Add your favorite jam or slather with butter. I like both. If you are not able to get one of the all-purpose flour blends I mentioned here, you can use any flour blend you have available.
Crumpets by Beth Hillson 
This recipe makes 8 to 10 crumpets.
1 ½ cups all-purpose gluten-free flour blend such as Gluten-Free Pantry All-Purpose Flour or King Arthur Multi-Purpose Flour
½ cup sorghum flour
2 ¼ teaspoons dry active yeast
1 teaspoon of sugar
½ teaspoon cream of tartar
¾ cup warm milk (about 110 degrees)
½ cup warm water (about 110 degrees)
1 ½ teaspoon baking powder
1 teaspoon baking soda
1 tablespoon melted butter
TIP: If using a blend that does not contain gum and salt, add 1 teaspoon xanthan gum and ½ teaspoon salt.
1) Combine flours, yeast, sugar, cream of tartar and blend. Add warm milk and water and beat for 3 minutes. Cover with plastic wrap and let stand in a warm place for about 20 minutes. The thick batter should double in size.
2) Add baking powder, baking soda and butter and beat for 1 minute or until well mixed. Cover and let stand 10 minutes.
3) Preheat a griddle to 350 degrees. Coat 8 to 10, 3 ½ inch English muffin rings well with vegetable spray. Set on griddle, bake stone or large skillet (see note below).
4) Place enough mixture into the center of each ring to come halfway to the top of the ring. Cook for 4-6 minutes over medium heat, until bubbles appear over the entire surface, and the dough appears ‘dry’.
5) Use tongs to remove the ring. Turn the crumpet over and cook an additional 2 to 4 minutes to brown the top. Remove from the pan and cool on a baking rack. Split and enjoy. Or, if thin enough, do not split before eating.
Notes: Alternatively, make thinner crumpets by filling only one-third of the way up the rings. These do not need to be cooked on the second side. If you don’t have a griddle, heat a heavy cast iron skillet and line it with as many rings as possible. You’ll need to make these in more than one batch.
Categories: Recipes | Tags: gluten free, gluten free bread, gluten free crumpets, gluten free recipe, gluten-free makeover | 2 Comments »
Happy Holidays! With Thanksgiving just around the corner, wow your guests with this unique and delicious twist on traditional apple pie. The rich sour cream center brightens the apple flavor and the presentation can’t be beat. For those with a dairy allergy replace the sour cream with soy sour cream or coconut yogurt. This can be made egg-free, too.
Apple Custard Crumb Pie 
Serves 8
Streusel Topping
½ cup packed light brown sugar
¾ cup all-purpose flour blend (any brand)
½ teaspoon ground cinnamon
¼ teaspoon salt
6 tablespoons cold unsalted butter or dairy-free butter replacement, cut into small pieces
Filling
5 McIntosh apples
2/3 cup low-fat sour cream, dairy-free sour cream or coconut yogurt
1 large egg, lightly beaten
½–¾ cup sugar, to taste
3 tablespoons all-purpose flour blend of choice or rice flour
1 teaspoon ground cinnamon
¼ teaspoon salt
1 Flaky Pie Crust, uncooked (below)
1. To make Streusel Topping, combine all topping ingredients in a food processor and pulse until mixture resembles coarse meal. Reserve.
2. Preheat oven to 350°F.
3. Peel and thinly slice apples.
4. In a large mixing bowl, combine sour cream and egg and beat well.
5. In another bowl, combine sugar, flour, cinnamon and salt. Whisk into sour cream mixture. Add apple slices, tossing to coat.
6. Spread mixture over uncooked crust. Sprinkle Streusel Topping over the top.
7. Set pie on a cookie sheet for ease of handling. Place on middle rack in preheated oven and bake 55 to 60 minutes or until filling is bubbly and topping is brown. If crust browns too quickly, cover edges loosely with foil.
TIP: For an egg-free pie, replace the egg in the filling by adding 3 additional tablespoons sour cream (or dairy-free substitute) in step 4. Add 1 tablespoon cornstarch or potato starch in step 5.
Flaky Pie Crust
Makes One 9-Inch Crust
Unless rolled too thin, this dough is not prone to tearing. If it does, pull it back into place and pat it down.
1½ cups + 2 tablespoons High-Protein Flour Blend (below)
1 tablespoon potato flour (not potato starch)
1 teaspoon xanthan gum
¼ teaspoon salt
2-3 teaspoons sugar
½ teaspoon baking powder
½ teaspoon ground cinnamon
4 tablespoons cold butter or dairy-free butter replacement
4 tablespoons organic shortening
1 large egg or 2 tablespoons additional unsweetened applesauce
1 teaspoon cider vinegar
2 tablespoons unsweetened applesauce
1. In the bowl of a food processor fitted with the knife blade, combine dry ingredients. Cut buttery stick and shortening into pieces. Sprinkle over dry ingredients. Pulse several times until pieces are the size of large peas.
2. In a separate bowl, combine egg, vinegar and applesauce. Add to flour mixture and blend just to combine. Carefully gather dough into a ball. (Watch your fingers as steel knife is very sharp.) Wrap in plastic wrap and chill at least 1 hour.
3. Place the dough between 2 layers of plastic wrap and press it down with heel of hand. Then gently roll it into a 9-inch circle. Start from the middle and roll out uniformly in all directions to form the circle. Rotate the dough in ¼ turns to help even-out crust to about ¼-inch thickness throughout.
4. Carefully peel off the top layer of plastic wrap. Turn the crust into the pan, slowly peeling off the backing. Press the crust into the pan and crimp the edges, trimming off any excess dough.
TIP: To reduce the fat in this pie crust, replace 3 tablespoons butter or shortening with an equal amount of unsweetened applesauce.
High-Protein Flour Blend
Makes 3¼ cups
1 cup amaranth flour
1 cup brown rice flour
¾ cup cornstarch or potato starch (not potato flour)
½ cup tapioca starch/flour
1. Combine ingredients. Store in a tightly covered container in the refrigerator until used.
Short on time? Use a commercial high protein flour blend or add 1 cup of amaranth flour to 2 1/4 cups gluten-free all-purpose flour blend.
A version of this recipe first appeared in Living Without Magazine.
Categories: Recipes | Tags: gluten free apple custard pie, gluten free pie, gluten free Thanksgiving, gluten-free makeover, gluten-free recipes | 2 Comments »
In celebration of reaching 1,500 “Likes” on Facebook, I am sharing this collections of holiday recipes with all of you. Here’s to a happy, healthy, and tasty holiday season!
Categories: Recipes | Tags: gluten free, gluten-free holiday dishes, gluten-free recipes | 6 Comments »
Pear Coffee Cake
As a baker, I am reluctant to let go of certain sacrosacnt ingredients. Eggs is one of those precious commodities. Then a colleague who is gluten and egg-free asked me if I could convert a coffee cake recipe so she could enjoy, too. I recalled that, back in the days when I owned the Gluten-Free Pantry, I had made many recipes where I replaced eggs with silken tofu, flax gel (1 tablespoon flax meal with 3 tablespoons of hot water) or even with applesauce. I dug out my favorite coffee cake recipe, already gluten-free, and went to work. The results were delicious.
This stunning coffee cake uses soy (or coconut) yogurt and pear puree. The yogurt adds back some of the protein from the eggs and the pear puree, like applesauce, contains pectin which tenderizes the cake. I added a little bit more baking powder to help it rise, usually another job done by the eggs. 
This is comfort food at its best and begs for a cup of coffee or tea. I also like to make this with apples and applesauce.
1 cup sugar
1 ½ cups All-purpose Gluten-Free Flour Blend
½ cup sorghum flour
2 teaspoons xanthan gum*
½ teaspoon salt*
2 teaspoons baking powder
1 teaspoon baking soda
1½ cups soy or coconut yogurt (flavored yogurt works well)
6 tablespoons vegetable oil
4 tablespoons pureed baby pear puree or unsweetened applesauce
½ cup peeled and chopped ripe Bartlett, Bosc or red pears, or diced canned pears
Crumble Topping (below)
Preheat the oven to 325°F and lightly oil a 9-inch springform pan.
Combine the sugar, flour blend, sorghum flour, xanthan gum, salt, baking powder, and baking soda in a large bowl. Set aside.
Combine the yogurt, vegetable oil, and pear puree in a mixing bowl and beat until smooth. Add the dry ingredients and beat until smooth. Fold in chopped fruit.
Spoon half the batter over the bottom of the prepared pan and smooth to the edges of the pan. Cover with half of the crumb mixture. Spoon the remaining batter over the crumb topping and smooth to the edges. Sprinkle the remaining topping over the top.
Bake 50 to 55 minutes, until cake tester comes out clean and center springs back when gently touched.
Cool 10 minutes in the pan. Remove the rim of the pan and cool completely on a wire rack. Serve.
*If your all-purpose blend contains salt and gum, omit the salt and reduce the gum to ½ teaspoon.
Crumble Topping
½ cup rice flour
½ cup packed brown sugar
2 teaspoons ground cinnamon
¼ teaspoon ground allspice
1/8 teaspoon ground cloves
¼ teaspoon salt
4 tablespoons unsalted butter or non-dairy buttery spread, at room temperature
Combine the flour, brown sugar, cinnamon, allspice, cloves, and salt in a large bowl. Mix well. Add the butter and use fingertips or a fork to mix just until crumbly.
This can be made ahead and stored in the refrigerator for up to 2 weeks.
Categories: Recipes | Tags: baked goods, coffee cake, coffee cake recipes, comfort food, dairy-free, egg-free, gluten free, Sweets | 2 Comments »
Follow Us Online
More Cookbook Stuff
Gluten-Free Makeovers - - Nearly 200 recipe makeovers for everyone to enjoy. Buy it at glutenfreeandmore.com, Amazon.com and barnesandnoble.com.
About This Blog
 Baking guru, Beth Hillson, transforms favorite foods into recipes that are safe for your gluten-free diet.


